 First up normally when I start talking to people about GIMP they get all nervous looking and edge towards a door, I think they assume I mean these, so to clarify my post is about GIMP (GNU Image Manipulation Program). I wrote this blog post for a few reasons. First I wanted some basic info to go with the Lost Reich posts I’ll be putting up later and as I seem to have posted/sent information like this out a few times to different people I thought others might find it useful.
First up the online Gimp help files are actually helpful and very well written so I would encourage people to have a flick through those. I will admit that for a new user they could seem a little over whelming with the amount of info presented. The full help files can be found here, I suspect most people will want to jump straight to Chapter 3 in that document as that’s were the real meaty help and how to use starts. My post below is a bit of a shortcut primer to just get you up and running quickly and start hacking some basic mods into an existing paper models but is no substitute for the full help files and hard won experience.
If your switching across to GIMP from your totally legal and fully purchased copy of photoshop. I would encourage you to stick with GIMP it took me about 3 months to become fully comfortable with GIMP when I switched over from my old copy of photoshop 5/6. Now I couldn’t live without some features in GIMP such as “Paste as New Image” (suspect photoshop has that now) and the ability to push docks onto my 2nd monitor as separate Windows. I will admit though that sometimes it takes a little longer in GIMP or it takes me time to locate a plugin to do the same job but unless your a high paid commercial graphic designer, GIMP should meet your needs :). Just give it a chance and give your mind a chance to learn (re-learn) where everything is.
* I have assumed with the below that the user has some understanding of terms like “docks”, can install the software and has some basic level of software knowledge. If not drop me a comment and I’ll try and clarify or help further.
Getting GIMP and First Startup
First up download GIMP and install, the version available when I wrote this is 2.8.2, so your success with the below instructions might vary if we are now up to version 4 and/or its the year 2022. Personally I prefer to use the portable version to the full install version as I tend to run GIMP off my external HDD I carry with me everywhere.
Next up launch Gimp either via the menu item/desktop icon or via the GIMPportable.exe if using the portable version. Now hopefully you’ll end up with something that looks like this on the first launch:

No I’m not a Starwars and Lego Fan..not at all
The first issue most people have is that we have 3 separate windows, if your running dual or more monitors I’d encourage you to leave GIMP in the above configuration. This will let you push the main image window onto one whole screen and manage the docks on your second screen so maximizing space when image editing (be nice if GIMP just treated both screens as 1 big screen..maybe next version).
However if you prefer a single window or have only one monitor, simply place GIMP into Single Window mode by going to the menu item “Windows” and select the bottom Option “Single-Window Mode” (depending on how your OS operates you may need to close and restart GIMP to have single window mode appear). Below are two more Screenshots, one in single window mode and the other how I have Gimp setup on two monitors (I normally have more docks opened out and untabbed):

Personally with dual monitors I find the above restrictive, but everyone has there own preference so use what your most comfortable with.
 I wish it looked that clean IRL with no monitor bezels 🙂
On the odd chance someone is missing some of the default docks to get those back simply go to the “Windows” menu item and first check that “Hide Docks” isn’t ticked on if it is untick it or simply hit the tab key. If you still have no luck go to “Windows” menu item again and select the recently closed docks option if there any options under that select them and it should return your docks. Still no good, Okay one more easy solution to try, go to menu item “edit” and select “preferences” then select “Window Management” (2nd last item) on the small screen on the right then select the “reset saved window positions to default values” select ok on the question that pops up and then hit ok and close GIMP and relaunch. Hopefully the default dialogs have reappeared.
Still no luck? You have my sympathies and I have no idea whats happened to your install, maybe best to try a re-install or try the portable version I mention above, but if you want you can rebuild your docks by hand but it is painful. First up hold ctrl and hit b this will return your toolbox you’ll need to re-size it a little as it will probably be long and thin. Next Select the “Windows” menu item again then the Dockable Dialogs and select the ones you want one by one and drag the docks back together. At a minimum you want Layers, Brushes and Tool Options. However many others are useful such as Channels, Paths and Undo history but you’ll figure out what you use/need over time.
Basic Paper Model Mods
Okay number one rule with anything in GIMP, most stuff can be subject to an undo, as with most programs undo is under the edit menu item or triggered through a ctrl-z, so don’t be afraid to use it :).
Getting the PDF into GIMP
This is actually much easier than you would think, the worst thing is that Gimp can’t handle layered PDF’s so it only imports the default view you get when you first open the PDF. I’ll cover a work around for this in a later post:
First Launch GIMP
Then Go to “File” then “Open” and browse to the PDF you wish to open and select it (I opened One Monks Old Devils-Imps.pdf ), you’ll be presented with the below:

The most important point on this screen is to make sure the resolution is set to 300 (pixels/in – default setting) and then click Import
In the above this was a simple 1 page PDF if I had imported a multi-page (not layered)PDF I would have seen multiple pages (see below) on the selection screen and each page I selected would be given it’s own layer in GIMP – Think of layers like different bits of papers with a different picture/drawing on it.

We now have our Imps inside GIMP seemingly ready to go, however if you simply print the page now from GIMP you’ll notice it comes out a little smaller than out of the PDF. I don’t fully understand why but there appears to be some internal margin in GIMP which forces the document to be shrunk on print out. To get around this we simply shrink the paper (canvas) size a little.
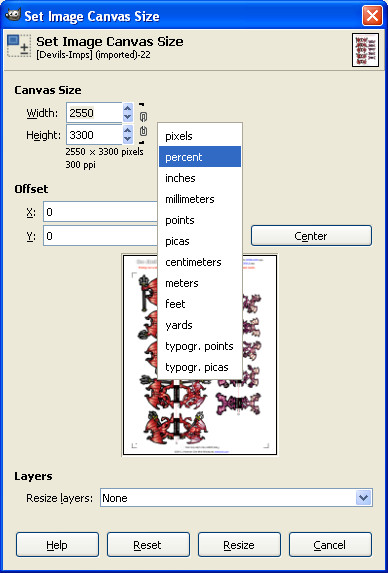
Go to “Image” then select “Canvas Size” (Do not use Scale Image), your canvas will probably be 2550×3300 px, Click on the “px” value (see below) and change it to %, change both values to 92% (optional turn on the little chain-link icon and change just the top value and both will match or very close). Press the “Center” button and then press “Resize” (you may have to play around with the X and Y values to get the robo marks to stay in view)
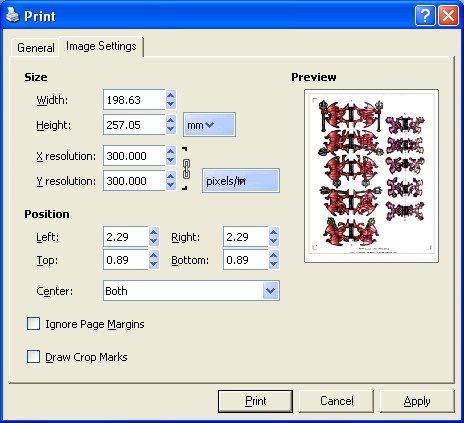
Okay why did we just do that last step? If you now go to “File” and “Print”, select your normal printer, now see right at the top you have a tab next to “General” called “Image setting” click that (see below). See the Resolution is set to 300, If you don’t shrink your canvas a little Gimps internal margins kick in and the resolution on this screen will be above 300, normally around 320-325 and hence your print outs are small. Now on the below screen you can select the “ignore margins” button and manually set your resolution back to 300 but I tend to forget and end up wasting ink and paper… feel free to check out the below screen before you shrink the canvas.

One Way of re-colouring
As with most software there are 3-4 different ways of doing something. GIMP is no different and the below is one way you can re-colour in GIMP, the below will however only let you re-colour it wont for example let you apply a different camo texture, but I’ll cover that in a later post. This way is very quick but not without its limitations it will change all instances of that colour/hue to a different colour/hue. So it works best on large single colour critters, Demons, Dragons, Trolls etc.
You have your Image all ready to go:

Next up go to “Colors” and select “Hue and Saturation”, this will launch this screen

I want some Blue Devils, so I select “R” for red as mostly their skin is Red and now I simply adjust the Hue slider until I get a nice Blue shade. If I want a lighter Blue I simply adjust the Lightness and Saturation Sliders (make sure the little Preview box above “help” is ticked on) until I’m happy with the colour. Below are some example re-colours and the settings used to achieve them. In both cases I adjusted both the Red and Magenta channels but have included screen grabs of both.

Blue Frost Demons

How about some Bright Green Forest Demons?
Once your happy with the colour, select ok and the minis will be re-coloured then save your version as an xcf file and print your document, cut out (or run through your Cameo/Robo) and enjoy your newly coloured minis.
I’ll leave it there for now as this post is very long, hopefully there is enough above to get you started. I’ll cover a bit more in other posts later this and next week, I have 3 posts part drafted. If you want me to cover something specific feel free to leave a comment asking/requesting it and I’ll try and add it to my next post.
As always have fun
 Fat Dragon Games released the Lost Reich game and miniatures about 12 months ago. It’s almost impossible for me to not pickup any mech based game so I had to grab this one, although due to the house renovations etc I’ve only just started to build up a few of the models. (Sorry about the rough pictures my camera is really starting to show it’s age and needs to be replaced.)
 Panzermech 1 and Sherman Mk 1 (1st Test Photo using the Wifes mobile phone)
 Group shot Panzermechs (using old camera)


