Archive for the 'Wargaming' Category

Battletech – Building Sci-Fi Houses

Houses Thumbnail
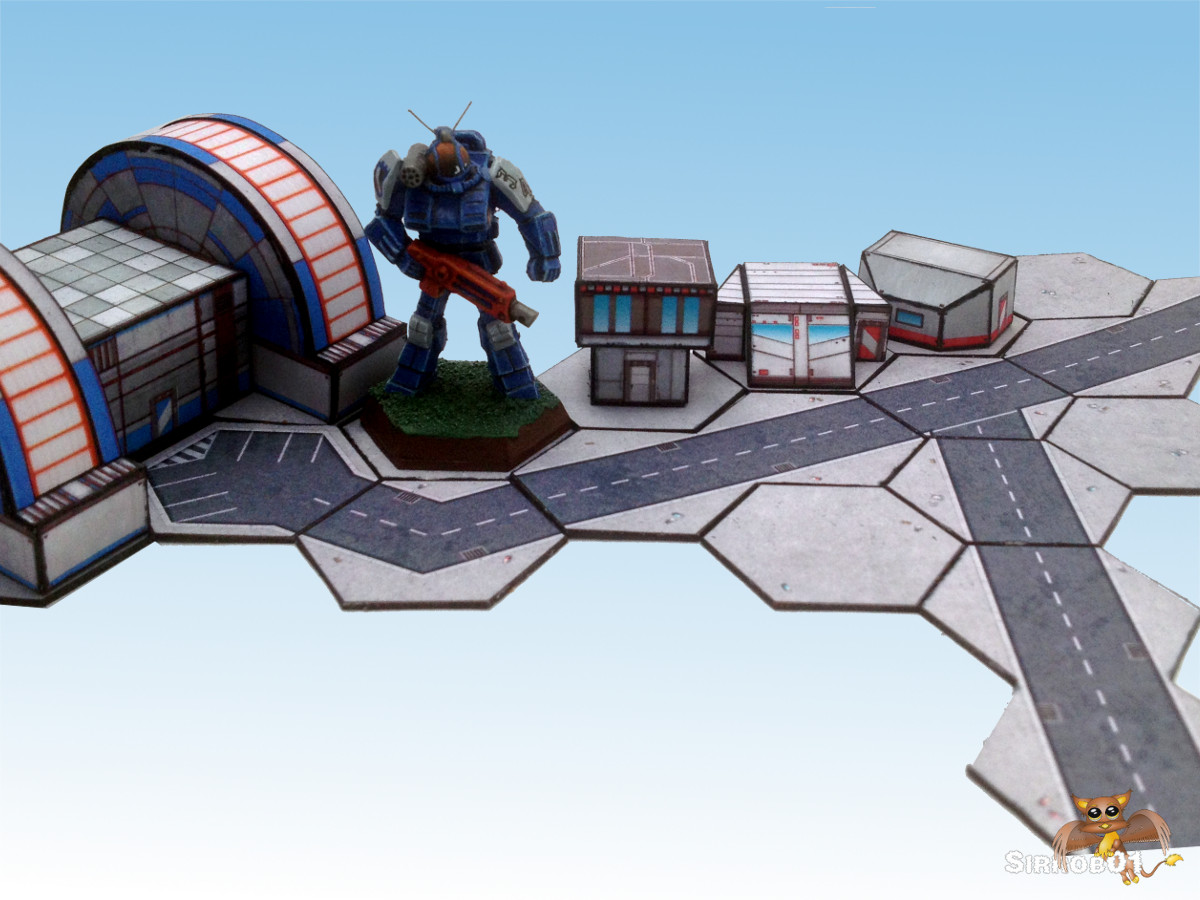
Now that the Power Plant is built and we’ve established some Roads, People have started to move into the Town. Three styles of house have started to spring up designed and built by three different construction companies but with a sci-fi look and feel (hopefully) – Sorry to much Simcity again :).

Houses Scene

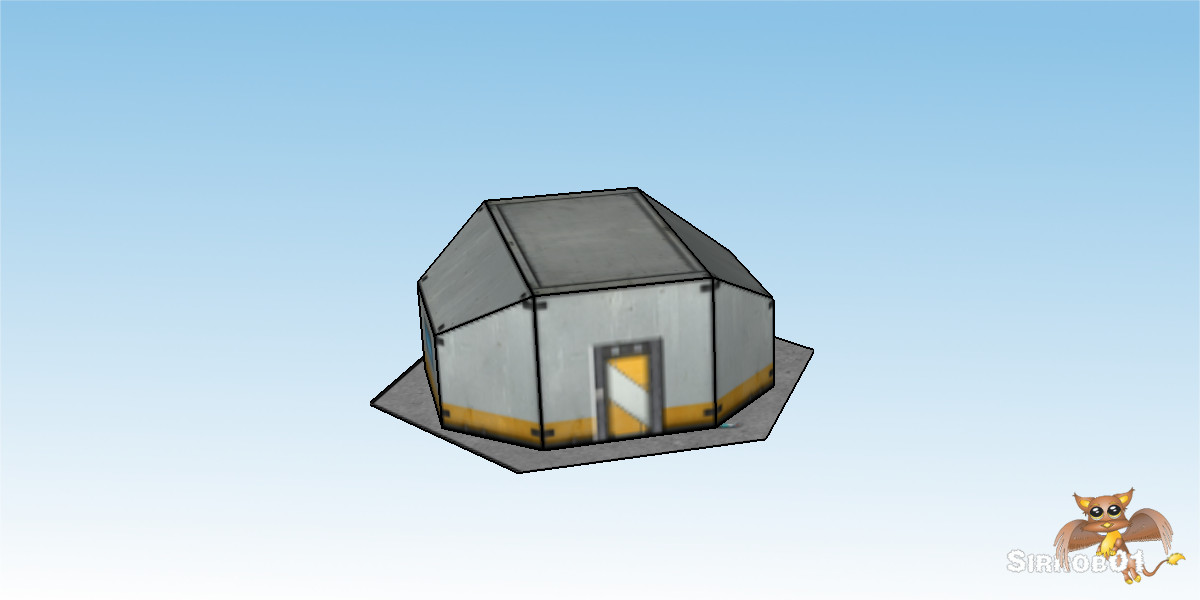
First up we have the Bunker by the B.O.R.I.N.G Construction Company. A fairly simple industrial looking concrete bunker building, used for both military and civilian purposes. Quick and cheap to build and extremely sturdy.  The company plans to extend the range for the military by offering rooftop mounted weapon modules in the future.

Sci-fi House 1


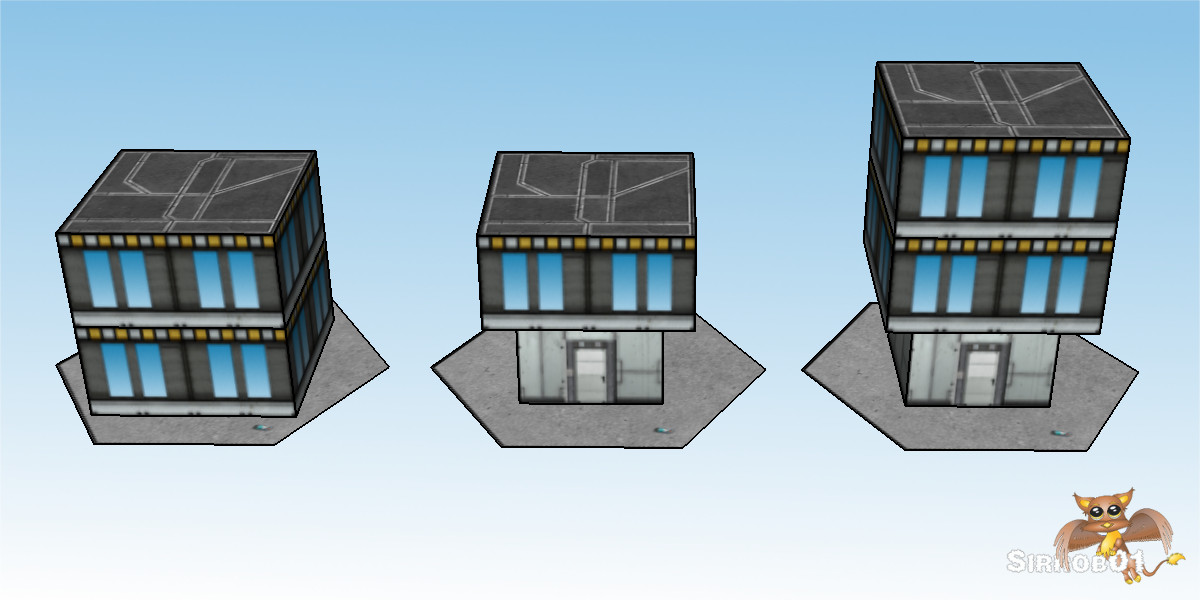
Cubico Construction Pty Ltd is providing a more modern look to their buildings in a two story layout. With the top floor of the building dedicated to the living areas/bedrooms and the lower floor for the garage/workshop/laundry space.  Appealing to the more affluent members of the city, these buildings are  more expensive to build due to the extensive use of large glass panels. Due to the square design the floors can be built offsite and then moved into location and bolted together, this also enables the floors to bolted together differently or added to at the client request very easily.

Sci-fi House 2


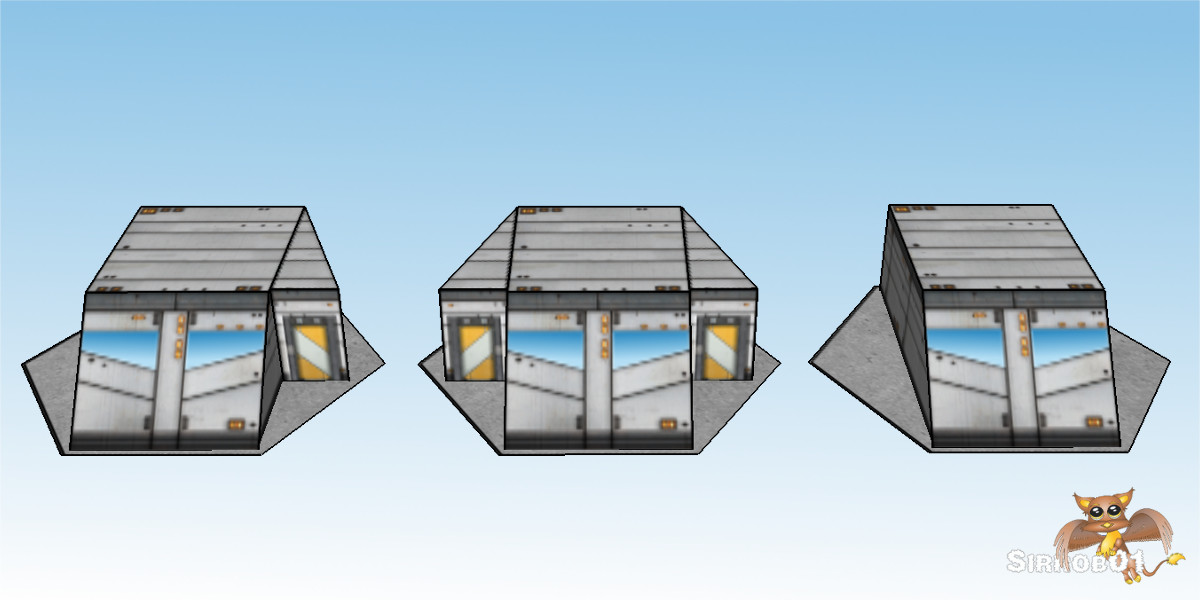
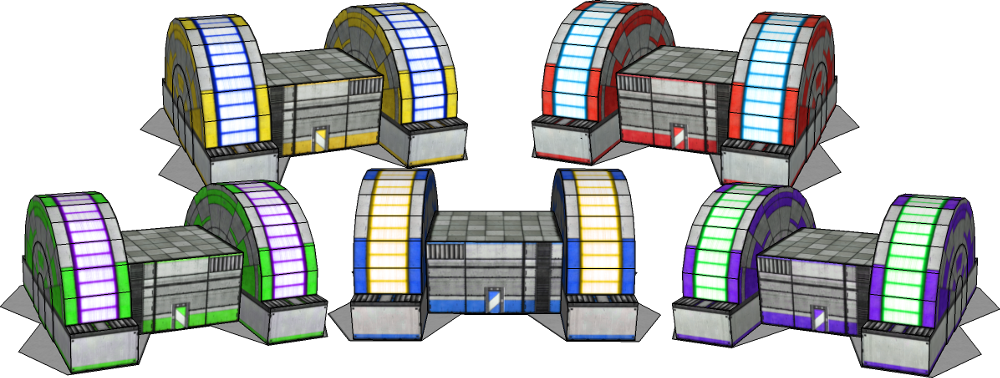
Lastly STAR Industries a former spaceship building company has entered the housing market to try and bolster there income streams.  There design more than a little resembles the spaceships they normally design and assemble. This does however mean the designs are strong and suitable for both civilian and military use.  Unfortunately the interiors also resemble spaceships, with bulkhead doors used in some of the cheaper fit outs. Great for military applications but not so much for your daily household when little Tommy continually trips over the door jam.

Sci-fi House 3

Messed up the texturing on this one, should only have a doorway on the right

Okay enough fluff stuff :). I used the same texture pack that I used for the power plant so the houses have a consistent look and feel with the power plant. I’ve also uplaoded a copy of the sketchup file to the warehouse, not sure if that will be useful to anyone in the future (Here). I’ve created a 32/33mm PDF version and a 38mm (1.5inch) PDF version, links are below enjoy:

Houses Group One 32_33mm

Houses Group One 38mm

Houses Only

An investment in knowledge pays the best interest – Benjamin Franklin


Battletech – Roads Asphalt

6mm Asphalt Road Tiles Decorative CircleNow that we have power on our Battletech map-board we need some roads so people can move around and start to build the city…maybe I’ve played a little to much Simcity in my time. Some simple asphalt road tiles to spread around your map board to give it more of a city feel. Later I may do some transition tiles for cross-country roads so they meld better with a green background.

The road tile image I created myself using base textures, there’s not to much to a simple road tile, concrete, asphalt and some drop shadows and your pretty much done. I did throw on some drains and rubbish but at this scale you’ll need a magnify glass to see them. As Battletech runs in two very different scales, 1:300 for the miniatures and 1:900 for the ground scale I struggled a little with what to do. In the end I scaled the road widths to about 1:300 so two 1:300 cars can be placed on each road half and not look strange. The car-park tile I split the difference and just made the parking spots about 1:500 no particular reason other than it looked okay.  Later I might do a proper drop in 1:300 scale car-park area in various hex sizes making the single tile redundant but it works for now.

Asphalt Road Tiles 1200x900

It would seem that hex size on the old Battletech maps and the new Battletech maps is different. Not by much 32mm vs 33mm. However that 1mm causes big problems when you string 10 road tiles together in a long straight suddenly your either half hex short or half hex to long. So the only solution I could see was to export a version at 32mm and a version at 33mm. If your using mostly new map-boards or the downloaded map sheets from RPGnow. It is safest to stick with the 33mm size, if you have a ton of old printed map sheets from the 80s/90s go with the 32mm sized tiles, If your not sure I’d run with the 33mm as that’s what the new stuff seems to be created in. I also created a 38mm/1.5inch version for those playing on a larger hex size. If someone has a need for some other odd size feel free to leave a comment and I’ll export a copy at that size (hex dimensions flat to flat in mm) – not promising it’ll have the layer options :). Due to this 32/33 discrepancy I’ll also need to upload a new base for the power plant in 33mm but I’ll do this when I get time to finish the page of plain concrete pieces.

Asphalt Road Tiles mockup  1200x900

I used the Megamek Road tiles to check I had included all the various turn shapes etc, hopefully I haven’t missed any. Later on I might try and pull together a high tech road set if I can find some inspiration but for the moment I’ve got more than enough basic models to work on. No cut files as they seemed a tad redundant as you’ll need to glue the tiles to some heavier weight card and cut around them so the tiles have more heft/durability. I’d recommend box board, matt board, cereal box card as good starters to back the tiles to, or you can do what I did and mount them on 0.8mm magnetic sheet. They are much easier and quicker to cut out with scissors than using a box cutter or scalpel blade.

To prevent them slipping around you can paint the backs with a thin layer of PVA glue or if you can get hold of it that paint on rubber stuff that should help a little with keeping them in place (trusty old blu-tak will also work). If you do use magnetic sheet simply place a big piece of flat tin/steel (1.5mm thick) under your paper map and then drop the tiles on and they wont shift and as a bonus the map sheet wont move either. Links to the pdf files are below- enjoy 🙂

Roads Asphalt 32mm hex 1.25 inches

Roads Asphalt 33mm hex 1.3 inches

Roads Asphalth 38mm hex 1.5 inches

Step with care and great tact ,and remember that Life’s a Great Balancing Act. – Dr. Seuss 


Battletech – Building Sci-Fi Power Plant

There is not to much card/paper hex based terrain around the internet that is designed to neatly fit on the standard 32mm or 1-3/16 inch Battletech hex without overhanging. As a sort of sub project in one of the several larger projects I’ve been working on, here is a Sci-fi power plant designed to fit neatly inside 5 standard Battletech hex’s.

Final Picture Scaled

Battlemechs not included 🙂

I designed the simple mesh in sketchup and then retrieved one of the many free sci-fi texture packs available across the internet to texture the mesh in GIMP – Full credit to Philipk across at the polycount forum for making the textures freely available. I did do some recolouring and tweaking to textures so they looked better on printout although at 6mm scale, textures are pretty redundant by the time the printer prints them.

PowerGeneratorOneSketchupColours

I did do two size varieties a standard 32mm 1-3/16inch hex size model and a 38mm 1 – 1/2 inch hex size model. Essentially the larger is just an upscale of the smaller although I kept the single door at about 7mm tall on both. My goal for the 32mm model was to have all the parts on a single page which was a bit of tight squeeze but they all fit with a bit of careful placement, unfortunately the 38mm model spans two pages.  I did a cutfile for the 32mm version which I also test built, although my cutter is playing up again so use the cut file at your own risk. The larger 38mm model has no cutfile – sorry, but I did include the rego marks in the 38mm pdf so generating one from the 32mm cut file should be easy enough if you have the desire. Minimal instructions included as most of the shapes are pretty simple box’s and half circles to assemble, although I have included an exploded view of the completed model inside the PDF’s and a few assembly dot points.

Exploded Image

I’ve uploaded a copy of the cleaned up sketchup file with the blue textures in place to the sketchup warehouse (Here). I have some plans for a modified 15mm and 30mm version for normal sized wargaming but I’ll have to see if I have time pull those together later on.

Power Plant One 32mm 1-25 inch

Power Plant One 38mm_1-5 Inch

Rename the studio file from .txt to .studio once you’ve downloaded it

Power Plant One 32mm cut File

Do not follow where the path may lead. Go instead where there is no path and leave a trail – Ralph Waldo Emerson

Miniature Painting – Battletech 3rd Edition Mechs

I finished painting four battlemechs from the old 3rd edition intro box. The four I painted are the Phoenix Hawk PXH-1, Griffin GRF-1N, Thunderbolt TDR-5S and Warhammer WHM-6R. A good friend let me take them from his stockpile of mechs to practice painting on with the understanding if I totally turned them into messy plastic blobs no problem. I think they turned out okay and should be okay for use on the tabletop.

These miniatures are not what you would call premium quality with sunken bits, holes and missing detail. The plastic itself doesn’t sand or file very well and only a really sharp blade seems capable of cleaning up the flash. The plastic itself is also very slippery with super glue struggling to adhere unless its roughed up. On each mech I did my best to clean them up as well as bending the arms around a little, I also added some magnet sheet to the bottoms to add some weight. I picked a paint scheme from the Federated Suns -1st Aragon Borderers   basically because it was majority blue which is an easier colour to paint and would fit the 3025 era mechs.

Battletech 3rd Edition Federated Suns 1st Aragon Borders

First up the Griffin, I reworked the gun and replaced it it with something more substantial and hopefully PPC looking. I’m pretty happy with how the cockpit came out on this one and the mech overall although I’m a little biased as the Griffin is one of my Favorite mechs.

Battletech 3rd Edition Griffin GRF-1N


Next up is the Phoenix hawk, minimal changes a little arm bending, leg bending  and a new gun barrel. The 4 antenna were a little painful to insert in place but they turned out okay, I used a bristle from a dustpan brush. I did paint this one slightly different to the others, on the Phoneix Hawk I tried to highlight the edges using the side of the paint brush rather than dry brushing. The result is definitely cleaner and nicer looking so I’ll continue practicing that technique.

Battletech 3rd Edition Phoenix Hawk PXH-1


Next up the thunderbolt, bent the arm up and replaced the end of the gun barrel but he still appears slightly off balance. I did not paint any of the numbers or insignia on any of the mechs they are all self print decals.

Battletech 3rd Edition Thunderbolt TDR-5S


Lastly the trusty old Warhammer, He really is the most boring of the bunch although I used him as a checker pattern practice, hard to see in the pictures but the bulbus bits on the backs of his lower legs are all checkered. If I paint another one of these I’ll try and add some different coloring around the torso area.

Battletech 3rd Edition Warhammer WHM-6R


I had fun painting these and for the first time I’m pretty happy with how they turned out. I hope to paint a few more next would be a star of Clan Mechs.

In order to succeed, your desire for success should be greater than your fear of failure – Bill Cosby


Flipit Black X – Commanders

Flipit Black X Commander Hanz Gewehr MiniI’ve been slowly working my way through building the Black X faction for Flipit. I’ve got a tub full of half finished Black X troops still to go but the commanders and almost all the vehicles are finished (One Tank to go).

The Black x faction for Flipit has four commanders as someone pulled together an extra commander who suspiciously resembles Colonel Klink. The three commanders done by Newobmij have special abilities I was unable to locate any special rules for Hauptman (Col Klink 🙂 ). I’ll either have to make up some of my own or simply sub the abilities for one of the others in.

Flipit Black X CommandersI wanted to give my Black X faction for flipit a city base theme, It probably seems odd to some people to have a basing theme for paper miniatures. However paper, plastic or metal good basing can really help finish off the miniatures and tie the army together. For the four commanders I made up some slightly raised bases so it looks like they are standing on the pavement in front of a road. I’m not sure it quiet works. It does give them a slight lift that should make them stand out from the regular troops so for the moment I’m happy with the effect. As I wasn’t sure this would work I magnetized the base of the miniatures and the top of the pavement surface so the miniatures can be removed from their bases easily (Erwin Muttonschnitzel needed this anyway).

Flipit Black X Commanders Magnetic BasesFat Dragon Games Capital City used for bases

Nothing much to mention in the assembly of Four Black X commanders for Flipit. Hanz Gewehr, Gunter Donnerfaust, Muttonschnitzel and Hauptmann all go together fairly easily. Donnerfausts claw and Hauptmanns crop were a little fiddly but this will have been because I’m building at 75% of full size.

Flipit Black X Commander Hauptmann

Flipit Black X Commander Hanz Gewehr

Flipit Black X Commander Gunter Donnerfaust

Flipit Black X Commander Erwin Muttonschnitzel

Captian Erwin Muttonschnitzel is a little different his special ability lets him drive (command an Uberpanzer). When I dropped him into the top of the Uberpanzers turret his arms naturally caught and he was suspended at a terrible angle. I created a little magnetic stool for him to stand on when driving the tank this means he pokes out a little more than normal but lets him stand straight. This issue was probably caused as I built the Uberpanzer as with the Blue Falcons Tank at 100% not 75%.

Flipit Black X Commander Erwin Muttonschnitzel Tank Riser

Flipit Black X Commander Erwin Muttonschnitzel Uberpanzer (Tank)

The commanders for the Black X army are now ready to lead there troops into battle. Muttonschnitzel is peppering me with tiny tank fire demanding I hurry up and finish the troops so they can face off against their adversaries the Blue Falcons….I better get back to building those troops before he ups the fire rate 🙂 .

Thousands of candles can be lit from a single candle, and the life of the candle will not be shortened. Happiness never decreases by being shared. – Buddha

Flipit Blue Falcons – Vehicles

Blue Falcons JetHere are the Blue Falcon Vehicles from Flipit, I’ve built all the vehicle types except the Agile II. I will only build that model if I can find a copy of the Red Hammer mech. I’ve  included some notes and handy pointers from when I assembled each vehicle, hopefully these will be helpful for anyone else who may wish  to build their own Blue Falcon army.

First up for the Blue Falcons Motor pool we have the bikes. These are a pretty simple build cut out and score the lines, then fold up one side and glue the front back strip in place, then glue the other side up. I then glued some small rocks into the inside of the bike to help weight the base down. I did push my riders down a little far when I glued them in.

Flipit Blue Falcons Bike Vehicle

Next up is the AA Microtank (Night Owl), I found this model the hardest of all the Blue Falcon vehicles to assemble. Scaling it down to 75% meant the little gun barrels were extremely difficult to roll. So on one of my Microtanks I cheated by replacing the paper gun barrels with toothpicks  cut to the correct length and coloured yellow. The tracks were also a little fiddly but the best way I found to assemble them was to glue the track base to both sides and then wrap the ends around and glue in place. There are not many references around about how to build the Microtank so I pulled together a quick reference page which will hopefully be a helpful to others who might wish to build one.

Flipit Blue Falcons Night Owl Microtank Vehicle

Flipit Blue Falcons AA Microtank Reference

 All Troops need some form of APC and the Blue Falcons come equipped with a rugged 4×4 called the Osprey. The model came together pretty easily, I did modify the windshield and inserted a small clear panel. I glued 4 troops into the vehicle permanently for two reasons; firstly as I based all my soldiers they wont fit in the vehicle with bases and secondly I didn’t want to be fiddling around pulling out and putting troops into the transport mid game much easier to just deploy a unit and mark the vehicle empty.  There are a number of completed pictures of the transport around the place but as with above Microtank I pulled together a quick 1 page assembly reference.

Flipit Blue Falcons Osprey Transport Vehicle

Flipit Blue Falcons Transport Reference

To protect the skies the Blue Falcons can deploy a Fighter Jet (Peregrine).  This is my favorite model for the blue falcon army (followed by the Micro tank), there’s something about it which just makes it cool and fun looking  (I deny all knowledge of sitting around swooshing jets through the air making engine noises). They were however a little fiddly to pull together at 75%. Make sure you have a pen or something thin handy to push/pull/press tabs into place while they glue. Newobmij put together some assembly instructions for the jets. I did build my own custom flight stands which are magnetized and let me store the jets much more easily, I did however make them a little tall and may need to shorten them a little in future.

Flipit Blue Falcons Peregrine Fighter Jet Vehicle One

Flipit Blue Falcons Peregrine Fighter Jet Vehicle Two

Lastly we have the Blue Falcon Tank. I did build a 75% version of this tank but it just seemed a little small for the main line Tank so I rebuilt the tank(s) at 100%. With everything else scaled to 75% this gives the tanks a much more impressive presence on the table, well to me. I’ll be building the other faction tanks at 100% as well. Newobmij has also done a very nice sequence of pictures showing assembly of this tank. The only other minor change I made was that instead of using the paper/card axle I replaced this with a Kebab skewer cut to correct length, it was the perfect size as an axle and much straighter and stronger than anything I could roll from card/paper.

Flipit Blue Falcons Tank Vehicle One

Flipit Blue Falcons Tank Vehicle Two

Lastly I needed some way to store my miniatures, so I grabbed two blue CD box’s from an Office supply store. For one of the CD boxes  I created a lift in and out module to hold the soldiers. The 2nd box will be used to store the Agile II (assuming I build it) and all the vehicles, if I need I can fit several units of troops on the top floor of the lift in and out module and several vehicles on the bottom so if I’m traveling anywhere I can take a single box with enough troops to game with.

Flipit Blue Falcons Carrier Storage One

Flipit Blue Falcons Carrier Storage Two

Well that’s enough troops to field a fairly hefty Blue Falcon army so I’ll move on a build a similar sized black X army. Although I’m really not looking forward to making another 50+ Soldiers :).

Try not to become a man of success, but rather try to become a man of value – Albert Einstein

Flipit Blue Falcons – Troops

Flipit Blue Falcons Mechanic SmallA Flipit army wont get very far without troops and support personnel, so here are the Blue Falcon troops. There is not very much I can say about these as the pictures pretty much say it all. I did modify the base Blue Falcon troops so I had a male and female version but all the rest are pretty much stock except printed and built at around 75%. I did mount them all to 1 inch Octagon bases for extra stability (2mm mag sheet) and it seems to help finish them. Some of the edging looks a little rough but I was having issues with edge bleed. The pictures pretty much show the whole story so enjoy :). If you need help building the troops check out this you tube video.

Flipit Blue Falcons Male and Female Soldier Troop

Male and Female Soldiers

Flipit Blue Falcons Soldier Troop Milling AroundAwaiting Parade

Flipit Blue Falcons Soldier Troop In UnitsIn Units On Parade

Flipit Blue Falcons Soldier Troop Single UnitClose Up Single Unit

Flipit Blue Falcons Mortar CrewMortar Crew (Need to build two more)

Flipit Blue Falcons ScientistsScience Team Equipped with Jet Packs

Flipit Blue Falcons Mechanic Medic Veteran SpyMechanic, Medic, Grumpy Sergeant and Saboteur

Flipit Blue Falcons WeaponsArmory – Little Low On Standard Rifles – Weapons tubes were fiddly at 75%

Flipit Blue Falcons Size Scale

Flipit Blue Falcons Size Scale TwoShowing Size Scale

Next up will be all the Blue Falcon vehicles and then I’ll move on to the Black X’s so the Blue Falcons have someone to fight against. I’ll try and find someway to share the female troops somewhere so keep a weather eye open if your interested in those.

There is only one way to avoid criticism: do nothing, say nothing, and be nothing. –Aristotle

Flipit Blue Falcons – Commanders

Flipit Blue Falcons Air Marshal Roce Bleauciel SmlI really like the models for the flipit wargame made by newobimj, probably as they have a fun chibi look. As a bonus they come with there very own wargame called flipit for which newobimj has designed 4 full factions. The game has been around a fair while 4+ years and basically these have been on my to build list for about that long.

I finally settled on a scale to build the armies at I spent way to much time trying to decide on a scale with numerous test builds occuring between 100% and 65%. After comparing all the test builds I finally settled on a 75% scaling. This makes the little weapon tubes still build-able and the miniatures themselves stand about 28mm to the eye or 35mm to the top of the head/helmet. I plan on building all four factions and using them for flipit but also defiance  and of course flying lead.

First up I decided to build the Blue Falcon faction, I spent sometime working out how to assemble a few of the models as well as throwing together a few Custom models. First up I’ve completed the Commanders of the blue falcons faction; Air Marshal Roce Bleauciel, Serge Cargoe and Acel DeSparrow, I modified all of them so they use the karate chop hands and mounted them permanently to octagon bases.

Flipit Blue Falcons Commanders

First up we have Serge Cargoe, semi cyborg mad scientist type who gets around in an exo-skeleton wielding a nasty zap pistol and lightning glove. The assembly of the standard figure was pretty easy simple cylinder and a round top head. The exo-skeleton was a little tougher, I re-enforced each of the legs with wire in the middle and then mounted them to the backpack, bending them a little. I couldn’t find any instructions or any pictures of  an already complete Cargoe so I made a best guess with the leg locations. Hopefully the wire will prevent any future miniature sag through the paper bending.

Flipit Blue Falcons Serge Cargoe

Next up we have Acel DeSparrow, Rocketeer and all round smiling hero. I made some minor adjustments to his helmet colour so it was more gold/brass then silver and knocked together a rocket blast so it looks like he is just lifting off the ground. I used a tank explosion available on the flipit forum to make the rocket fire and smoke.  Looking at it I probably made the smoke and fire a little long.

Flipit Blue Falcons Acel DeSparrow

Lastly we have the big cheese of the Blue Falcons Air Marshal Roce Bleauciel. I didn’t want to have him sitting at the same height as the other falcons so I found a nice Crate papercraft (scaled to about 80%) and placed the Air Marshal on top of the Crate. I was trying to make it look like the Air Marshal was giving a speech before the troops head into battle and so he’s not looking the same as all the other regular troops when placed on the table.

Flipit Blue Falcons Air Marshal Roce Bleauciel

I found these a lot of fun to build and I’ve got more builds in the Blue Falcon faction coming shortly. If I could I’d share my 75% version of these files but unfortunately I can’t post in the flipit forum so for now you’ll have to scale them yourself. Later on if I get an okay to share or can post them in the flipit forum I’ll share them as I’ve done cut files as well. If I was building these guys again I would definitely edge in matching colour rather than in black but as I’ve now started in black edging they’ll all be black edged for consistency :).

Troop Builds here

Today was good. Today was fun. Tomorrow is another one. – Dr. Seuss

Lego – Basing Minifigs for Wargaming (Part 2)

In my never ending hunt for different basing options for Lego Minifigs. I stumbled onto these nice hex bases by catspaw customs, now I’m a bit slow to the party as the bases have been around for a while.

I couldn’t make the Catspaw website work or at least there shop (I think they might have closed) so I picked my bases up from Gi Brick, but you can also grab them from Brick Arsenal and Minifigforlife.

Lego bases Parts2 OneFront and Back Clear Trans 4 stud

These bases are still not what you call cheap at around the $1 USD each.  This makes these bases more expensive than my home made washer ones (this previous post). However they are superior to my home made bases in a few ways and only one minor negative apart from cost:

  • They come in clear, I know for wargaming armies quite often you have themed armies and bases. For myself I like my mini’s to appear to be mounted on the right terrain that they are currently marching over. Clear bases let you see the terrain the miniature is moving over creating the illusion froma distance they are based the same as the terrain.
  • They stack and clip together like normal Lego.  Storing my washer bases is quiet annoying and due to the weight I have to be careful to store them separate to the minifigs and vehicles.
  • They are hexagonal, I prefer Hex bases to Round ones. This mainly stems from a few rulesets I’ve tried using facing more heavily.
  • The bases are not as heavy as washers so minifigs are easier to knock over, but I don’t think this will cause any major problems as it still requires a fair knock to push a Minifig over.
Lego bases Parts2 TwoHero’s vs the Undead

For me the above advantages more than out weigh the added cost. The bases themselves come in a broad range of colours and either a 2 stud or 4 stud design. For myself I’ll stick with the Clear bases with a 4 stud design so I can add markers if needed to the bases. I’m unsure if this was happy accident or not but inscribed on the bottom of each base between the 2 marker studs is a number between 1-9 on my clear bases it’s a little hard to read and I’d imagine on opaque ones you would need to flip the base over to read the number, I ordered 10 bases initially and received 1 of each 1-9 and a second 4. The bases are sized to be 1 inch square, however mine measure as just a hair over an inch on the long side (point to point) and just under an inch (flat to flat). I can’t see it causing myself any major problems and troops can still be ranked up if needed and it makes the bases fit in better with normal Lego plate stud sizing.

Lego bases Parts2 ThreeMy base plate is a little short

I’m going to pickup a few more of these clear bases and eventually use them for all my Lego gaming.

As always have fun 🙂

“Always desire to learn something useful.” – Sophocles

Warmachine – Hirst Objective Markers

I have a few Hirst arts molds which I have never used before, I bought them about mid last year but had not had anytime to try using them. However over the Xmas/New years period I did a big pile of casting, I did something like 10-12 casts of each of the 5 molds I own. Since it’s been a while since I last painted I decided to do a few objective markers for a friend who plays Warmachine.

These are primarily made from parts from Hirst mold #85 cavern accessories but they also include a few Warmachine shields, odd cogs and a lego spanner. I restricted the size of my objective markers to the same size as the official Warmachine ones that were  released last year. My friend who is going to use these primarily plays the  Khador faction, so I asked him for a few bits from his bits box so I could give each one a unique Khador feel.

Building each one was pretty simple, I selected some random Hirst crates, barrels or sacks and then stacked them on a 60mm Warmachine base, adding the odd cog and Khador component. Once I was happy with the combination of parts I based the bases with plain red sand to keep them simple and to have them fit in with the way the rest of his army is based. Then painted each of the components individually and finally glued them to the base I applied two coats of matt varnish to help provide an extra level of durability as objective markers tend to get handled more compared to normal terrain.

The marker above is my favorite of the three, the blending on the shield came out quiet well and the Lego spanner seems to make the marker more dynamic than the other two.


My second favorite of the three markers.

Lastly and my least favorite, this one just doesn’t work for me, the blending on the arm is very sketchy but I tried three times to improve it and failed each time. I think I struggled as my brain really wanted to highlight the middle of the hand not the outside edge so I was fighting my own internal notion of how I would normally have painted the hand. The marker also seems less full than the others as the axe hand takes up a lot of volume but is not a solid block so the base appears emptier. It should still be good enough to game with :).

These didn’t take me very long to make and I enjoyed making them, although painting the shields and hand took longer than I would I have liked.

Have fun gaming 🙂


Project Status


WWII Project First Release

80%


B-tech Buildings Five

20%


Design Victorian era City

15%


Something Different

5%


Enter your email address to follow this blog and receive notifications of new posts by email.

Join 110 other subscribers

Content Released Under

Creative Commons License
This work is licensed under a Creative Commons Attribution-NonCommercial 3.0 Unported License.
Please Attribute to Sirrob01 with a link back to my blog

%d bloggers like this: