Posts Tagged 'Wargaming'

Papercraft Build – Steam Ram

Mayhem in Paper Steam Ram Variant F(1)Back in April Squirmydad from Mayhem in Paper released the Steam Ram. At the time I picked up the model with the plan to build a Steampunk army around a couple of them. I’ve finally got around to building two and thought I’d do a review/build post about the Steam Ram.

Once you have purchased the Steam Ram for the very reasonable price of $3.95, you’ll receive a zip which contains:

  • A single layered version of each colour (brown, dark grey, light grey and green) at 28/30mm scale
  • A layered version of the above so you can turn guides and other bits off which is great for customizing
  • A single layered version of each colour (brown, dark grey, light grey and green) at 15mm scale
  • A single layered version of each colour (brown, dark grey, light grey and green) at 15mm scale with all guides off
  • Assembly Instructions and a Card modelling basics file.

On top of this if you own a craftrobo/silhouete/cameo you can slip over to the Mayhem in Paper website and pickup the GSD files for the cutter. All round this is an absolute pile of stuff for the purchase price but as you look through the Instructions and files you’ll notice that Squirmydad has also included parts not just for one model but for at least four different versions. Although with the parts this actually equates to a lot more options, here are the four basic ones easily constructed from the instructions:

  • Wheeled with Main Gun
  • Tracked with Main Gun
  • Wheeled with Top Machine Guns
  • Tracked with Top machine Guns.

Steam Ram Mayhem In Paper Variant A_C

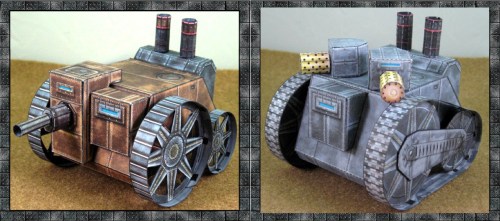
I’ve borrowed the above images from the Instructions (copyright Mayhem in Paper)

The model itself is well laid out and all the parts are easy to identify. If you are hand cutting the model do be aware that not all the parts are used when assembling a Steam Ram so make sure you check the instructions and see what parts are needed for the version your planning to build before just cutting everything out. The 30mm sized Steam Ram is spread across 4 pages but for a single tank build you’ll only need to use about 3 pages of parts.  I found the colouring of the ram to be perfect not to dark and not to light scaling wise the ram should be perfect to use with 28mm miniatures. It did take me around 4-5 hours to finish each Ram, they mainly took this long as I was building very carefully and ensuring every join and part was edged, I even sanded a couple of parts to ensure they were perfectly perpendicular. So if your used to assembling card models you should be able to pull a Ram together much more quickly.

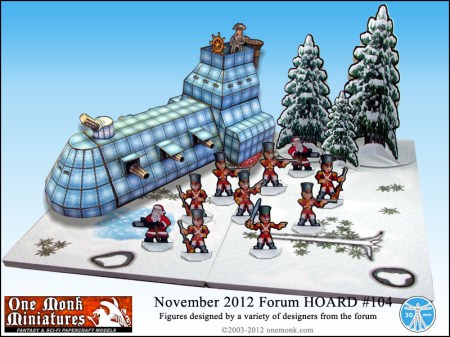
I did make some slight modifications to the two tanks I constructed. Firstly I centralized the gun box on the front but then cut out the driver window and glued this to the left of the gun box. I then added both machine guns to the top but set these towards the rear and facing left and right to provide some flanking protection to the tank. Naturally I had to build the tracked version and later on I might add some unit markings when I have more of a feel/theme for the army.

Mayhem in Paper Steam Ram Variant F(1)

Mayhem in Paper Steam Ram Variant F(3)
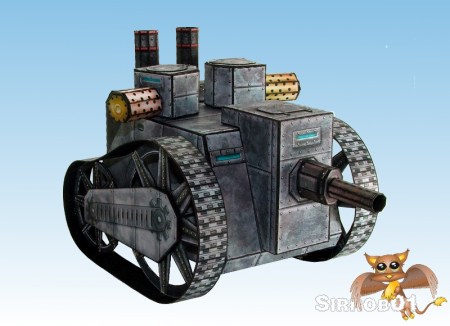
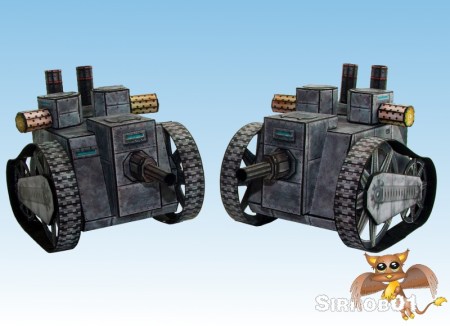
You can see in the above picture  how I made use of some of the extra hatches that were included with the Steam Ram to add hatches to the top of the machine gun turrets. I am really happy with how the Steam Ram looks on the table and a pair of them really do look intimidating when I was in no way pretending to push them across a table in formation 🙂 .

Mayhem in Paper Steam Ram Variant F(2)

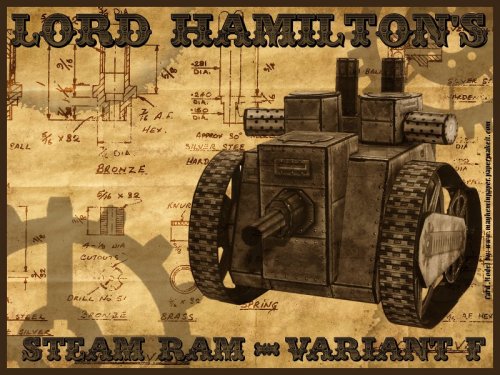
I actual had the urge to create some fan art for the Steam Ram, this ended up being  some desktop wallpapers and a Kindle screensaver image. First up the wallpapers I did two versions a widescreen 1920×1080 and a 4:3 aspect ratio 1600×1200 version.  I am happy with how the wallpapers came out although I’m not sure anyone would actual use them as wallpaper. However they were fun to make and have a Steampunk/Victorian era feel. For want of a better name I’ve called my Steam Ram “Variant F”, Lord Hamilton Squirmydad had already written into the short back story for the model.

Mayhem in Paper Steam Ram 1600x1200 (small2)

1600×1200 version – Link to Full Size

Mayhem in Paper Steam Ram 1920x1080(small2)

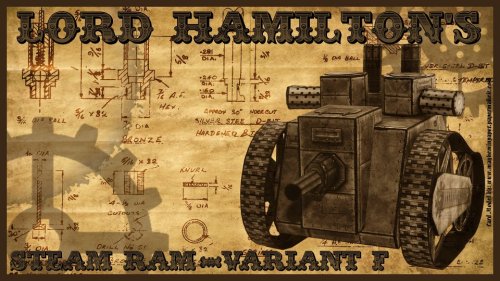
1920×1080 version – Link to Full Size

Lastly I pulled together a quick version for a Kindle Screensaver. The image below will appear slightly washed out but it has been colour balanced to look okay on an e-ink Kindle not a computer monitor :). I’ve uploaded the below on my kindle and it now cycles through in my screensavers and if anything still appears a little dark (note you do need to jailbreak your kindle to use custom screensavers).

00006_Card_Steam_Ram

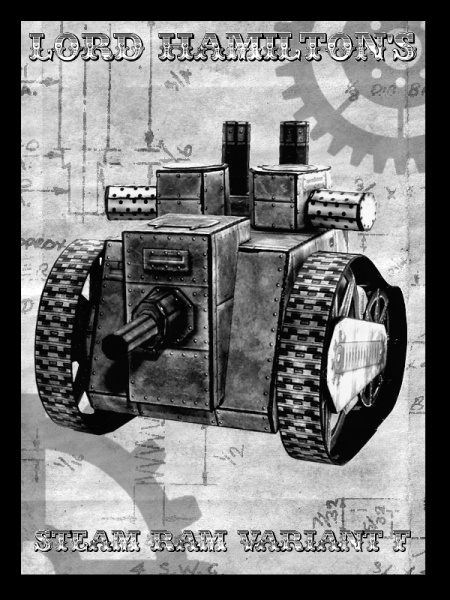
Click the above and then right click save as

As you can probably tell I really enjoyed building the Steam Rams and the customization options available in the PDF’s is huge with a large variaty of models achievable from just the base included parts. As I mentioned above I plan on building an entire Steam punk army around these two models and then using either Defiance VG or No Limits to spec the army out so watch out for more models/miniatures and eventually army lists in the coming months. If you haven’t already done so this model is well worth the money so head over to RPGNOW and grab a copy you wont be disappointed.

Hope you enjoy your Steam Ram, I’m going to go back to not pushing mine around a table in formation 🙂 .

Cardboard Warriors Forum – Paper Miniature Hoard 104

Cardboard Warriors forum Hoard 104 is finished and released, this hoard contains some good stuff to pack out your Christmas Wars armies with. There is the Reinhold by Squirmydad a couple of mini-gun wielding Santa’s by Ryan and the Snow Tundra Tiles and Toy Soldiers from myself.

hoard104
You can pick up other Xmas Wars goodness from Hoards 38, 39, 40 and 88 . Between the old hoards and the new one this year you can put together a couple of very nice themed warbands or a whole Xmas wars themed army.

The December Hoard (105) with a theme of Chaos Unleashed/Modern & Ancient is open and will remain so until mid Jan so why not head over and create a miniature, a piece of terrain or a vehicle for the hoard.

Hoard 104 – November 2012

Enjoy battling with Xmas wars miniatures over the holidays :)

Snow Tundra Tiles/Terrain

Snow Tundra Terrain Tiles

The Cardboard Warriors forum hoard 104 was Xmas Wars and as I’ve always wanted to try my hand at creating some terrain I thought some Snow Tundra tiles would be a nice start. It turned out to not be as easy as I hoped as getting some form of texture into a white snow background is very challenging.

First up I sorted through my skiing photos looking for a good snow texture, unfortunately real snow when used as a texture looks very boring basically you may as well just go and cut out 6 inch squares from plain white card. So I took a segment of particularly interesting textured snow from one of my photos, duplicated it and then bump mapped and played around with the colours until I got a base texture I was pretty happy with. I then added an overlay of irregular white shapes to represent blown snow drifts and then finally placed on some rocks, logs, grass tops and a frozen pond (sorry no river it was beyond me, plus no time). I’m fairly happy with how the tiles turned out although the shadows around the rocks didn’t really work the way I wanted but overall they look good on the table. I turned the whole thing into a layered PDF and with the bits I’ve put in you can get about 8-9 fairly unique tiles.

Snow Tundra Terrain TilesReady for Xmas Wars miniatures to be deployed

I also put together a quick snow covered tri-fold pine tree, I changed the colour a little on the tree so there is a green/green tree and blue/green tree in 3 sizes; 5 3/4, 4 3/4 and 3 inch tall versions. I only had time to put together one tree texture so all the versions use the same texture but I’m very happy with how they turned out as I don’t think there are any snow covered pine trees out there in the war gaming paper tree world. I did make the little 1/3 base circle bits separate so if you like you can easily integrate my trees with one of the commercial snow terrain sets around the place.

Snowy Paper Pine Trees

Three Sizes of Snow Covered Pine Trees

I’ll be including my Snow Tundra tiles in hoard 104 but they are available below  for download as well. I’ve included both a Cameo and SD cutfiles,  Unfortunately I cant test the Cameo file so use with caution, if they do work okay please let me know in the comments below.

The below is a zip file but I’ve had to rename it as an odt so right click save as and then rename the extension .zip once downloaded.

All Zipped – Sirrob01 Snow Tile Final

I’ve only put the cutfiles in the zip as I have rename those anyways but below are just the PDF’s.

PDF – Snow Tiles and Pine Trees

PDF Instructions – Pine Tree Instructions

Enjoy 🙂

Cardboard Warriors Forum – Paper Miniature Hoard 103

I’ve just finished assembling the Cardboard Warriors forum hoard 103. This was a fairly small hoard although the little Zerstorung was pretty challenging to build due to the size. I’ve included two different PDF’s, one with SD registration marks and the other with Cameo registration marks both are contained in the zip below.

Reminder that the November hoard is still open which is Xmas wars and Super Heroic, so get those submissions in, only a week left.

Feel free to check over the old Hoards for other miniatures.

Hoard 103 – May/June 2012

Enjoy 🙂

Trying out Axles and Alloys

Over the weekend myself and a number of friends got together to give Axles and Alloys II a try. The get together was  a little impromptu so I had to throw some terrain together the night before, basically just some polystyrene covered with sand and quickly spray painted red/brown.

For the game itself I modified the rules slightly so we could use a bunch of micro machine cars (about n scale/15mm). Although it doesn’t quite have the impact on the table it did make the game much easier to transport. For using the micro machine cars I used the tried and true method of converting inchs to cm and it seemed to work out well with the rules still holding together very well. The board we played on was only about 45cm x 75 cm ( 1.5 x 2.5 feet) and it did get a little crowded with 7 players, but this just meant more mayhem. I wrote up some quick vehicle cards and for each game we shuffled and dealt the cards out so no-one had the same car twice.

We played a total of two games with basic race to the finish goal. The first game resulted in all player vehicles being out of commission by the end of the 5th turn, except one. This was mostly caused by the figure 8 track design and a rather cramped first turn which resulted in much ramming, weapons fire and collisions with terrain as skids and drifts were misjudged, also a lack of anyone using the brake pedal didn’t help 🙂 :

The above photo was taken just after the second turn at this point the Orange and Green cars driver had been killed after a wicked burst of MG fire from the rear by the blue car. The blue car had been savagely rammed by both the yellow 4×4 and orange and green car in the 1st turn. As you can see even though it was our first game a mountain of mines and spikes had already been dropped.

Similar time as the above shot but you can see the field was fairly well spread out the purple dragster in the middle went on to win the game.

This was near the end of the game, the yellow 4×4 slide into the towering rock cluster after I misjudged drift. The two blue cars ended up ramming each other and then getting out of control and colliding with each other a second time. We were unsure if this meant another ram but we played it that way and it destroyed both cars, one due to driver death. You can just see the purple dragster in the background heading of to win the race.

Final positions of everyone at the end of game 1, the lime green car on the right edge had tried a massive drift circle and had been planning to try and cut off, then ram to death the purple dragster but came unstuck on some rocks. This left the purple dragster as the last car alive.

For the second game we changed the board layout so it was a simple Horseshoe track with 1 lap to win. This seemed to help with 4 cars still surviving when one crossed the finish line.

Cars lined up at the blue start finish line for race 2. Three cars are obscured by the terrain in the lower left of the shot.

Just after the 1st turn with a few cars having moved for their second, two cars used the ramp suffering a little damage but it was a heap of fun for the players and to watch.

This was at the top turn, once again the purple dragster was in the lead. Just after the purple dragster passed around the turn, there were 2 head on collisions which knocked out a couple of cars. The purple dragster itself was rammed head on to try and knock it out and slow it down but unfortunately it didn’t quite work and the purple dragster once again went on to win.

As part of the setup one piece of terrain had a hole in it and we designated the leading edge a ramp, so a car could fly up the ramp and jump out the hole. The purple dragster did this but due to the ramming damage incurred and then hitting the ramp to fast was almost destroyed on landing. The dragster crossed the line with 2 damage box’s remaining.

Much fun was had by all over the two games and the rules themselves are written very well, we only had a couple of minor spots were we weren’t quiet sure what the rules should work, but we simply worked something out. Due to the success of the game I plan on mounting the micro machines to bases permanently and giving them a quick coat of paint. As a group we are more likely to do pickup one off games and so to randomize the vehicles a little more we may put in place some form of random weapon assignment mechanism. The only other minor change we might make is to double the weapon damage we found ramming was much more deadly than weapons and want to encourage weapon use a little more.

If your looking for a fun car game, which doesn’t take itself to seriously give Axles and Alloys II a try, for the price (free) I don’t think you’ll be disappointed.

Have Fun 🙂

Papercraft Build – Sanity Studios: Orcs

I’ve built quiet a number of  Sanity Studios paper miniatures, so I thought it was time I did a review of one of their sets so I picked latest set. They have just released a very nice set of Orcs which is the first set in there Green tide army. These are the more modern take on Orcs that we have all come to expect when someone says Orc, ugly, brutish with green skins. For those who are unaware Sanity Studio’s has a set of tabletop rules to go along with their paper miniatures called Bellicose, I’ll probably do a review on rules in a separate post later on. To save me some space you can read about comparable scaling in this post. I will just mention that the Orcs stand a little taller than a Sanity Studio’s human, approximately 30mm to the eyes.

There are a total of 10 unique Orcs in the set with an additional 3 which are a mirror of the first 3 so your not wasting paper when you print them off (a nice touch).  This gives you 13 orcs across two pages. Additionally there are 3 skin tones available for each Orc, Green, Dark green and Olive. This means you can print of the pages 3 times and have 39 Orcs that are all slightly different.

Sanity Studios Orc Skin Tones

The first page contains 6 unique Orcs, wielding a variety of weapons, shields and armour. The poses are very dynamic and really convey a sense of movement in each of the miniatures. All the miniatures are very good on this first page with my favorites being Orc3 and Orc6, my least favorite is Orc2. The photo below shows the 6 Orcs in stock Green skin:

Orc1, Orc2, Orc3, Orc4, Orc5, Orc6

The 2nd page contains 4 unique Orcs and 3 mirrored Orcs (1,2 and 4), for 7 in total, the poses are likewise very dynamic across this page. My favorite from this page is Orc8 with Orc7 running a close second, I’m going to pick on Mirrored Orc2 as my least favorite. The photo below shows the 7 Orcs in stock Green skin:

Orc8, Orc7, Orc9, Orc10, 1Cro, 2Cro , 4Cro

As you can see from the above pictures the Orcs are coloured/shaded differently to David Okums work. David goes for a more comic book cell shaded look for his mini’s were as Labrat from Sanity Studios colours/shades  similar to how you would have if you were painting a metal/plastic Orc miniatures. Both styles work well on the table but I have to admit when placed side by side on the table the Sanity Studio’s mini’s do seem to “pop” a little more, but this could just be my own personal preference seeping through as they both look good even at longer distances, either way your not going to go wrong picking up work from either artist.

Sanity Orcs vs Okums Elves

The Orc’s come with a premade craftrobo/silhouette  cut file so if you have one of those cutters it’s very quick to go from pdf to a couple of units of Orcs. Unfortunately an optional Cameo layer was not included but this can be addressed using a ruler and black pen. Handcutting will be a little slower, as you can see from the above pictures the Orcs have quiet a few small shapes protruding off them which increases the time it takes to cut them out. The added detail does mean the Orcs have a better overall impact on the table.

At the moment these Orcs would be great for populating a warband for a skirmish level war game eg SoBH (this will be one of my uses). They’d also be great for a GM to use in  a dungeon for a role playing game. There’s not quiet enough to populate up a full fantasy Orc army but I know Labrat has some goblins in the works which will then make these much more usable for larger army wargames. I know from reading the Bellicose rules (were these minis are intended to be used) that in the future Sanity Studios/Labrat will be working on several other additions for the Orc army such as:

  • Goblins
  • Goblin Pedal tank
  • Hobgoblins
  • Ogres
  • Shaman
  • Orc Warlord

No idea when they will be available but Sanity Studios has been filling out there troop roster for 24-36 months now so I’m fairly confident we’ll see most of the above at some point.

The Orc set is $3.95 which is good value for money, you don’t get as many different Orcs as David puts in his sets but David appears to be the exception rather than the rule when it comes to number of paper miniatures in a release. These Orcs are also more what people think off when they think Orc so for myself they are an excellent set/instant buy and lastly and most importantly you can never have to many Orc’s :).

Have fun gaming :).

Warmachine – Hirst Objective Markers

I have a few Hirst arts molds which I have never used before, I bought them about mid last year but had not had anytime to try using them. However over the Xmas/New years period I did a big pile of casting, I did something like 10-12 casts of each of the 5 molds I own. Since it’s been a while since I last painted I decided to do a few objective markers for a friend who plays Warmachine.

These are primarily made from parts from Hirst mold #85 cavern accessories but they also include a few Warmachine shields, odd cogs and a lego spanner. I restricted the size of my objective markers to the same size as the official Warmachine ones that were  released last year. My friend who is going to use these primarily plays the  Khador faction, so I asked him for a few bits from his bits box so I could give each one a unique Khador feel.

Building each one was pretty simple, I selected some random Hirst crates, barrels or sacks and then stacked them on a 60mm Warmachine base, adding the odd cog and Khador component. Once I was happy with the combination of parts I based the bases with plain red sand to keep them simple and to have them fit in with the way the rest of his army is based. Then painted each of the components individually and finally glued them to the base I applied two coats of matt varnish to help provide an extra level of durability as objective markers tend to get handled more compared to normal terrain.

The marker above is my favorite of the three, the blending on the shield came out quiet well and the Lego spanner seems to make the marker more dynamic than the other two.


My second favorite of the three markers.

Lastly and my least favorite, this one just doesn’t work for me, the blending on the arm is very sketchy but I tried three times to improve it and failed each time. I think I struggled as my brain really wanted to highlight the middle of the hand not the outside edge so I was fighting my own internal notion of how I would normally have painted the hand. The marker also seems less full than the others as the axe hand takes up a lot of volume but is not a solid block so the base appears emptier. It should still be good enough to game with :).

These didn’t take me very long to make and I enjoyed making them, although painting the shields and hand took longer than I would I have liked.

Have fun gaming 🙂

Papercraft Build – Dave Graffam/Thomas Weaver Observatory

I’ve spent the last week working on Dave/Tommyguns Observatory model.  This is a free model but it is full of character and is unique as far as I have found in papercraft terrain. I did make some slight modifications to the model as I was building it, primarily I increased the size of the model by 145%, added an inside and tried my hand at adding some extra detailing to the model. I plan on giving this model to a friend to use as part of his warmachine table layout and I think it should fit in well with the steampunky feel of the Warmachine universe. I added the extra details to the model so it can be used as an objective in a scenario and look a little more special.

Due to the extensive changes I have made to the model I can’t really give you a step by step on what to print and how to replicate what I’ve done but hopefully the below pictures of the model and the comments I’ve made will help if you do wish to try. I will say edge under absolutely everything in black before gluing things in place as this will help cover up miss alignments and small gaps.

First up the telescope it’s self , I cut the end out of the telescope and glued a glass bead into the end of the telescope, I glued the blue end I’d cut out to the bottom of the bead to give a deep blue effect otherwise when you look at the bead you would have just seen the black inside the tube. Other than the clear acetate windows this is the only part I’ve added to the model which is not paper. I did try to make several domed paper parts but they looked terrible. I also printed out the parts twice and cut out bands of wood (doubled up 2 layers of 220 gsm) and glued these around the tubes to add some extra detail, the very end one I increased in width by 100% to add a shroud effect around the glass bead lens.

Under Construction

Completed and Mounted

Next up the base: In GIMP I split the lower walls from the upper dome on the lower side of the metal flange. I then increased the wall height by 6mm (1/4 inch) so I could insert a foam floor later on. Next I added wood texture across the entire inside base. It was a simple matter to print out the lower walls floor and pretty much assemble as normal. Although I cut a dodecagon of foamboard to insert into the floor first and glued the walls to this (triangles on the underside)then dropped in and glued the textured floor on top of this.  I also cut out the windows and doors to enable me to fit them back later on. Once the outside was assembled I cut small segments of foamboard and glued these along the inside of the wall for strength and thickness. I then modified the external plaster texture to fit on the inside of the model to become the inner walls (102% height 90% width). Before gluing the inside in place I cut the window and door holes into the foam inserts then test fit the inside insert and marked were the door and windows would be and cut these out, the inside was then glued in place. I next added some flex steel (turned out to be un-needed) around the top edge and glued it in place and then covered this with a special dodecagon wall topper I made up in GIMP. Last step was to add some acetate windows, hinged door, framed star charts for the inside and window frames on the outside and the base was done.

Outer Walls and Floor in Background

Floor Glued in and Inner Foam Support Added

Finished Base

Next up was the top inside and out, this was a right pain in the neck as I had to design a telescope end and eye piece inside the Observatory. In the end I got a design that fit although I did make one piece slightly to long if I make a second one I will shorten the 2nd main bend a little. Sorry getting a little ahead of myself, assembling the outside was fairly easy, once again I cut out the windows before assembly. I then glued a foamboard dodecagon piece to the inside of the base of the dome approximately matching up with the steel flange graphic on the outside and about 6mmx6mm square (1/4 of an inch). Once this was in place I glued the top together in pairs to keep it symmetrical then glued the pairs into fours and so on until it was glued into the dome shape. I next added some detailing to the top (all double thickness 220gsm card) such as the horizontal wooden beams, the window frames and a cap to the top of the roof to help finish it off. At this point I also glued the acetate windows onto the inside of the dome top.

Outside Glue Up

Finished Outside Top

Onto the dome inside. As I wanted the wooden dome to be thinner than the masonry walls I kept the dome as only a double card thickness. To line it I simply printed the outside again and cut these into individual triangles, reverse scored them cut the windows out and glued them into place, there is a slight bulge on the inside were they cover up the windows. Next I added 6 small (5mm square) magnets to the foam flange and then reprinted the wall topper from the base and glued this to the under side of my foam flange. I likewise duplicated the outside texture and glued this to the inside of the foam flange. I didn’t bother to detail the inside of the dome as it’s almost impossible for someone to look up into the dome while gaming without removing the top and then your focused on the bottom. I did add an inside tube and eye piece to the telescope as mentioned this was a right pain but I finally got the geometry worked out on my third test build.  Unfortunately due to the small windows it’s very difficult to see from the outside but it looks nice when you pull the top of the model. To help hold the top to the bottom and cover any small miss alignments I made up a double wide metal textured piece and glued this on the bottom of the dome, this slides over the base and is a very tight fit (magnets seem to do nothing) if I was to redo the flange I’d put a thickness of card behind the card flange to give a little more play. On the plus side pulling the model apart requires some force so accidentally knocking it apart during gaming would be impossible.

Inside Top Lining

Finished Inside Top

Overall I’m very happy with how the model turned out, it let me try my hand at detailing in paper which although fiddly is no worse than scratch building in traditional materials except no painting and as an added bonus the model is extremely durable/strong due to the added bracing. The extra detail helps make the model pop on the table from a distance.

So why not go and grab some of Dave’s models or Tommygun’s and either build them stock or try detailing one up as a special terrain piece.

Finished and Assembled

Papercraft Build – Okumarts Darkfast Set Two: Wood Elves

This is the second set in Darkfast series released by Okumarts. As the numbering for the Darkfasts series starts at zero this set is labeled as Set Two: Wood Elves. You can read about the size/scaling and background information in this post to save on repetition.

As you can guess from the title of the set this set contains Wood Elves. Before I proceed any further with build review a little bit of disclosure, I’m a wood elf fan, they are one of my favorite races in any fantasy setting so be warned this review might be a little biased due to my Wood Elf tinted glasses. The Elves are drawn in what I would describe as classic D&D elf style, the elves are slightly shorter and of a thinner build than your average human.  There are a total of 18 unique miniatures in this set broken up into two sets. The first twelve you see when you open the PDF are warriors and these are printable in four colours with white hair; green, red, blue and white with an extra green set with brown hair. The second bonus set of six (turn off the five warrior layers) are available in the one colour however Okumarts has really raised the bar with them, there are four Buck (Deer) Riders and one male & one female wood elf Druid/Mage. Below are photo’s of the various miniatures avaliable in the set in various colours:

Elf Sword (M), Elf Sword (F), Elf Archer (F), Elf Archer (F), Elf Archer (M), Elf Archer (M)
Elf Archer Chainmail(M), Elf Spear (F), Elf Spear (M), Elf Spear (M), Elf Sword Heavy (M), Elf Sword Heavy (F)
Elf Buck Rider Archer (M), Elf Buck Rider Archer (M)
Elf Buck Rider Spear (M), Elf Buck Rider Spear (M)
Elf Druid/Mage (M), Elf Druid/Mage (F)

This set is stunning and extremely versatile, again the colour selections for the miniatures and the dynamic poses Okumarts has selected look really good on the tabletop. I can see a lot of uses for the miniatures in this set:

  • There are six special looking mini’s that would make good PC’s or important NPC’s, Elf Ranger Sword (M), Elf Ranger Sword (F), Elf Sword Heavy (M), Elf Sword Heavy (F), Elf Druid/Mage (M) and Elf Druid/Mage (F).
  • Both male and female variants of every miniature, except the Buck (deer) riders.
  • Extremely dynamic poses.
  • Deer Riders, great idea and well executed.
  • Lots of different troop types.

The outlines on this set are slightly more complex than the previous two with a few deer antlers, cape ends and hair spikes, however overall they are not difficult to cut out. The back to front alignment on the first twelve miniatures and the Druid/Mage is as usual excellent. I did however notice that on a couple of the buck riders there wasn’t quiet enough black border on the rear side, this was easily fixed with a black marker. Do keep that in mind when cutting the miniatures out as you will need to cut out the miniatures from the front side (face side).

The set contains a good number of figures that can be used across an RPG from PC’s, NPC’s down to simple forest border guards. It would be a great set to use to play out an encounter with elven border guards as the PC’s try to enter Wood Elven lands.  Depending on how the initial encounter played out you could have the PC’s being pursued by ardent Buck riders across the rolling plains away from the forest.

There are more than enough figures to make up a very nice and varied Warband for Song of Blades and Heros in fact with the varied figures in the set you could do up themed lists; all mounted, all ground  or a mixed wood elf warband. Elves are contained in the main Song of Blades and Heros book on page 26, I plan on using the stats for heavy cavalry with the Buck Spears and have made a new profile for the Buck Archers (see below). All the other miniatures equate out reasonably well with the stock list, with a few double ups:

  • Elf Warrior (SBH) = Elf Spear
  • Elf Archer (SBH) = Elf Archer
  • Wood Elf Warrior (SBH) = Elf Sword
  • Wood Elf Archer (SBH) = Elf Archer or Elf Archer Chainmail
  • Elf Wizard (SBH) = Elf Druid/Mage
  • Elf Hero (SBH)= Elf Sword Heavy or Elf Archer Chainmail
  • Elf Commander (SBH) = Elf Sword Heavy
  • Wood Elf Commander(SBH) = Elf Sword Heavy
  • Elf Sneak (SBH)= Not really one, Elf Spear (F) is close
  • Elf Cavalry (light) (SBH)= Elf Buck Rider Spear (better fit below)
  • Elf Cavalry (heavy) (SBH)= Elf Buck Rider Spear

Wood Elf Buck Archer (Bow and Riding Buck)
Points 50   Quality 3+  Combat 3
Special Rules Mounted, Shooter (Medium)

Being a bit of Wood Elf Fan I also had a quick look over at Wargames Unlimited – No Quarter and they have a Wood Elf Army list already (cue squeal of delight). There are not enough miniatures in this first set to have a different miniature for each profile avaliable in the wood elf army list. There are however more than enough different miniatures to put a reasonably well rounded fighting force onto the tabletop. I went through the avaliable miniatures and matched them as closely as I could to those avaliable on the list, As there are a number of duplicates don’t forget to use different cloak colours and different hair colours to represent different unit types if you need. I also added a few idea’s from other papercraft manufacturers (all free):

Individuals and Leaders

  • Elven King – none that are really special enough
  • Woodland Noble – Elf Sword Heavy or Elf Sword
  • Clan Leader – Elf Sword Heavy
  • Totem Bearer – none
  • Elven Warlock – Elf Druid/Mage (M)
  • Elven Witch – Elf Druid/Mage (F)
  • Elven Sorceress – Elf Druid/Mage (F)
  • Elven Sorceress on Unicorn – none

Core Units

Elite Units

  • Greater Tree Spirit – none ( Onemonk Halloween set tree  or WorldWorksGames Halloween tree or Eddnic’s Treant or HannesX’s Treeman)
  • Border Gaurd – Buck Riders (Spear or Archer)
  • Levy Nobility – Elf Heavy Sword
  • Woad Warriors – none
  • Eagle Riders – none
  • Huntsfolk – Elf Archer
  • Clansfolk – Elf Sword

Remembering you wont ever field every troop type in every army list that you field for a particular battle. Below I’ve put together some quick army lists as well as the number of times to print a particular page to field the army of that size(2 Okumarts miniatures only, 1 mixed list):

500 point Army

503 points total

Print: 2 of page 1 and 1 of page 2

General

Elven Sorceress (Elf Druid/Mage) – 59 pts

Core Units

Woodfolk x10 (Elf Archer) – 280pts

Elite Units

Border Guard x4 (Buck Rider) – 164pts

1000 Point Army

986 points total

Print: 3 of page 1 and 2 of page 2

General

Clan Leader (Elf Sword Heavy) – 55 pts

Individual

Elven Sorceress (Elf Druid/Mage) – 59 pts

Core Units

Schiltrons x8 (Elf Spear) – 264 pts

Woodfolk x10 (Elf Archer) – 280pts

Elite Units

Border Guard 1 x4 (Buck Rider) – 164pts

Border Guard 2 x4 (Buck Rider) – 164pts

1500 point Army

1485 points total

Print: 4 of page 1 and 2 of page 2 + 1 WWG Halloween tree

General

Woodland Noble (Elf Sword Heavy) – 92 pts

Individual

Elven Witch (Elf Druid/Mage) – 59 pts

Elven Warlock (Elf Druid/Mage) – 59 pts

Core Units

Schiltrons x8 (Elf Spear) – 264 pts

Woodfolk x8 (Elf Archer) – 224pts

Woodfolk x8 (Elf Archer) – 224pts

Fae Lorn x4 (Elf Sword) – 128pts

Elite Units

Border Guard 1 x4 (Buck Rider) – 164pts

Border Guard 2 x4 (Buck Rider) – 164pts

Greater Tree Spirit (WWG Tree) – 107pts

For me this set is a winner, one of my favorite fantasy races and usable across all three types of games I enjoy playing for a very reasonable $2.50 (USD) . I’d recommend  buying the set, no matter what game your going to use it for you will get good use out of the set.

Overall I have been very impressed with the Darkfast series and will pickup any more miniatures that Okumarts releases in this series to add to the ones above.

Have fun gaming

How to Base Paper Miniatures

I’ve been meaning to do a post on how to base paper miniatures, which includes some of the various types of paper miniature basing you can do. There are advantages and disadvantages to each type of basing so there is no right or wrong way to base. Most of the various base idea’s below come from the cardboard warrior forums, so feel free to head over and browse through the gallery to see what others have done. Depending on the type of basing you decide on you’ll need to grab some of Onemonks standard bases or I’ve made up a plain base template as a layered PDF (30mb) which includes Onemonks basic textures. Additionally I’ve  included the raw shape png’s at the end of this post so you can overlay them on any texture you like from anyone, sorry no cut files yet.

First you’ll need to choose a base shape. This initially would seem easy to do and if you only game using one set of rules just use whatever they recommend. If however you jump around between rulesets/RPG’s/Wargamming it gets slightly more difficult to pick a shape. If your using one of the removable base types below you can just make different base sets for each rule sets you use although if you have 2-3 armies making all those bases can get tiring. For myself after much deliberation I settled on Octagons, there are several reasons why I choose Octagons:

  1. Most RPG’s don’t care what base’s you use but by some sort of weird default convention most stuff to be used for RPG’s ends up on round bases. Round bases do have their advantages in that you don’t snag base corners on things and they aren’t as easily damaged. Octagons provide a similar level of protection not quiet as good as a circle but very close.
  2. Most War games (fantasy) like you to rank your troops up into units and use movement trays, normally specifying a square base so troops and units fit tightly into a movement tray. Octagon bases can also be ranked up quiet effectively in movement trays.
  3. Some war gaming rules have the concept of facing and it can be quiet important which way your unit is facing. The facing rules can be based on a Hexagon or Octagon. By using the trusty Octagon you can cover facing very easily and disregard two sides if you need to very easily.
  4. There easy to cut out compared to circles 🙂 .

In the end pick the shape that works for you, for me that’s Octagons but if you want heart shaped bases go for your life :). With some of the below base types if you use black foam core you can save yourself a significant amount edging.

My Current Bases

I’ll cover my current basing method first. I use a modification of the slotted Foam board base (see below) and something Afet posted about here. I bought a sheet of 2/3mm Depron, Depron is used in RC plane construction and is pretty much available everywhere (okay I know the US/UK and AUS can get hold of it very easily).

I find these bases are slightly thinner than a 5mm foam core base below and don’t look quiet so odd on the table next to regularly based metal mini’s but provide plenty of stability for the paper mini’s. The mini’s don’t slip out easily during game play and I can remove the mini’s to store them flat at the end of a game so they take up less space. It also gives the illusion of flat basing which I prefer with my miniatures. There are a couple of draw backs: It takes slightly longer to make each base than the stock foam block method. I have to shorten the black base tabs a little bit on each miniature which again uses up time. Eventually the bases take on a permanent bend and wont grip the miniature as well (this takes a lot of use). Below I’ve documented the process for making these bases:

First up Print and Cutout a base of the required size.

Glue the above base to a piece of 2/3mm Depron/Foamboard

Cut around the hexagon and cut the base in half (or just off center if your going to rank troops) and colour all white edges to black using a thick black marker

Stick the two halves back down onto some thin magnetic sheet ( I use the cheap fridge magnet stuff on ebay), Insert a single piece of card between the two halves as you stick them down to make a slight gap.

Trim the magnet to size and the base is ready to use.

When I make bases for larger paper miniatures I do tend to mount them on thicker bases as they look less out of scale.

Flat Slide Bases (Reivaj bases)

Full credit goes to Reivaj for coming up with this basing method. I’m torn at the moment between using my basing method above or slowly moving my miniatures across to this basing method.

This basing method  provides you with a removable bases, the bases are not to thick so your mini’s don’t have a mounted to a plinth look, they are only slightly more difficult to make than my modified foam block bases above and the miniatures once mounted are near impossible to pull out of the base. They do however have a couple of draw backs: When you make your paper miniatures you have to be careful not to glue the black base tabs together so you can bend them outwards later on, sliding the miniatures into the bases can be a little fiddly and if your not careful you can damage the the base (bend it to much) or the miniature (burr over the tabs).

First up print and cut out a standard One Monk base of the required size.

Trim off the square end tabs as they are not required.

Flip over the base and glue some strips/pieces of cardboard inside the base (black spacers in the below image, I’ve been using doubled up 190GSM card to create the spacers), trim to size and edge.

Fold over and glue the top to the bottom

When Gluing your miniatures up make sure you Don’t glue the black tabs as you need to bend those out left and right.

(You can strength the black tabs with a little sticky tape)

Base all finished. When sliding miniatures in and out bend the base upwards slightly.

As an addition I’ve been  sticking  a thin piece of magnetic sheet to the bottom of these bases to add a little extra weight/strength.


Slotted Foam Block Bases

I’m not sure who came up with this basing method but I’ve seen several users on the cardboard warrior forums using this technique . The advantage of these bases is that they are very quick and easy to make. However they are not without their drawbacks. I have had some problems pushing miniatures into the base slots and removing them which can damage the miniatures base tab, if you use standard 5mm foam core for the bases they are also very chunky. I tend to only use these bases in a pinch eg I’ve run out and need to mount some more mini’s for a game I’ll quickly cut some squares  from black foam board and wont worry about adding a ground texture.

First up Print and Cutout a base of the required size. I tend to find with these bases I need one size bigger than I would normally use for the miniature.

Glue the above base to a piece of foam board

Trim the foam board back to the base shape and cut a groove. I use a small steel ruler to help work the groove slightly bigger.

The base is all finished and ready for use

Onemonk Standard Bases

These are the standard Onemonk bases you can download. There are over 50 pre-made bases and textures available in multiple manufacturers textures. These are easy and fairly quick to make. I have found overtime with use that the tab on the base that holds the miniatures slowly loses it’s grippyness, this tends to occur more quickly than with the other base types. You can fix this issue by simply using a short bobby pin or if you prefer permanently gluing your miniature into the base. This of course then removes some of the advantages of paper miniatures as you will no longer be able to store them flat. I’ve included how I assemble them below as it’s slightly different to the PDF guide located here.

First up print and cut out a standard One Monk base of the required size and score along the indicated score lines.

Flip the base over and using a black  marker blacken the end tabs and a strip down the middle of the base

Simply glue the top to the bottom and edge with a black marker

The base is now ready to use

Permanent Flat Bases

With all the options above I no longer use flat basing as a basing method. Although it looks good it removes one of the key benefits of paper miniatures for me and that’s the ability to store a lot of miniatures in a small space. Saying that it is impossible to remove a miniature from a base short of ripping it off so during gaming they are very durable.

First up Print and Cutout a base of the required size.

Glue the base to your preferred basing material and edge. I’ve used magnetic sheet, Matt board and plain cardboard in the past.

Simply cut the black tab off your miniature and glue it to the base using PVA or super glue

Going All Out

There are some really nice based paper skeleton miniatures across on the cardboard warrior forums, although not removable from the bases they look out standing. Using the above bases as a start there is no reason you can’t use more traditional basing materials to really make your miniatures and bases pop. Although fairly labour intensive to make for a whole army, for special miniatures like Hero’s or PC’s these bases really help to make special characters stand out on the table top. Below is one example I’ve assembled but you could use any of the hundreds of regular basing tutorials on the web to create unique looking bases (here, here, here and here).

Fancy Reivaj style base (sorry about the dark base in the photo)

Here’s a picture of the five different base types side by side at the end of the day they will all look good on the table so pick the base that works best for yourself 🙂

Have fun gaming

Plain Base Shapes Layered PDF (30mb recommend right click save as)

Save the below and load in GIMP/Photoshop, they should be 2550×3300 pixels @ 300 pixels an inch

Circle Square Octagon Hexagon
15mm 15mm 15mm 15mm
20mm 20mm 20mm 20mm
25mm 25mm 25mm 25mm
30mm 30mm 30mm 30mm
40mm 40mm 40mm 40mm
50mm 50mm 50mm 50mm
Pill Rectangle Oct-Rectangle
15x30mm 15x30mm 15x30mm
20x40mm 20x40mm 20x40mm
25x50mm 25x50mm 25x50mm
25x75mm 25x75mm

Project Status


WWII Project First Release

80%


B-tech Buildings Five

20%


Design Victorian era City

15%


Something Different

5%


Enter your email address to follow this blog and receive notifications of new posts by email.

Join 110 other subscribers

Content Released Under

Creative Commons License
This work is licensed under a Creative Commons Attribution-NonCommercial 3.0 Unported License.
Please Attribute to Sirrob01 with a link back to my blog

%d bloggers like this: