Posts Tagged 'Paper Terrain'

Papercraft Build – Inked Adventures Dungeon Cut-Up Basic

Inked Adventures Dungeon 4 (S01)I have a real soft spot for nostalgic themed games, papercraft or artwork, this little build fills two of those. Ever since Inked Adventures released their basic Dungeon cup setup I’ve been wanting to build enough for a dungeon layout. So I put some time aside over the past few weeks  and have now built enough tiles to populate a fairly decent sized dungeon, I can see I need to create a few more tiles but for the most part I’m done. As you can tell by the release date it’s taken me a fair bit of time to get around to building these, some of this relates to me trying to find a good material to mount tiles to but I’ll mention more below on that.

All Inked adventure tiles are hand drawn which I find a very nice look. There are 41 pages of dungeon goodness contained in this pack; rooms, corridors, stairs, trap tiles, 2d doors and 3d standup doors multiple versions of both. The beauty of the Dungeon Cut-Up set is even if your not into altering dungeon segments using GIMP/Photoshop, Billiam from Inked Adventures  has created this set so you can use a pair of scissors and glue to create your own custom tiles. There are 4 pages of “extra” bits which you can use to either decorate your tiles permanently by sticking them down directly to the tiles or by turning them into loose tiles you can add mid game.

Inked Adventures Dungeon 3 (S01)
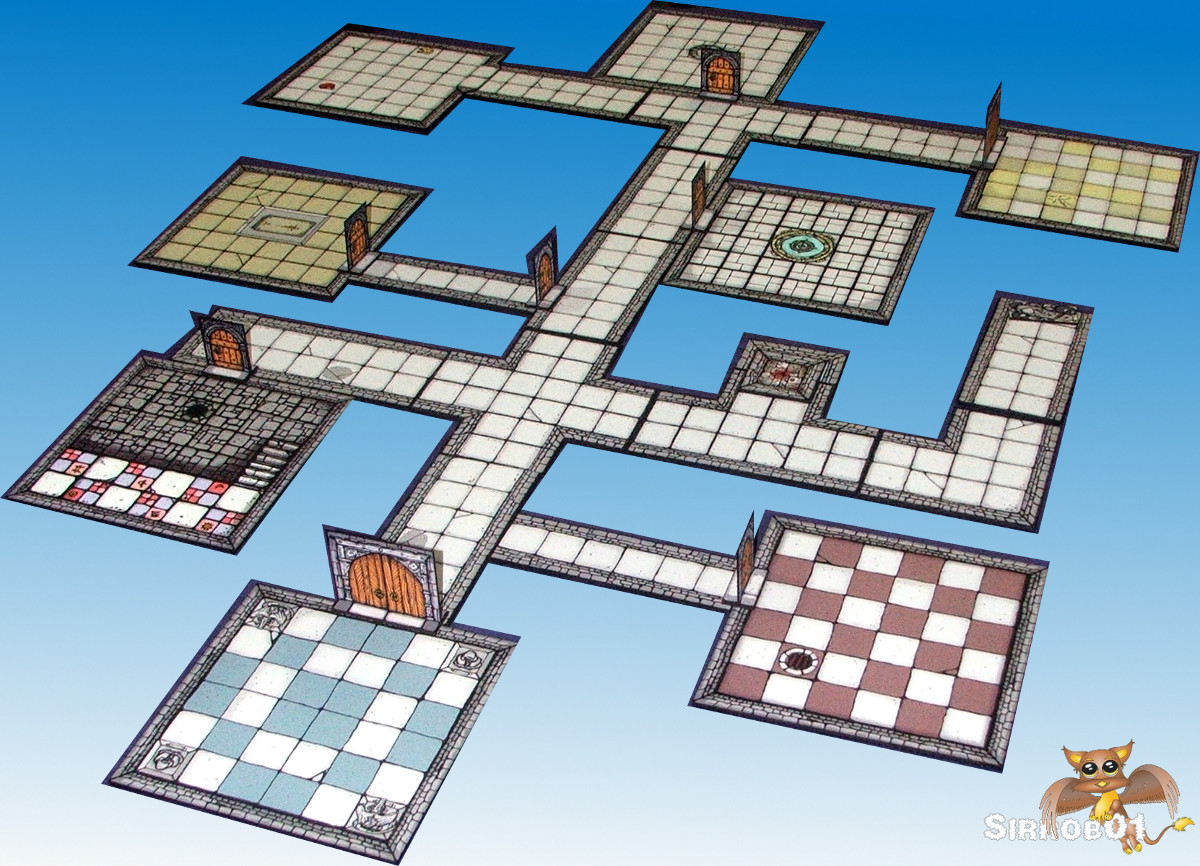
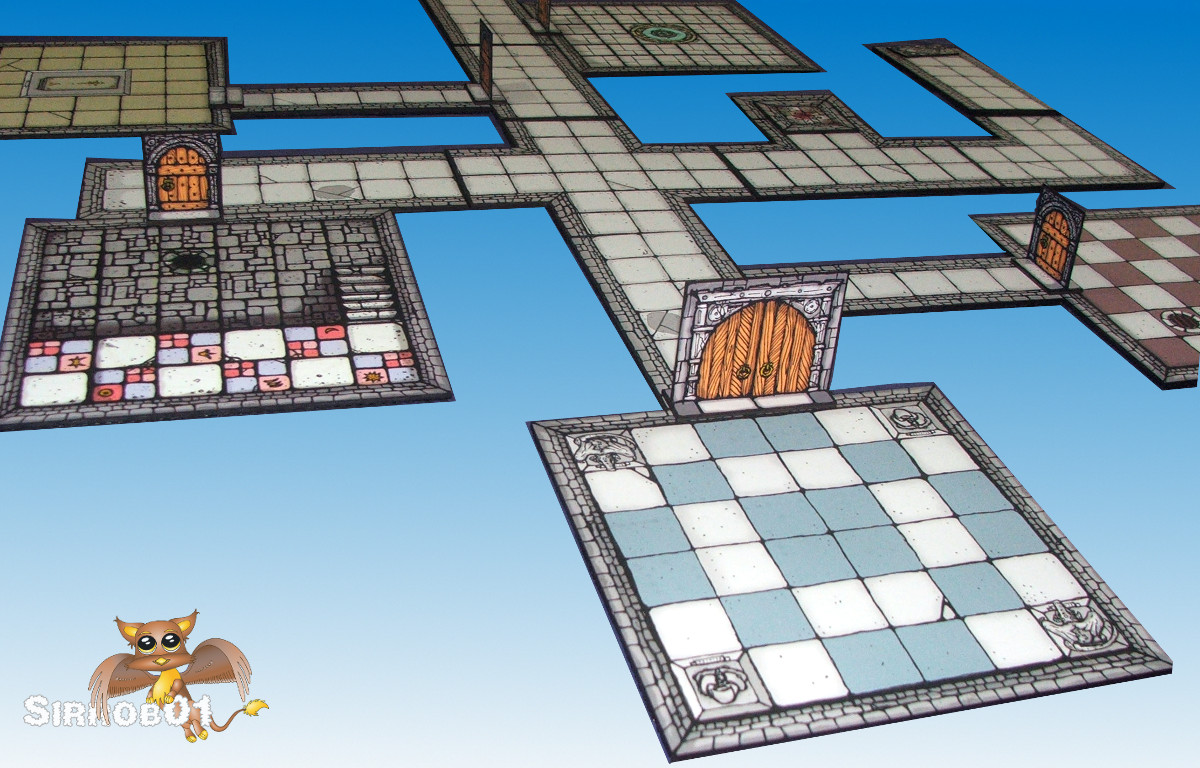
Layout Example – From an angle

For my set I stuck with components that are multiples of 2inches, 3inches or 6 inches. This will make it simpler to use for Dungeon plungin and Basic fantasy, although I might make a few special rooms that don’t conform to these sizes later on. For the moment I’ve created 8 – 6×6 rooms, 8- 6×2 corridors, 2 – 6×1 corridors, 4 L and T junctions, 2 X junctions, 4 dead ends, 14 small doors, 2 double doors, 2 double joiners, 4 double rockfalls and 2 large pit traps.

Inked Adventures Dungeon 1 (S01)
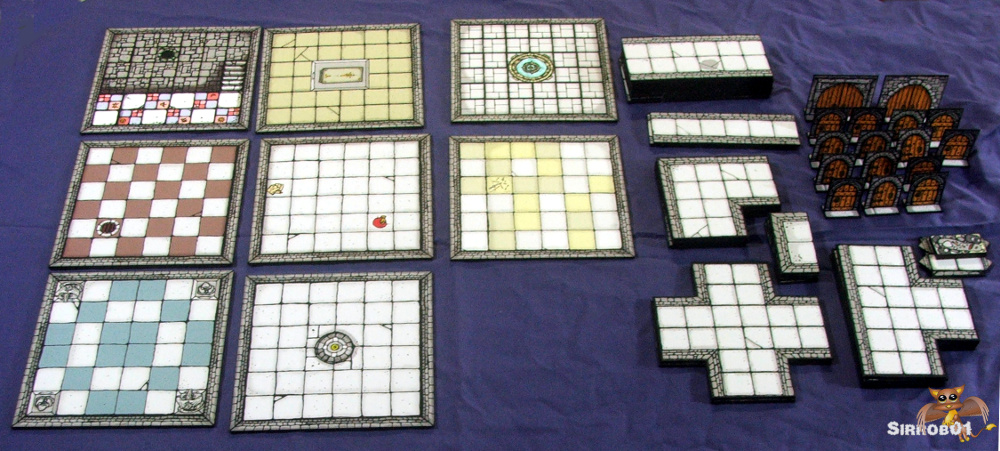
Bits created so far laid out

The rooms I created from the parts supplied by Billiam although I did a fair chunk of altering in Gimp to make them fit a 6×6 square. Other than the room with blue squares you could replicate most of the room designs with a pair of scissors, glue and  a little ingenuity or simply use the ones that come with the bundle (12 rooms included).

Inked Adventures Dungeon 2 (S01)
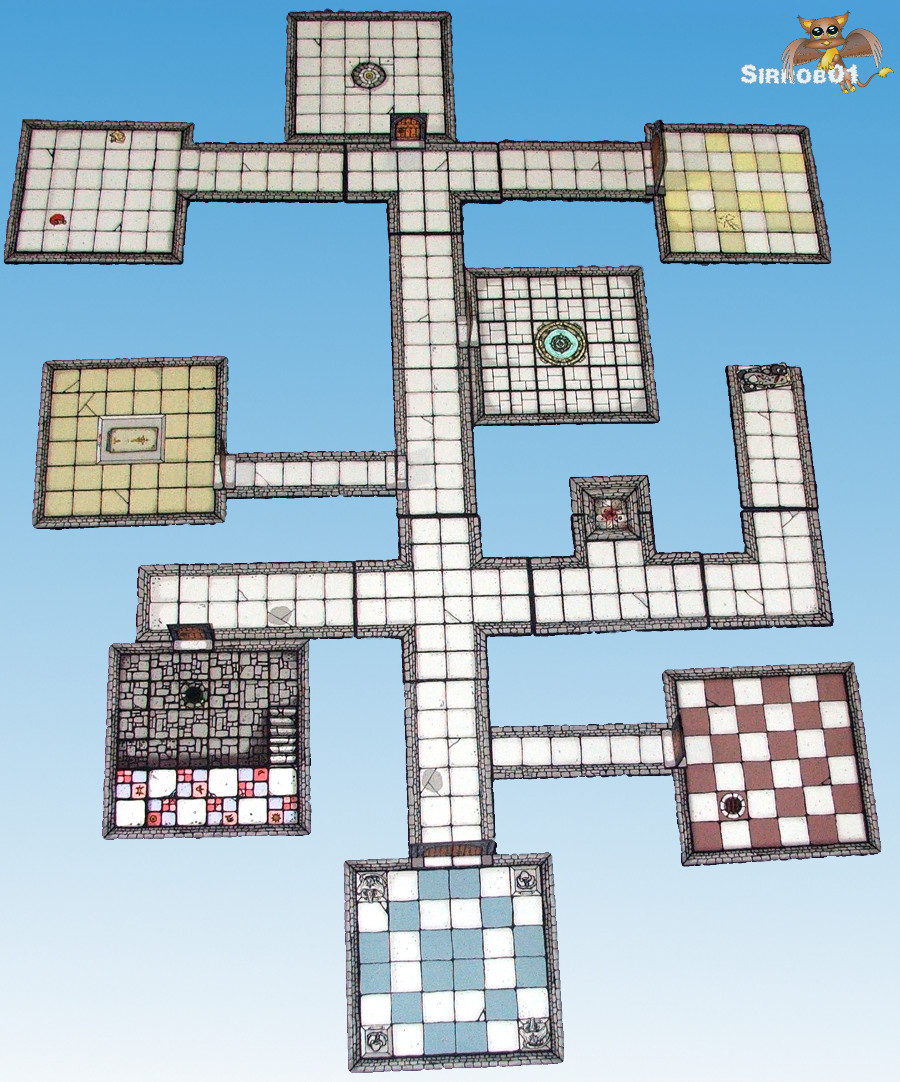
Example Layout – Top Down

I mentioned at the top I’d been putting of creating these as I’ve never really found a suitable substrate for mounting tiles to. I’ve tested quiet a number of crazy ideas in my time from rubber carpet tiles to magnetic sheet. Not sure if it’s just the extreme weather down under but I’ve found all glues that are easy to use for tile creation (read spray glue even the good 3m stuff) do eventually fail, 3m takes the longest at around the 1-2 year mark.

Inked Adventures Dungeon 6 (S01)Kitchen mat backing, simply double sided taped on

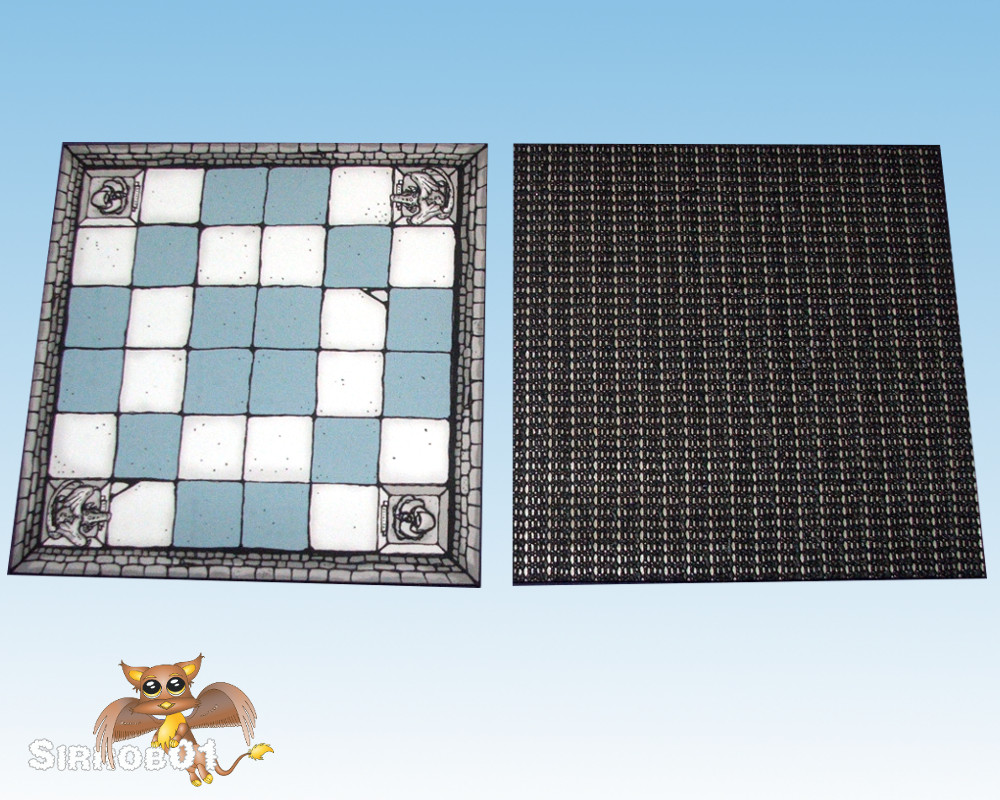
After years I’ve finally narrowed it down to two methods, the first I mentioned in my city build thread 8mm PVC foamboard. A little heavy duty for this application plus chews up extra storage space so I’ve simply used grey boxboard 1400gsm (basically what commercial game boards are made from) and printed directly to sticker sheet, stuck the tiles down then cut around the whole lot giving a nice neat tile. To prevent slipping on smooth tables I used double sided tape to a fix non-slip kitchen mat to the backs. Nothing to out of the ordinary and it’s been done before but I’ve found this one of the better solutions for DIY tiles; No spray glue mess, No warping from glue, No lifting , Reasonably slip proof on a table and lastly they don’t take up to much room to store. My current dungeon tiles fill about 1/3 of an  A4 document box. To give the doors some weight I stuck them down to some thick (2mm) magnetic sheet, this will also let me stick them to the inside of the lid of the storage box later on to protect them during storage.

Inked Adventures Dungeon 5 (S01)
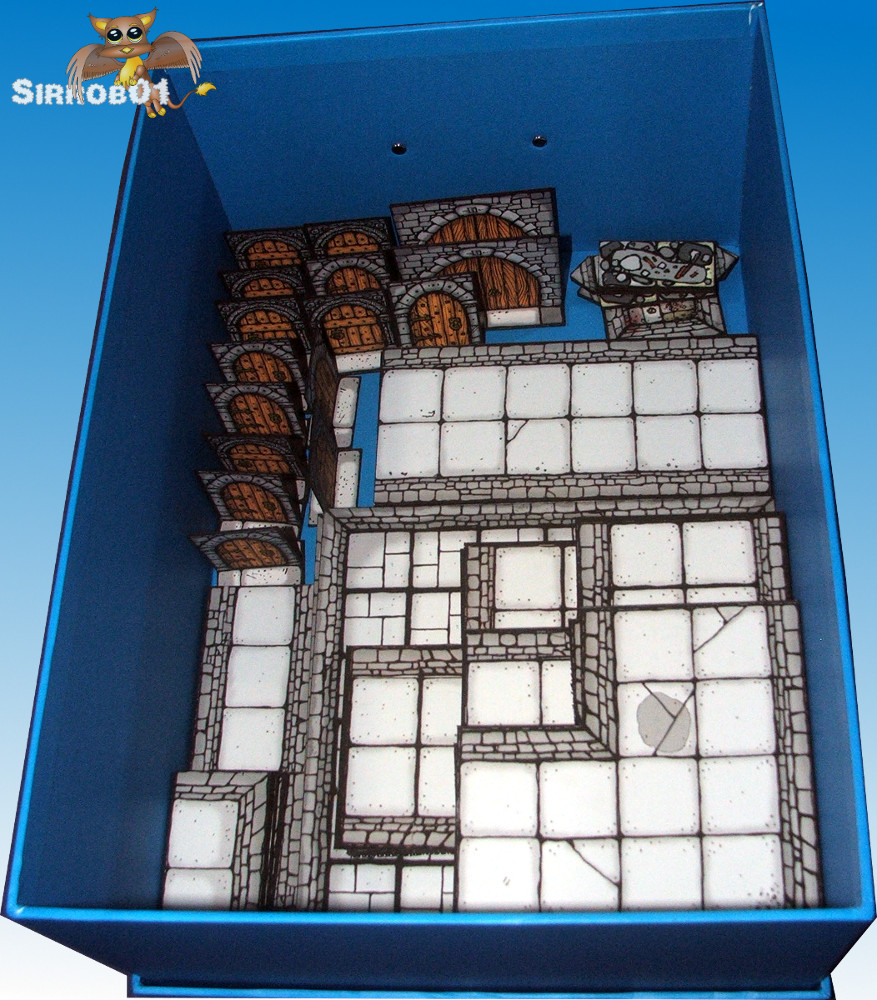
I’ll add some dividers etc later on but just to give an idea on storage

If your not sure you like the style of the tiles or simply want to give them a try there is a free sampler pack which should give you an idea of what to expect. I did this myself while experimenting with tile mounting techniques, once I had a solution I grabbed the full set and haven’t been disappointed. I even grabbed the square tile version although I haven’t used them. I should probably mention that Inked Adventures has released some freebies for this set so grab those as well as they’ll give you more options.

Inked Adventures Dungeon 4 (S01)The whole example layout – yep missed a door on the right

As always have fun building and gaming and I hope to get some more posts up shortly, I have 6 projects 90% complete….I should probably focus on one project at a time rather than starting six at once :).

Papercraft Build – Capital City Build Stage One

To go with the half sized Lost Reich mecha  I’ve been building, I have slowly been working on a small Fat Dragon Capital City build.I plan on using this build for Lost Reich and Destroy all monsters or Mighty Monsters games. As those games can involve a lot of smashing and building destruction I worked on customizing a fair number of elements and incorporating magnets and metal into the pieces.

First up I had to work out the scaling to use to get the Capital City down to Z-scale, by a happy coincidence this was fairly easy, basically each 7inch tile was scaled down to 2 inches square and then I recombined 9 of these together to form a new 6inch square. This is just slightly smaller than Z-Scale however they look good on the table. Each tile was also designed such that the road exits on each side are in the middle, the only tiles that don’t respect this rule are the highway pieces but I can live with those being special.

As part of the above tile scaling and creation process, I created several custom tiles; parking lot, street parking and dual lane highway tiles. I created all these at full size so that later if I want to build a full size capital city I can use those elements in the build.

Next up was working out how to join the tiles together along each edge and designing some way of allowing magnets to stick to the tiles. I also wanted to do slightly raised footpath/sidewalks to give a little dimensionality to the tiles. I played around in sketchup with the design until I came up with the below. After that I then did numerous test tiles using different basing materials and glues but didn’t uncover anything to new,  although I did use up a bucket load of time.

The basing material I settled on was PVC foamboard it is much stronger than the regular paper foamboard but extremely tough to cut. I created the little tin circles using a hand sheet metal hole punch and then tapping them flat with a hammer. I probably could have saved some ink by not printing the sidewalks out on the lower pieces but at the time I thought I might have to use the layout before all the sidewalks were ready, but this turned out to not be the case. The spacer pieces I simply created as craftrobo cut files and then cut them from 200gsm card.The edge joiners are simply pieces of flex magnet on the edge of the tiles and I cut up some cheap steel rulers to make joiners.

Each building will have a very thin disc magnet in its’ base to stick it to the board, you can see my first prototype building in the below pictures.  I will do a separate post on the buildings at a later date when I have built some others, as they are also not exactly stock. Here’s a quick picture of the underside of one of the corner sidewalks about to have the washer and metal discs glued into place.

Below is the initial  GIMP layout of the city which I used to make sure I built the right tiles. the city  it’s self is  currently 61cm x 61cm or 2 feet square consisting of 16x6x6 inch tiles. If I had built the tiles at full size this would equate to a gaming table approximately 214cm or 7 feet  square. Later I will figure out some other city layouts and make some additions, one addition I do plan to add is  a city park which I’ll size so I can drop it in were the carpark currently is:

And lastly a few pictures of the finished tiles laid out in the above design, as you can see I did change the design a little from the prototype layout above:

The full impact of the raised sidewalks isn’t really coming through very well in the above photos but they really add a dimensionality to the tiles which the human eye can pick up at a significant distance (at least across the room).

Now I just need to finish building the mechs, buildings and props but those will be posts for another day.

Papercraft Build – Dave Graffam/Thomas Weaver Observatory

I’ve spent the last week working on Dave/Tommyguns Observatory model.  This is a free model but it is full of character and is unique as far as I have found in papercraft terrain. I did make some slight modifications to the model as I was building it, primarily I increased the size of the model by 145%, added an inside and tried my hand at adding some extra detailing to the model. I plan on giving this model to a friend to use as part of his warmachine table layout and I think it should fit in well with the steampunky feel of the Warmachine universe. I added the extra details to the model so it can be used as an objective in a scenario and look a little more special.

Due to the extensive changes I have made to the model I can’t really give you a step by step on what to print and how to replicate what I’ve done but hopefully the below pictures of the model and the comments I’ve made will help if you do wish to try. I will say edge under absolutely everything in black before gluing things in place as this will help cover up miss alignments and small gaps.

First up the telescope it’s self , I cut the end out of the telescope and glued a glass bead into the end of the telescope, I glued the blue end I’d cut out to the bottom of the bead to give a deep blue effect otherwise when you look at the bead you would have just seen the black inside the tube. Other than the clear acetate windows this is the only part I’ve added to the model which is not paper. I did try to make several domed paper parts but they looked terrible. I also printed out the parts twice and cut out bands of wood (doubled up 2 layers of 220 gsm) and glued these around the tubes to add some extra detail, the very end one I increased in width by 100% to add a shroud effect around the glass bead lens.

Under Construction

Completed and Mounted

Next up the base: In GIMP I split the lower walls from the upper dome on the lower side of the metal flange. I then increased the wall height by 6mm (1/4 inch) so I could insert a foam floor later on. Next I added wood texture across the entire inside base. It was a simple matter to print out the lower walls floor and pretty much assemble as normal. Although I cut a dodecagon of foamboard to insert into the floor first and glued the walls to this (triangles on the underside)then dropped in and glued the textured floor on top of this.  I also cut out the windows and doors to enable me to fit them back later on. Once the outside was assembled I cut small segments of foamboard and glued these along the inside of the wall for strength and thickness. I then modified the external plaster texture to fit on the inside of the model to become the inner walls (102% height 90% width). Before gluing the inside in place I cut the window and door holes into the foam inserts then test fit the inside insert and marked were the door and windows would be and cut these out, the inside was then glued in place. I next added some flex steel (turned out to be un-needed) around the top edge and glued it in place and then covered this with a special dodecagon wall topper I made up in GIMP. Last step was to add some acetate windows, hinged door, framed star charts for the inside and window frames on the outside and the base was done.

Outer Walls and Floor in Background

Floor Glued in and Inner Foam Support Added

Finished Base

Next up was the top inside and out, this was a right pain in the neck as I had to design a telescope end and eye piece inside the Observatory. In the end I got a design that fit although I did make one piece slightly to long if I make a second one I will shorten the 2nd main bend a little. Sorry getting a little ahead of myself, assembling the outside was fairly easy, once again I cut out the windows before assembly. I then glued a foamboard dodecagon piece to the inside of the base of the dome approximately matching up with the steel flange graphic on the outside and about 6mmx6mm square (1/4 of an inch). Once this was in place I glued the top together in pairs to keep it symmetrical then glued the pairs into fours and so on until it was glued into the dome shape. I next added some detailing to the top (all double thickness 220gsm card) such as the horizontal wooden beams, the window frames and a cap to the top of the roof to help finish it off. At this point I also glued the acetate windows onto the inside of the dome top.

Outside Glue Up

Finished Outside Top

Onto the dome inside. As I wanted the wooden dome to be thinner than the masonry walls I kept the dome as only a double card thickness. To line it I simply printed the outside again and cut these into individual triangles, reverse scored them cut the windows out and glued them into place, there is a slight bulge on the inside were they cover up the windows. Next I added 6 small (5mm square) magnets to the foam flange and then reprinted the wall topper from the base and glued this to the under side of my foam flange. I likewise duplicated the outside texture and glued this to the inside of the foam flange. I didn’t bother to detail the inside of the dome as it’s almost impossible for someone to look up into the dome while gaming without removing the top and then your focused on the bottom. I did add an inside tube and eye piece to the telescope as mentioned this was a right pain but I finally got the geometry worked out on my third test build.  Unfortunately due to the small windows it’s very difficult to see from the outside but it looks nice when you pull the top of the model. To help hold the top to the bottom and cover any small miss alignments I made up a double wide metal textured piece and glued this on the bottom of the dome, this slides over the base and is a very tight fit (magnets seem to do nothing) if I was to redo the flange I’d put a thickness of card behind the card flange to give a little more play. On the plus side pulling the model apart requires some force so accidentally knocking it apart during gaming would be impossible.

Inside Top Lining

Finished Inside Top

Overall I’m very happy with how the model turned out, it let me try my hand at detailing in paper which although fiddly is no worse than scratch building in traditional materials except no painting and as an added bonus the model is extremely durable/strong due to the added bracing. The extra detail helps make the model pop on the table from a distance.

So why not go and grab some of Dave’s models or Tommygun’s and either build them stock or try detailing one up as a special terrain piece.

Finished and Assembled

Dave Graffam Patrol Boat– Papercraft Build

Dave Graffam has just released a Patrol boat model, basically a small skiff. I needed a break from my terrain building so I put one together. Dave releases all his models as layered PDF’s so you can get quiet a few different looking boats out of the one product. Dave does however include some print and go models ie no layers to tick on and off you just print and build. Unfortunately no GSD’s but there is something soothing about hand cutting a model now and again, I’m always surprised at how enjoyable I find hand cutting stuff.

The Patrol boat is a fairly simple model, there are a couple of free hand curves but nothing to worry about. I was able to cut out all the parts and edge them in about an hour and I had it fully assembled an hour after that. Assuming I can count the model consists of 16 parts, here are mine all cut out and ready to assemble:

I went with a blue theme so that it matched with my Pirate Bear Cog. Once you get all the parts cut out it’s a simple matter of gluing them together, make sure you follow Dave’s instructions as there are a couple of spots were if you glue things out of order you will be reprinting parts 🙂 . Here is my finished patrol boat:

You may have noticed the little piece of string and magnet at the bow of my boat in the above picture. I made one little change and that was to add a small piece of metal to the base of the boat and place a magnet in the mast. This allows me to remove the mast for storage making the boat much easier to store:

It’s a great little boat and I plan on making 2 or 3 more. The only minor issue I have with the design is that the front sail is mounted offset, however I plan on adding a few little tabs to the sail on my next one and gluing these inside the mast through some slots I’ll cut , similar to how the rudder is mounted.

It’s a great little boat and well worth the $3.95 price tag Dave has on it.

I better get back to building the WWG terrain I’m doing.

WorldWorksGames Ruined Keep (Custom) – Papercraft Build

I’ve spent the past 4 -5 days working on some Worldworksgames terrain. Primarily I’m working on a largish Tlinx Hinterland (pending release)and Mayhem city layout. I will make separate posts for both those builds. To go with the Hinterland (out door type terrain) I wanted some drop down tiles. Pieces of terrain that stand independent of the surrounding game board which can be used with my Hinterland table or if we need can be scattered onto a more conventional tabletop. I’ve also converted Tlinx to use magnets but I’ll detail that more in it’s own post later on.

This is my first standalone tile a small ruined keep, which has turned out to be significant amount of work, a lot more than I originally intended (hence the lack of turtle miniatures 🙂 ). The additional work was mostly caused by the fact I had to convert Castleworks ultimate (CWU) to the Tlinx format or at least those bits I wanted to use.

First up I cut a base out of depron (straight foam), using my hotwire cutter to this I added some sloped/beveled edges to give the appearance of the ruin sitting on a slight rise. Once the foam was cut I inlaid some metal mount points into the tile and then covered the tile edges in hinterland grass texture. For the top of the base piece I created a custom graphic which combined elements of Castleworks Ultimate and Hinterland. The two texture types fit together very well which is a credit to the quality of work the WWG crew put out:

Depron Base with mounts inserted

(Yes those are old craftknife ends 🙂 )

Base Ready to Go

Next I started converting CWU textures to the Tlinx layout, I had to do walls, mounting posts and create a custom 1st floor destroyed/damage tile. I ended up creating a few other custom parts such as a “3 inch through wall” it hooks through the mid sized post and pokes out the other side to create a more solid destroyed wall effect. I also bashed some parts using Streets Of Legend-Destroyed as a guide but replacing the textures with CWU. Below you can see all the parts laid out and the through walls:

Through Walls


Laid out ready for assembly

The above may not look like a lot of work, but it took a fair amount of time to create those pieces. The good thing about Tlinx is it’s very flexible and with the parts I’ve created I could easily build a none destroyed keep. The downside is it’s very flexible so when you want to change elements or use different textures you have to convert a minimum number of parts so whether it’s one building or 10 the workloads about the same. Still I’m going to do a second stand alone outpost but undamaged and I wont need to bash any parts (okay maybe 1-2) so it’ll be much quicker. Here’s some pictures of the keep from 4 angles fully assembled and ready for gaming:

I know building the above sort of defeats the purpose of Tlinx as it’s not very flexible but for me being able to disassemble the whole thing and pack it easily for transport makes it well worth the while. Packing and carting air around with you is no fun 🙂

A few points of note, I’m using very small magnets 6mmx1mm these are plenty strong enough to hold the posts and building up, If I find I’m having problems I’ll drop a 2nd magnet on top of the first. The metal piece’s I’m now using (base used old craftknife ends) are square shade cloth holders I cut them into 4 or 2 depending on whether I’m doing corners or mid points, these save me from any polarity issues I might have with magnet to magnet joins, they also allow me to adjust the post locations a little if I need to (read build inaccuracies 🙂 ), I’ll cover this a bit more in later post :).

If you often travel for gaming or even just have limited storage space check out Tlinx terrain across at WWG :).


Project Status


WWII Project First Release

80%


B-tech Buildings Five

20%


Design Victorian era City

15%


Something Different

5%


Enter your email address to follow this blog and receive notifications of new posts by email.

Join 110 other subscribers

Content Released Under

Creative Commons License
This work is licensed under a Creative Commons Attribution-NonCommercial 3.0 Unported License.
Please Attribute to Sirrob01 with a link back to my blog

%d bloggers like this: