Posts Tagged 'Song Of Blades And Heroes'

Snow Tundra Tiles/Terrain

Snow Tundra Terrain Tiles

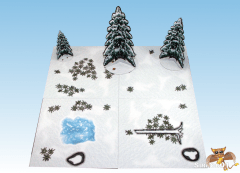
The Cardboard Warriors forum hoard 104 was Xmas Wars and as I’ve always wanted to try my hand at creating some terrain I thought some Snow Tundra tiles would be a nice start. It turned out to not be as easy as I hoped as getting some form of texture into a white snow background is very challenging.

First up I sorted through my skiing photos looking for a good snow texture, unfortunately real snow when used as a texture looks very boring basically you may as well just go and cut out 6 inch squares from plain white card. So I took a segment of particularly interesting textured snow from one of my photos, duplicated it and then bump mapped and played around with the colours until I got a base texture I was pretty happy with. I then added an overlay of irregular white shapes to represent blown snow drifts and then finally placed on some rocks, logs, grass tops and a frozen pond (sorry no river it was beyond me, plus no time). I’m fairly happy with how the tiles turned out although the shadows around the rocks didn’t really work the way I wanted but overall they look good on the table. I turned the whole thing into a layered PDF and with the bits I’ve put in you can get about 8-9 fairly unique tiles.

Snow Tundra Terrain TilesReady for Xmas Wars miniatures to be deployed

I also put together a quick snow covered tri-fold pine tree, I changed the colour a little on the tree so there is a green/green tree and blue/green tree in 3 sizes; 5 3/4, 4 3/4 and 3 inch tall versions. I only had time to put together one tree texture so all the versions use the same texture but I’m very happy with how they turned out as I don’t think there are any snow covered pine trees out there in the war gaming paper tree world. I did make the little 1/3 base circle bits separate so if you like you can easily integrate my trees with one of the commercial snow terrain sets around the place.

Snowy Paper Pine Trees

Three Sizes of Snow Covered Pine Trees

I’ll be including my Snow Tundra tiles in hoard 104 but they are available below  for download as well. I’ve included both a Cameo and SD cutfiles,  Unfortunately I cant test the Cameo file so use with caution, if they do work okay please let me know in the comments below.

The below is a zip file but I’ve had to rename it as an odt so right click save as and then rename the extension .zip once downloaded.

All Zipped – Sirrob01 Snow Tile Final

I’ve only put the cutfiles in the zip as I have rename those anyways but below are just the PDF’s.

PDF – Snow Tiles and Pine Trees

PDF Instructions – Pine Tree Instructions

Enjoy 🙂

Papercraft Build – Dave Graffam/Thomas Weaver Observatory

I’ve spent the last week working on Dave/Tommyguns Observatory model.  This is a free model but it is full of character and is unique as far as I have found in papercraft terrain. I did make some slight modifications to the model as I was building it, primarily I increased the size of the model by 145%, added an inside and tried my hand at adding some extra detailing to the model. I plan on giving this model to a friend to use as part of his warmachine table layout and I think it should fit in well with the steampunky feel of the Warmachine universe. I added the extra details to the model so it can be used as an objective in a scenario and look a little more special.

Due to the extensive changes I have made to the model I can’t really give you a step by step on what to print and how to replicate what I’ve done but hopefully the below pictures of the model and the comments I’ve made will help if you do wish to try. I will say edge under absolutely everything in black before gluing things in place as this will help cover up miss alignments and small gaps.

First up the telescope it’s self , I cut the end out of the telescope and glued a glass bead into the end of the telescope, I glued the blue end I’d cut out to the bottom of the bead to give a deep blue effect otherwise when you look at the bead you would have just seen the black inside the tube. Other than the clear acetate windows this is the only part I’ve added to the model which is not paper. I did try to make several domed paper parts but they looked terrible. I also printed out the parts twice and cut out bands of wood (doubled up 2 layers of 220 gsm) and glued these around the tubes to add some extra detail, the very end one I increased in width by 100% to add a shroud effect around the glass bead lens.

Under Construction

Completed and Mounted

Next up the base: In GIMP I split the lower walls from the upper dome on the lower side of the metal flange. I then increased the wall height by 6mm (1/4 inch) so I could insert a foam floor later on. Next I added wood texture across the entire inside base. It was a simple matter to print out the lower walls floor and pretty much assemble as normal. Although I cut a dodecagon of foamboard to insert into the floor first and glued the walls to this (triangles on the underside)then dropped in and glued the textured floor on top of this.  I also cut out the windows and doors to enable me to fit them back later on. Once the outside was assembled I cut small segments of foamboard and glued these along the inside of the wall for strength and thickness. I then modified the external plaster texture to fit on the inside of the model to become the inner walls (102% height 90% width). Before gluing the inside in place I cut the window and door holes into the foam inserts then test fit the inside insert and marked were the door and windows would be and cut these out, the inside was then glued in place. I next added some flex steel (turned out to be un-needed) around the top edge and glued it in place and then covered this with a special dodecagon wall topper I made up in GIMP. Last step was to add some acetate windows, hinged door, framed star charts for the inside and window frames on the outside and the base was done.

Outer Walls and Floor in Background

Floor Glued in and Inner Foam Support Added

Finished Base

Next up was the top inside and out, this was a right pain in the neck as I had to design a telescope end and eye piece inside the Observatory. In the end I got a design that fit although I did make one piece slightly to long if I make a second one I will shorten the 2nd main bend a little. Sorry getting a little ahead of myself, assembling the outside was fairly easy, once again I cut out the windows before assembly. I then glued a foamboard dodecagon piece to the inside of the base of the dome approximately matching up with the steel flange graphic on the outside and about 6mmx6mm square (1/4 of an inch). Once this was in place I glued the top together in pairs to keep it symmetrical then glued the pairs into fours and so on until it was glued into the dome shape. I next added some detailing to the top (all double thickness 220gsm card) such as the horizontal wooden beams, the window frames and a cap to the top of the roof to help finish it off. At this point I also glued the acetate windows onto the inside of the dome top.

Outside Glue Up

Finished Outside Top

Onto the dome inside. As I wanted the wooden dome to be thinner than the masonry walls I kept the dome as only a double card thickness. To line it I simply printed the outside again and cut these into individual triangles, reverse scored them cut the windows out and glued them into place, there is a slight bulge on the inside were they cover up the windows. Next I added 6 small (5mm square) magnets to the foam flange and then reprinted the wall topper from the base and glued this to the under side of my foam flange. I likewise duplicated the outside texture and glued this to the inside of the foam flange. I didn’t bother to detail the inside of the dome as it’s almost impossible for someone to look up into the dome while gaming without removing the top and then your focused on the bottom. I did add an inside tube and eye piece to the telescope as mentioned this was a right pain but I finally got the geometry worked out on my third test build.  Unfortunately due to the small windows it’s very difficult to see from the outside but it looks nice when you pull the top of the model. To help hold the top to the bottom and cover any small miss alignments I made up a double wide metal textured piece and glued this on the bottom of the dome, this slides over the base and is a very tight fit (magnets seem to do nothing) if I was to redo the flange I’d put a thickness of card behind the card flange to give a little more play. On the plus side pulling the model apart requires some force so accidentally knocking it apart during gaming would be impossible.

Inside Top Lining

Finished Inside Top

Overall I’m very happy with how the model turned out, it let me try my hand at detailing in paper which although fiddly is no worse than scratch building in traditional materials except no painting and as an added bonus the model is extremely durable/strong due to the added bracing. The extra detail helps make the model pop on the table from a distance.

So why not go and grab some of Dave’s models or Tommygun’s and either build them stock or try detailing one up as a special terrain piece.

Finished and Assembled

Turtle Clan – Paper Miniatures

I’ve  finished the Turtle Clan, which means I can sort of play through to the end of scenario 10 in Song of Fur and buttons, I really need to get those picnic bears done.  I haven’t added any extra troop types this time although there is an extra musician. I haven’t designed any flags but I might add a flag or two later on.

On with the show as they say, here are the pictures of the Turtle/Terrapins:

Turtle Command with Musicians


Terrapin Spears


Turtle Rifle


Turtle Bow


Turtle Snipers


Turtle Giants


Turtle War Anklyosaur


The files are below, you will need to rename the GSD files after you download them from .odt to .gsd(feel free to grab some bases from Onemonks site):

Turtle Clan Page 1 – PDF

Turtle Clan Page 1 – GSD

Turtle Clan Page 2 – PDF

Turtle Clan Page 2 – GSD

Turtle Clan Page 3 – PDF

Turtle Clan Page 3 – GSD

I’m going to be taking a little bit of a break from creating miniatures for fur and buttons as I need to get some terrain built. At the moment I have no gaming board to play Fur and Buttons on :). I will be coming back to these miniatures it just maybe 3-4 weeks before I get a chance to work on them again :).

Green Tree Frog Clan – Paper Miniatures

I finished the Green tree Frog Clan today this means I’ve finished up enough miniatures to play through to the end of scenario 9 in Song of Fur and buttons.  I haven’t added any extra troop types this time although there are two extra musicians. I did create flags for the standard bearer but I don’t like the way they look so I didn’t glue one to my standard bearer but left them on the page as I thought someone might still get some use out of them :).

I have some idea’s and thoughts for some other troop types later on which I’ll add once I’ve finished all the mini’s I need to finish the  Song of Fur and buttons scenario’s. Below are the pictures of the Green Tree Frog Clan:

Command Group: Standard Bearer, Major and Hero


Spearfrogs


Turtle Crusher


Musketog’s or Musket Frogs 🙂


Musicians: Piper, Tambourine Player and Drummer


Toad Rider Cavalry


Onemonkeybeau’s daughter across on the cardboard-warriors forum asked for some Pink frogs. So I did I full set of re-colours to pink of the above frogs:

I learnt a lot doing the re-colours in Inkscape. The biggest issue was that when I changed the gradient fill colours in Inkscpae to the pink scheme I had to also change all the line colours, this was much more time consuming as I had to click every object and adjust the line colour. In future I’ll set all the line colours using a gradient with the same colour at both ends to make re-colours much faster and easier. I have now set the above frog files up in that manner and I can produce any colour I like very quickly :).

The files are below, as usual you will need to rename the GSD files after you download them (feel free to grab some bases from Onemonks site):

Green Tree Frog Page 1 – PDF

Green Tree Frog Page One – GSD

Green Tree Frog Page 2 – PDF

Green Tree Frog Page Two – GSD

Green Tree Frog Page 3– PDF

Green Tree Frog Page Three – GSD

Pink Versions:

Pink Tree Frog Page 1 – PDF

Pink Tree Frog Page 2 – PDF

Pink Tree Frog Page 3 – PDF

I’ll get the turtles laid out as quickly as I can, until then have fun :).

Fat Dragon Games Medieval Cog – Papercraft Build

To go with the pirate bears I really wanted some sort of ship. It’s never explicitly called for in the fur and buttons scenario’s but I thought it would look cool. I didn’t really want to design and build something myself at this stage and as I knew of several card model ships around the net I had a look at what was available. I eventually settled on the Fat Dragon Games medieval cog.

I ended up making a few modifications and changes to the Cog (I can’t leave anything stock 🙂 ). The first change I made was to cut a 1nch length out of the hull, I wanted to shorten the ship by 2 inchs but wasn’t sure what sort of impact that would have on the overall design so settled on a safe 1 inch shorter.

While I had been checking around for other card ships I had stumbled across this (One Picture below):

I really liked the rear stern-castle design so I decided to modify the stern-castle on the FDG Cog to emulate the above. First up I worked out the length of the rounded walls and bashed these from the existing stern-castle walls. I was able to keep the front wall of the stern castle as it was. Next was to design the floor insert for the floor of the cabin and glue it into place. Once this was done the stern-castle was glued to the rear deck:

Next was the angled top for the rounded stern-castle.  I made the topper 7inchs wide at the front approximately 6inchs long down each side and about 3 inchs across at the rear. As these were all straight piece’s bashing them up from the existing stern-castle top was very easy. The worst mistake I made was to use matte board to reinforce the floor of the stern-castle, matte board and PVA glue don’t like each other at all and the floor cupped quiet badly. It’s not very noticeable in the picture:

I am pretty happy with how the rounded Stern-castle turned out. Next I added a removable crows nest so I could still swap the sail over if I wanted, this turned out to be very easy. The crows nest is approximately 3×3 inchs but shaped like an Octagon, the walls are modded from the fore-castle walls. A small hole cut in the middle lets me slide it down the mast and it holds in place very well:

Last mod I made was to add the Bear skull and crossbones to the sail, but you can see that in the finished pictures below:

Even though it’s a bit the wrong century and my printer was playing up hence all the interesting colour variation, Captain Longfur and his pirates are very happy with their new Cog:

I seem to be able to share the bashed files, big thanks go’s to Tom for allowing this with his files. You’ll need to head over to Fat Dragon Games to buy the cog first so you can make use of the files. All the modified images  inside my files remain the property of Fat Dragon Games:

Forum Board Link – Yep you’ll need to login to get them 🙂

For anyone needing a smallish vessel for there gaming needs you can’t go past the FDG Cog.

Anyways back to laying out those frogs 🙂

Pirate Bears – Paper Miniatures

I’ve finally finished the Pirate bears that I need so I can finish Scenario 7 in Song of Fur and buttons. It’s been bit of long time between posts but I’ve been working on several things in tandem which has slowed me down a little but less risk of project burn out. I have expanded the troop types a little so that in the long term I can use the pirate’s as a general full faction for Song of Blades and Heros. I haven’t had a chance to stat up all the additional troop types yet so for the moment no stats but I will get to it.

I have tried as much as possible to give the pirates a ragtag appearance, so they are equipped with different looking muskets and clothes. I’m planning on using the fanciest sawshbucklerette (the one above on left) as a female pirate captain if I need one. I was a little stuck for musicians in the end the banjo player and Sea Shanty singer worked out unfortunately the Harmonica player didn’t look like anything. A picture is worth a thousand words as they say:

1st Mate Shagpile, Captain Longfur and a Banner bearer

Three Swashbucklerettes

Banjo player and a Sea Shanty Singer

Hulking Brutes, wielding small cannons

Cutlass Pirates

Musket Pirates

With these out of the way I’ll get onto the Frogs and Turtles, I’ve finished drawing both sets I just (can’t believe I said just 🙂 ) need to lay them out, create the GSD files and then test build them all. The files are below, as usual you will need to rename the GSD files after you download them (feel free to grab some bases from Onemonks site):

Pirate Bears Page 1 – PDF

Pirate Bear Page One – GSD

Pirate Bears Page 2 – PDF

Pirate Bear Page Two – GSD

I’ll get those frogs done asap 🙂

Gaming Weekend

This is not exactly a project but it was a fun wargaming weekend and it is what a lot of my projects work towards. I also used a significant amount of time preparing for the weekend over the past 10 days.  As we had a long weekend I headed to a friends place for 2 days of wargamming slaughter (mostly me being slaughtered).

First up was Defiance vital ground, which is a skirmish based  sci-fi game which you can use any models for. So the lego clone army was broken out for this game although I had managed to lose my troop list and had to use the generic star marines list. We had an 4000pt army on each side so I got to field a TX-130 for the first time as well as a couple of AT-PT’s and of course some scout and regular clone troopers. I don’t have any scout helmets so the clone troopers with no helmets represent scouts.

After the glory and excitement of the setup I proceeded to get my butt handed to me  by the opposing UNE force.  I did have one very nice maneuver were I killed of about 8 of the UNE infantry with an AT-PT but after that it was all downhill. Some lucky shots by some UNE infantry took out my AT-PT’s. Normally in defiance destroying  vehicles with infantry weapons is very very difficult so to have both of them destroyed by infantry was pretty unlucky. The Tx-130 likewise got unlucky losing it’s 2 best weapons in the first point of damage it took. After that it was all downhill, a couple of pictures from deployment:

(Sorry about photo quality)

After the UNE troops had finished giving the clone army a pasting they moved on to issue an even more humiliating defeat to the Space thugs (Orks). Making the UNE army the undefeated army of the weekend. Lessons learnt from the above make sure your infantry have some kind of anti-vehicle weapons.

We also played a giant game of Songs of Blades and Hero’s. This was one giant game of 300pts a person and 6 factions we had Barbarians, Kobolds+Wyvern, Goblins 1, Goblins 2, Adult dragon + Rat wolverine’s and Lizardmen.  We actually made the table a little big with about 6footx6foot playing area. Most of the players were learning as they played and I forgot a few rules which made for some interesting situations.  The game was ended in the end by adding an impromptu goal as we had to get up early the next day to clean the location and drive back home.  The Adult dragon was virtually unstoppable although it had some issues actually delivering a killer blow, the rats with it had no such problems dishing a quiet a significant amount of death.

The first goblin warband  dealt a significant amount of death to the lizardmen before being caught between the Wyvern/Kobold and the remaining lizardmen and being almost wiped out. Goblin2 band kept the dragon and rats busy although ii cost quiet a number of goblin warriors to do so. The barbarians quit the field early on due to problems with their general (player had to go home). Due to the size of the board and some very unlucky rolling the poor kobolds spent the whole time trying to move into combat range. Fun was had by all even with the rules mistakes and board size issues. A few pictures:

Goblin Warband 2 facing the Dragon

Goblin Warband1 facing the Lizardmen (Wyvern moving in, in background)

Dishing out and receiving some pain

Wyvern on oneside, Lizardmen on the other…time to run

It was great weekend and hopefully I’ll be able to do another one soon by then I hope to re-write my clone army list for defiance, My Onemonk marines will be done and I’ll have my WWG hinterland layout ready to go as well as some more SOBH warbands + all my frog/bear/turtle warbands.

I better get back onto those Pirate bears now 🙂

Native Bears – Paper Miniatures

Here are the next set of paper miniatures for Song of fur and buttons. Native bears, Oviraptors , Gallimimus dinosaurs and some egg markers. With these you can do the scenarios in Song of Fur and buttons up to the sixth one.

I based the native bears on the Koala’s and added a few extra troop types, so that later on I can use them as a more full faction for regular song of blades and hero’s games. First up the dinosaurs, I didn’t do nest marks for the Gallimimus but did do egg markers as these seemed more useful as they can be dropped if needed:

Next are the Oviraptors slightly smaller than the Gallimimus but very much more colourful, oddly enough most of the reference pictures I found for Oviraptors had them coloured brightly and oddly:

For the native bears I added a banner bearer, musicians and some Boomerang throwers. No cavalry for these guys but that seemed not in the spirit of the faction:

Native Spear

Native Elite

Native Ambushers

Native Boomerang Throwers

Native Musicians and Standard Bearer

Native Leaders(Sulpher Crest, Hero/Leader, Stitch Doctor)

The Elementals For the Stitch doctor to Summon

Here are the extra stats for the extra troop types:

Native Leaf Bearer – Troop
Points 26 Quality 3+ Combat 2
Special Rules: Forester, Standard Bearer

Native Musician Rattler – Troop
Points 16 Quality 3+ Combat 1
Special Rules:
Forester, Music

Native Musician Piper – Troop
Points 22 Quality 3+ Combat 1
Special Rules:
Forester, Music, Stealth

Native Boomerang Thrower – Troop
Points 33 Quality 4+ Combat 3
Special Rules: Forester, Shooter: Medium

I managed to work out some better settings on my camera so the pic’s are coming out slightly clearer. I basically put a homemade diffuser over the flash so I can use the flash without washing out the mini’s to much. This is in addition to the normal lightbox, it seems to have improved the pic’s a fair bit.

The files are below, as usual you will need to rename the GSD files after you download them (feel free to grab some bases from Onemonks site):

Gallimimus One Final – PDF

Gallimimus One – GSD

Oviraptor One Final – PDF

Oviraptor One – GSD

Bear Native One Final – PDF

Bear Native One – GSD

Bear Native Two Final – PDF

Bear Native Two – GSD

Bear Native Three Final – PDF

Bear Native Three -GSD

I’ll get to work on the pirate bears :).


Colonial Bears – Paper Miniatures

I’ve been working on some paper miniatures for Song of fur and buttons. First up are the Colonial bears and the Compsognathus dinosaurs, I also did some honey pot markers. I did these in a different style to the normal onemonk style a more cartoon chibi style. I found them much easier to draw as the style seems to fit more to my naturally inclined drawing style :).

First up are the Colonial Bears, I’ve done the 3 main hero’s plus an extra female heroin. Next up came the Bear infantry carrying rifle muskets and lastly the Bear special infantry. I didn’t do a Colonial Captain but I did one of each of the infantry types with mustache which I’m going to use as Colonial Captains. Below are pictures of each troop type:

Fursworth,  Cuddlesbury, Paws, Fluffyfur

Lady Fluffyfur was added primarily for my wife as she tends to like to play female heroin’s. I see her as the daughter of an important Colonial Bear who is always following our three intrepid bear hero’s even when she’s not supposed to be and helping them out when she can.  Hopefully others will enjoy using her as well, the stats to play her are below:

Lady  Penelope Fluffyfur – Personality
Points 80  Quality 3+ Combat 3
Special Rules: Hero, Acrobat, Fearless Shooter: Medium


Bear Infantry

Bear Special Infantry

I’m going to add a few more troop types once I’ve finished off all the other troops to play fur and buttons through to the end.  Next up are the Compsognathus dinosaurs and honey pot markers:

The above miniatures  cover the first two scenarios in the fur and buttons book. The files are below, as usual you will need to rename the GSD files after you download them.

Colonial Bear One – PDF

Colonial Bear One – GSD

edit: I’ve relaid out the compsognathus and have made 6 honey pots fit on the sheet:

Compsognathus One Improved – PDF

Comp One Imp – GSD

I’ve left the originals below for completeness but the above should be used 🙂

Compsognathus One – PDF

Compsognathus One – GSD

I’ll finish up the remaining troop types needed to play the scenario’s through over the next week or so. A big thanks go’s out to Ganesha Games and Ben who developed and released Fur and buttons as it really is a fun setting for Song of Blades and Heroes.


Project Status


WWII Project First Release

80%


B-tech Buildings Five

20%


Design Victorian era City

15%


Something Different

5%


Enter your email address to follow this blog and receive notifications of new posts by email.

Join 110 other subscribers

Content Released Under

Creative Commons License
This work is licensed under a Creative Commons Attribution-NonCommercial 3.0 Unported License.
Please Attribute to Sirrob01 with a link back to my blog