Posts Tagged 'RPG'

Papercraft Build – Onemonk Hybrid Cannoneer

Onemonk Chimera Hybrid Cannoneer Small
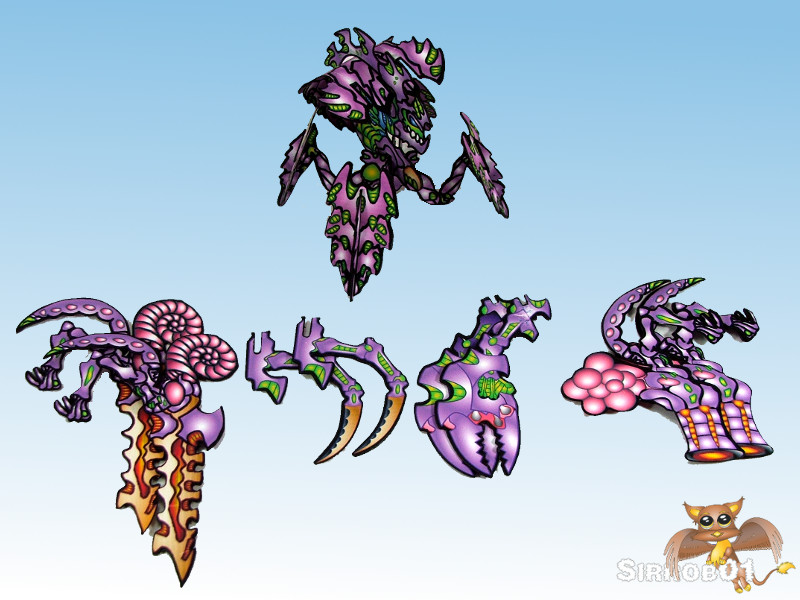
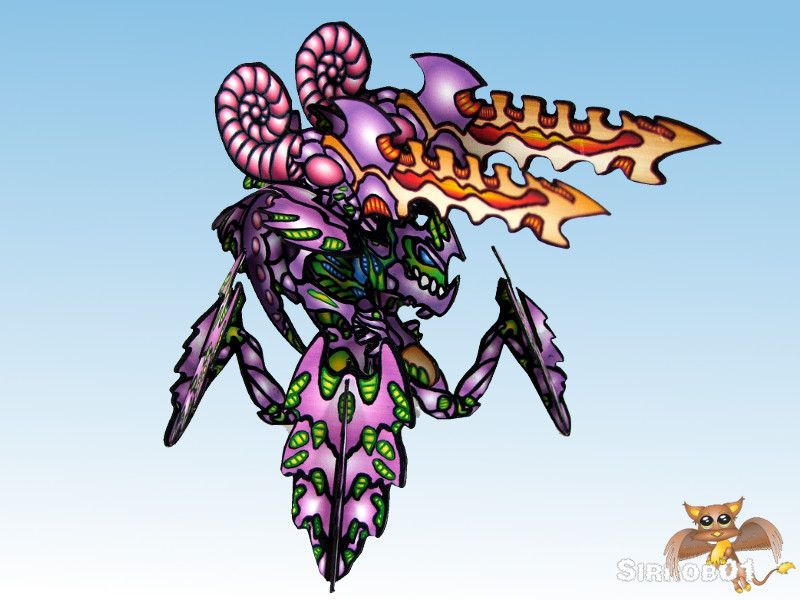
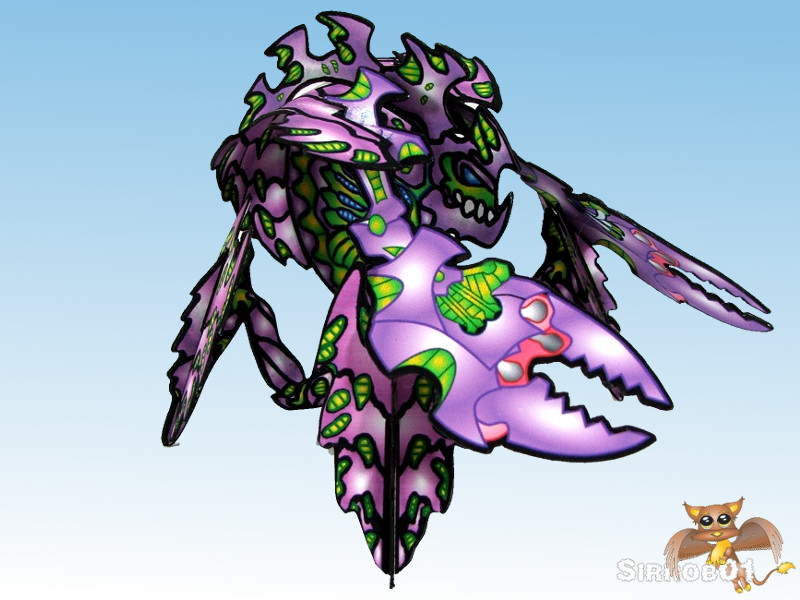
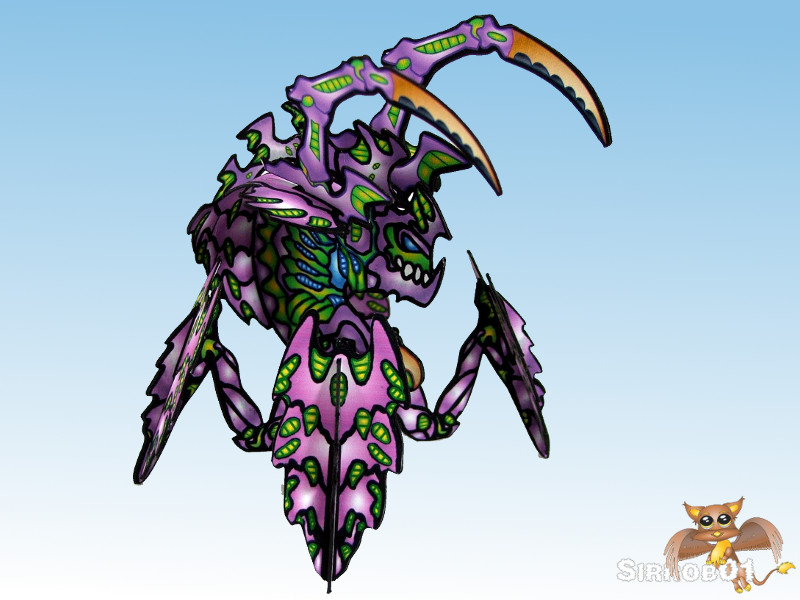
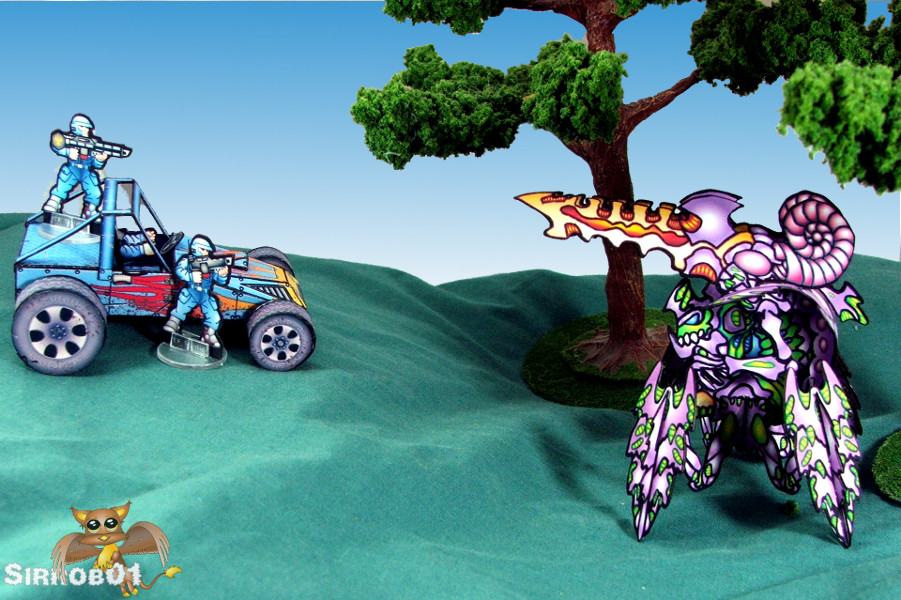
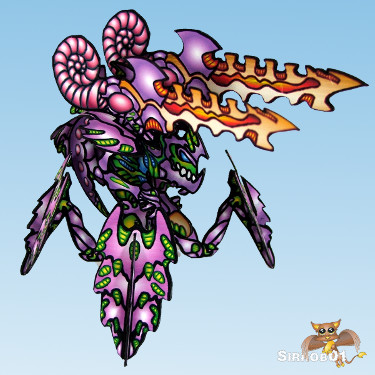
The onemonk site has not had a new release in a while but two days ago the Chimera Hybrid Cannoneer was released.  For those who missed it  Squirmydad took over custodianship of the onemonk website and all the content 4-5 months ago. Squirmydad has spent the past few months re-releasing all the old sets.  Now  the back catalog is back up he has released the first new set the Chimera Hybrid Cannoneer. Many of us have been waiting a longtime for this model ever since Onemonk showed some concept art 2-3 years ago… hmm maybe longer. I needed a break from building Flipit Black X troopers (25 waiting for arms) so I decided to build a Cannoneer.

Onemonk Chimera Hybrid Cannoneer all

The Cannoneer is a large model, think of it as either a light vehicle or small mech rather than as a single human sized model. The Cannoneer comes with four different weapons an Acid Lobber (right end), Spike Cannon (Left end) and two different types of claws (middle). These all mount to the top edge of the carapace, although I think I’ll be using the claws more for mods or possibly mount them down lower.

Onemonk Chimera Hybrid Cannoneer Spike Cannon

Onemonk Chimera Hybrid Cannoneer Acid Lobber

You can mount the weapons permanently or the Spike Cannon and Acid Lobber fit tightly enough that you can leave them as swappable weapon options (what I’ll be doing). I will be spraying mine with clear matte varnish so that the printed surface doesn’t take to much wear when sliding them on and off.

Onemonk Chimera Hybrid Cannoneer Claws Two

Onemonk Chimera Hybrid Cannoneer Claws One

Once I finished wrestling with my printer (its getting a little old 🙂 )the assembling of the model wasn’t difficult but it did take some time, this is fine if you remember the model equates to a light mecha or vehicle rather than a single  humanoid trooper. The Chimera Cannoneer will certainly help round out the Chimera Brood as they have been sorely lacking some heavier units/fire support. Unfortunately all the other Chimera models I had built were destroyed when the roof leaked in our back sun room so I’ll have to rebuild all the others from scratch again. This will be after the Black X army and the Orcs I’m working on, so many fun things so little time.

Onemonk Chimera Hybrid Cannoneer Ambush

If your looking for a Xenomorph styled Army but don’t want figure flats or are willing to spend a little more time building up the 2.5d Chimera Brood, drop across to RPGnow and pick up the whole set and then grab the Chimera Hybrid Cannoneer. I’m pretty sure you wont be disappointed and the sets even though a little old  (except the Chimera Hybrid Cannoneer) are still great value for money.

The mind is everything. What you think you become.  – Buddha

Snow Tundra Tiles/Terrain

Snow Tundra Terrain Tiles

The Cardboard Warriors forum hoard 104 was Xmas Wars and as I’ve always wanted to try my hand at creating some terrain I thought some Snow Tundra tiles would be a nice start. It turned out to not be as easy as I hoped as getting some form of texture into a white snow background is very challenging.

First up I sorted through my skiing photos looking for a good snow texture, unfortunately real snow when used as a texture looks very boring basically you may as well just go and cut out 6 inch squares from plain white card. So I took a segment of particularly interesting textured snow from one of my photos, duplicated it and then bump mapped and played around with the colours until I got a base texture I was pretty happy with. I then added an overlay of irregular white shapes to represent blown snow drifts and then finally placed on some rocks, logs, grass tops and a frozen pond (sorry no river it was beyond me, plus no time). I’m fairly happy with how the tiles turned out although the shadows around the rocks didn’t really work the way I wanted but overall they look good on the table. I turned the whole thing into a layered PDF and with the bits I’ve put in you can get about 8-9 fairly unique tiles.

Snow Tundra Terrain TilesReady for Xmas Wars miniatures to be deployed

I also put together a quick snow covered tri-fold pine tree, I changed the colour a little on the tree so there is a green/green tree and blue/green tree in 3 sizes; 5 3/4, 4 3/4 and 3 inch tall versions. I only had time to put together one tree texture so all the versions use the same texture but I’m very happy with how they turned out as I don’t think there are any snow covered pine trees out there in the war gaming paper tree world. I did make the little 1/3 base circle bits separate so if you like you can easily integrate my trees with one of the commercial snow terrain sets around the place.

Snowy Paper Pine Trees

Three Sizes of Snow Covered Pine Trees

I’ll be including my Snow Tundra tiles in hoard 104 but they are available below  for download as well. I’ve included both a Cameo and SD cutfiles,  Unfortunately I cant test the Cameo file so use with caution, if they do work okay please let me know in the comments below.

The below is a zip file but I’ve had to rename it as an odt so right click save as and then rename the extension .zip once downloaded.

All Zipped – Sirrob01 Snow Tile Final

I’ve only put the cutfiles in the zip as I have rename those anyways but below are just the PDF’s.

PDF – Snow Tiles and Pine Trees

PDF Instructions – Pine Tree Instructions

Enjoy 🙂

Papercraft Build – Sanity Studios: Orcs

I’ve built quiet a number of  Sanity Studios paper miniatures, so I thought it was time I did a review of one of their sets so I picked latest set. They have just released a very nice set of Orcs which is the first set in there Green tide army. These are the more modern take on Orcs that we have all come to expect when someone says Orc, ugly, brutish with green skins. For those who are unaware Sanity Studio’s has a set of tabletop rules to go along with their paper miniatures called Bellicose, I’ll probably do a review on rules in a separate post later on. To save me some space you can read about comparable scaling in this post. I will just mention that the Orcs stand a little taller than a Sanity Studio’s human, approximately 30mm to the eyes.

There are a total of 10 unique Orcs in the set with an additional 3 which are a mirror of the first 3 so your not wasting paper when you print them off (a nice touch).  This gives you 13 orcs across two pages. Additionally there are 3 skin tones available for each Orc, Green, Dark green and Olive. This means you can print of the pages 3 times and have 39 Orcs that are all slightly different.

Sanity Studios Orc Skin Tones

The first page contains 6 unique Orcs, wielding a variety of weapons, shields and armour. The poses are very dynamic and really convey a sense of movement in each of the miniatures. All the miniatures are very good on this first page with my favorites being Orc3 and Orc6, my least favorite is Orc2. The photo below shows the 6 Orcs in stock Green skin:

Orc1, Orc2, Orc3, Orc4, Orc5, Orc6

The 2nd page contains 4 unique Orcs and 3 mirrored Orcs (1,2 and 4), for 7 in total, the poses are likewise very dynamic across this page. My favorite from this page is Orc8 with Orc7 running a close second, I’m going to pick on Mirrored Orc2 as my least favorite. The photo below shows the 7 Orcs in stock Green skin:

Orc8, Orc7, Orc9, Orc10, 1Cro, 2Cro , 4Cro

As you can see from the above pictures the Orcs are coloured/shaded differently to David Okums work. David goes for a more comic book cell shaded look for his mini’s were as Labrat from Sanity Studios colours/shades  similar to how you would have if you were painting a metal/plastic Orc miniatures. Both styles work well on the table but I have to admit when placed side by side on the table the Sanity Studio’s mini’s do seem to “pop” a little more, but this could just be my own personal preference seeping through as they both look good even at longer distances, either way your not going to go wrong picking up work from either artist.

Sanity Orcs vs Okums Elves

The Orc’s come with a premade craftrobo/silhouette  cut file so if you have one of those cutters it’s very quick to go from pdf to a couple of units of Orcs. Unfortunately an optional Cameo layer was not included but this can be addressed using a ruler and black pen. Handcutting will be a little slower, as you can see from the above pictures the Orcs have quiet a few small shapes protruding off them which increases the time it takes to cut them out. The added detail does mean the Orcs have a better overall impact on the table.

At the moment these Orcs would be great for populating a warband for a skirmish level war game eg SoBH (this will be one of my uses). They’d also be great for a GM to use in  a dungeon for a role playing game. There’s not quiet enough to populate up a full fantasy Orc army but I know Labrat has some goblins in the works which will then make these much more usable for larger army wargames. I know from reading the Bellicose rules (were these minis are intended to be used) that in the future Sanity Studios/Labrat will be working on several other additions for the Orc army such as:

  • Goblins
  • Goblin Pedal tank
  • Hobgoblins
  • Ogres
  • Shaman
  • Orc Warlord

No idea when they will be available but Sanity Studios has been filling out there troop roster for 24-36 months now so I’m fairly confident we’ll see most of the above at some point.

The Orc set is $3.95 which is good value for money, you don’t get as many different Orcs as David puts in his sets but David appears to be the exception rather than the rule when it comes to number of paper miniatures in a release. These Orcs are also more what people think off when they think Orc so for myself they are an excellent set/instant buy and lastly and most importantly you can never have to many Orc’s :).

Have fun gaming :).

Papercraft Build – Dave Graffam/Thomas Weaver Observatory

I’ve spent the last week working on Dave/Tommyguns Observatory model.  This is a free model but it is full of character and is unique as far as I have found in papercraft terrain. I did make some slight modifications to the model as I was building it, primarily I increased the size of the model by 145%, added an inside and tried my hand at adding some extra detailing to the model. I plan on giving this model to a friend to use as part of his warmachine table layout and I think it should fit in well with the steampunky feel of the Warmachine universe. I added the extra details to the model so it can be used as an objective in a scenario and look a little more special.

Due to the extensive changes I have made to the model I can’t really give you a step by step on what to print and how to replicate what I’ve done but hopefully the below pictures of the model and the comments I’ve made will help if you do wish to try. I will say edge under absolutely everything in black before gluing things in place as this will help cover up miss alignments and small gaps.

First up the telescope it’s self , I cut the end out of the telescope and glued a glass bead into the end of the telescope, I glued the blue end I’d cut out to the bottom of the bead to give a deep blue effect otherwise when you look at the bead you would have just seen the black inside the tube. Other than the clear acetate windows this is the only part I’ve added to the model which is not paper. I did try to make several domed paper parts but they looked terrible. I also printed out the parts twice and cut out bands of wood (doubled up 2 layers of 220 gsm) and glued these around the tubes to add some extra detail, the very end one I increased in width by 100% to add a shroud effect around the glass bead lens.

Under Construction

Completed and Mounted

Next up the base: In GIMP I split the lower walls from the upper dome on the lower side of the metal flange. I then increased the wall height by 6mm (1/4 inch) so I could insert a foam floor later on. Next I added wood texture across the entire inside base. It was a simple matter to print out the lower walls floor and pretty much assemble as normal. Although I cut a dodecagon of foamboard to insert into the floor first and glued the walls to this (triangles on the underside)then dropped in and glued the textured floor on top of this.  I also cut out the windows and doors to enable me to fit them back later on. Once the outside was assembled I cut small segments of foamboard and glued these along the inside of the wall for strength and thickness. I then modified the external plaster texture to fit on the inside of the model to become the inner walls (102% height 90% width). Before gluing the inside in place I cut the window and door holes into the foam inserts then test fit the inside insert and marked were the door and windows would be and cut these out, the inside was then glued in place. I next added some flex steel (turned out to be un-needed) around the top edge and glued it in place and then covered this with a special dodecagon wall topper I made up in GIMP. Last step was to add some acetate windows, hinged door, framed star charts for the inside and window frames on the outside and the base was done.

Outer Walls and Floor in Background

Floor Glued in and Inner Foam Support Added

Finished Base

Next up was the top inside and out, this was a right pain in the neck as I had to design a telescope end and eye piece inside the Observatory. In the end I got a design that fit although I did make one piece slightly to long if I make a second one I will shorten the 2nd main bend a little. Sorry getting a little ahead of myself, assembling the outside was fairly easy, once again I cut out the windows before assembly. I then glued a foamboard dodecagon piece to the inside of the base of the dome approximately matching up with the steel flange graphic on the outside and about 6mmx6mm square (1/4 of an inch). Once this was in place I glued the top together in pairs to keep it symmetrical then glued the pairs into fours and so on until it was glued into the dome shape. I next added some detailing to the top (all double thickness 220gsm card) such as the horizontal wooden beams, the window frames and a cap to the top of the roof to help finish it off. At this point I also glued the acetate windows onto the inside of the dome top.

Outside Glue Up

Finished Outside Top

Onto the dome inside. As I wanted the wooden dome to be thinner than the masonry walls I kept the dome as only a double card thickness. To line it I simply printed the outside again and cut these into individual triangles, reverse scored them cut the windows out and glued them into place, there is a slight bulge on the inside were they cover up the windows. Next I added 6 small (5mm square) magnets to the foam flange and then reprinted the wall topper from the base and glued this to the under side of my foam flange. I likewise duplicated the outside texture and glued this to the inside of the foam flange. I didn’t bother to detail the inside of the dome as it’s almost impossible for someone to look up into the dome while gaming without removing the top and then your focused on the bottom. I did add an inside tube and eye piece to the telescope as mentioned this was a right pain but I finally got the geometry worked out on my third test build.  Unfortunately due to the small windows it’s very difficult to see from the outside but it looks nice when you pull the top of the model. To help hold the top to the bottom and cover any small miss alignments I made up a double wide metal textured piece and glued this on the bottom of the dome, this slides over the base and is a very tight fit (magnets seem to do nothing) if I was to redo the flange I’d put a thickness of card behind the card flange to give a little more play. On the plus side pulling the model apart requires some force so accidentally knocking it apart during gaming would be impossible.

Inside Top Lining

Finished Inside Top

Overall I’m very happy with how the model turned out, it let me try my hand at detailing in paper which although fiddly is no worse than scratch building in traditional materials except no painting and as an added bonus the model is extremely durable/strong due to the added bracing. The extra detail helps make the model pop on the table from a distance.

So why not go and grab some of Dave’s models or Tommygun’s and either build them stock or try detailing one up as a special terrain piece.

Finished and Assembled

Papercraft Build – Okumarts Darkfast Set Two: Wood Elves

This is the second set in Darkfast series released by Okumarts. As the numbering for the Darkfasts series starts at zero this set is labeled as Set Two: Wood Elves. You can read about the size/scaling and background information in this post to save on repetition.

As you can guess from the title of the set this set contains Wood Elves. Before I proceed any further with build review a little bit of disclosure, I’m a wood elf fan, they are one of my favorite races in any fantasy setting so be warned this review might be a little biased due to my Wood Elf tinted glasses. The Elves are drawn in what I would describe as classic D&D elf style, the elves are slightly shorter and of a thinner build than your average human.  There are a total of 18 unique miniatures in this set broken up into two sets. The first twelve you see when you open the PDF are warriors and these are printable in four colours with white hair; green, red, blue and white with an extra green set with brown hair. The second bonus set of six (turn off the five warrior layers) are available in the one colour however Okumarts has really raised the bar with them, there are four Buck (Deer) Riders and one male & one female wood elf Druid/Mage. Below are photo’s of the various miniatures avaliable in the set in various colours:

Elf Sword (M), Elf Sword (F), Elf Archer (F), Elf Archer (F), Elf Archer (M), Elf Archer (M)
Elf Archer Chainmail(M), Elf Spear (F), Elf Spear (M), Elf Spear (M), Elf Sword Heavy (M), Elf Sword Heavy (F)
Elf Buck Rider Archer (M), Elf Buck Rider Archer (M)
Elf Buck Rider Spear (M), Elf Buck Rider Spear (M)
Elf Druid/Mage (M), Elf Druid/Mage (F)

This set is stunning and extremely versatile, again the colour selections for the miniatures and the dynamic poses Okumarts has selected look really good on the tabletop. I can see a lot of uses for the miniatures in this set:

  • There are six special looking mini’s that would make good PC’s or important NPC’s, Elf Ranger Sword (M), Elf Ranger Sword (F), Elf Sword Heavy (M), Elf Sword Heavy (F), Elf Druid/Mage (M) and Elf Druid/Mage (F).
  • Both male and female variants of every miniature, except the Buck (deer) riders.
  • Extremely dynamic poses.
  • Deer Riders, great idea and well executed.
  • Lots of different troop types.

The outlines on this set are slightly more complex than the previous two with a few deer antlers, cape ends and hair spikes, however overall they are not difficult to cut out. The back to front alignment on the first twelve miniatures and the Druid/Mage is as usual excellent. I did however notice that on a couple of the buck riders there wasn’t quiet enough black border on the rear side, this was easily fixed with a black marker. Do keep that in mind when cutting the miniatures out as you will need to cut out the miniatures from the front side (face side).

The set contains a good number of figures that can be used across an RPG from PC’s, NPC’s down to simple forest border guards. It would be a great set to use to play out an encounter with elven border guards as the PC’s try to enter Wood Elven lands.  Depending on how the initial encounter played out you could have the PC’s being pursued by ardent Buck riders across the rolling plains away from the forest.

There are more than enough figures to make up a very nice and varied Warband for Song of Blades and Heros in fact with the varied figures in the set you could do up themed lists; all mounted, all ground  or a mixed wood elf warband. Elves are contained in the main Song of Blades and Heros book on page 26, I plan on using the stats for heavy cavalry with the Buck Spears and have made a new profile for the Buck Archers (see below). All the other miniatures equate out reasonably well with the stock list, with a few double ups:

  • Elf Warrior (SBH) = Elf Spear
  • Elf Archer (SBH) = Elf Archer
  • Wood Elf Warrior (SBH) = Elf Sword
  • Wood Elf Archer (SBH) = Elf Archer or Elf Archer Chainmail
  • Elf Wizard (SBH) = Elf Druid/Mage
  • Elf Hero (SBH)= Elf Sword Heavy or Elf Archer Chainmail
  • Elf Commander (SBH) = Elf Sword Heavy
  • Wood Elf Commander(SBH) = Elf Sword Heavy
  • Elf Sneak (SBH)= Not really one, Elf Spear (F) is close
  • Elf Cavalry (light) (SBH)= Elf Buck Rider Spear (better fit below)
  • Elf Cavalry (heavy) (SBH)= Elf Buck Rider Spear

Wood Elf Buck Archer (Bow and Riding Buck)
Points 50   Quality 3+  Combat 3
Special Rules Mounted, Shooter (Medium)

Being a bit of Wood Elf Fan I also had a quick look over at Wargames Unlimited – No Quarter and they have a Wood Elf Army list already (cue squeal of delight). There are not enough miniatures in this first set to have a different miniature for each profile avaliable in the wood elf army list. There are however more than enough different miniatures to put a reasonably well rounded fighting force onto the tabletop. I went through the avaliable miniatures and matched them as closely as I could to those avaliable on the list, As there are a number of duplicates don’t forget to use different cloak colours and different hair colours to represent different unit types if you need. I also added a few idea’s from other papercraft manufacturers (all free):

Individuals and Leaders

  • Elven King – none that are really special enough
  • Woodland Noble – Elf Sword Heavy or Elf Sword
  • Clan Leader – Elf Sword Heavy
  • Totem Bearer – none
  • Elven Warlock – Elf Druid/Mage (M)
  • Elven Witch – Elf Druid/Mage (F)
  • Elven Sorceress – Elf Druid/Mage (F)
  • Elven Sorceress on Unicorn – none

Core Units

Elite Units

  • Greater Tree Spirit – none ( Onemonk Halloween set tree  or WorldWorksGames Halloween tree or Eddnic’s Treant or HannesX’s Treeman)
  • Border Gaurd – Buck Riders (Spear or Archer)
  • Levy Nobility – Elf Heavy Sword
  • Woad Warriors – none
  • Eagle Riders – none
  • Huntsfolk – Elf Archer
  • Clansfolk – Elf Sword

Remembering you wont ever field every troop type in every army list that you field for a particular battle. Below I’ve put together some quick army lists as well as the number of times to print a particular page to field the army of that size(2 Okumarts miniatures only, 1 mixed list):

500 point Army

503 points total

Print: 2 of page 1 and 1 of page 2

General

Elven Sorceress (Elf Druid/Mage) – 59 pts

Core Units

Woodfolk x10 (Elf Archer) – 280pts

Elite Units

Border Guard x4 (Buck Rider) – 164pts

1000 Point Army

986 points total

Print: 3 of page 1 and 2 of page 2

General

Clan Leader (Elf Sword Heavy) – 55 pts

Individual

Elven Sorceress (Elf Druid/Mage) – 59 pts

Core Units

Schiltrons x8 (Elf Spear) – 264 pts

Woodfolk x10 (Elf Archer) – 280pts

Elite Units

Border Guard 1 x4 (Buck Rider) – 164pts

Border Guard 2 x4 (Buck Rider) – 164pts

1500 point Army

1485 points total

Print: 4 of page 1 and 2 of page 2 + 1 WWG Halloween tree

General

Woodland Noble (Elf Sword Heavy) – 92 pts

Individual

Elven Witch (Elf Druid/Mage) – 59 pts

Elven Warlock (Elf Druid/Mage) – 59 pts

Core Units

Schiltrons x8 (Elf Spear) – 264 pts

Woodfolk x8 (Elf Archer) – 224pts

Woodfolk x8 (Elf Archer) – 224pts

Fae Lorn x4 (Elf Sword) – 128pts

Elite Units

Border Guard 1 x4 (Buck Rider) – 164pts

Border Guard 2 x4 (Buck Rider) – 164pts

Greater Tree Spirit (WWG Tree) – 107pts

For me this set is a winner, one of my favorite fantasy races and usable across all three types of games I enjoy playing for a very reasonable $2.50 (USD) . I’d recommend  buying the set, no matter what game your going to use it for you will get good use out of the set.

Overall I have been very impressed with the Darkfast series and will pickup any more miniatures that Okumarts releases in this series to add to the ones above.

Have fun gaming

How to Base Paper Miniatures

I’ve been meaning to do a post on how to base paper miniatures, which includes some of the various types of paper miniature basing you can do. There are advantages and disadvantages to each type of basing so there is no right or wrong way to base. Most of the various base idea’s below come from the cardboard warrior forums, so feel free to head over and browse through the gallery to see what others have done. Depending on the type of basing you decide on you’ll need to grab some of Onemonks standard bases or I’ve made up a plain base template as a layered PDF (30mb) which includes Onemonks basic textures. Additionally I’ve  included the raw shape png’s at the end of this post so you can overlay them on any texture you like from anyone, sorry no cut files yet.

First you’ll need to choose a base shape. This initially would seem easy to do and if you only game using one set of rules just use whatever they recommend. If however you jump around between rulesets/RPG’s/Wargamming it gets slightly more difficult to pick a shape. If your using one of the removable base types below you can just make different base sets for each rule sets you use although if you have 2-3 armies making all those bases can get tiring. For myself after much deliberation I settled on Octagons, there are several reasons why I choose Octagons:

  1. Most RPG’s don’t care what base’s you use but by some sort of weird default convention most stuff to be used for RPG’s ends up on round bases. Round bases do have their advantages in that you don’t snag base corners on things and they aren’t as easily damaged. Octagons provide a similar level of protection not quiet as good as a circle but very close.
  2. Most War games (fantasy) like you to rank your troops up into units and use movement trays, normally specifying a square base so troops and units fit tightly into a movement tray. Octagon bases can also be ranked up quiet effectively in movement trays.
  3. Some war gaming rules have the concept of facing and it can be quiet important which way your unit is facing. The facing rules can be based on a Hexagon or Octagon. By using the trusty Octagon you can cover facing very easily and disregard two sides if you need to very easily.
  4. There easy to cut out compared to circles 🙂 .

In the end pick the shape that works for you, for me that’s Octagons but if you want heart shaped bases go for your life :). With some of the below base types if you use black foam core you can save yourself a significant amount edging.

My Current Bases

I’ll cover my current basing method first. I use a modification of the slotted Foam board base (see below) and something Afet posted about here. I bought a sheet of 2/3mm Depron, Depron is used in RC plane construction and is pretty much available everywhere (okay I know the US/UK and AUS can get hold of it very easily).

I find these bases are slightly thinner than a 5mm foam core base below and don’t look quiet so odd on the table next to regularly based metal mini’s but provide plenty of stability for the paper mini’s. The mini’s don’t slip out easily during game play and I can remove the mini’s to store them flat at the end of a game so they take up less space. It also gives the illusion of flat basing which I prefer with my miniatures. There are a couple of draw backs: It takes slightly longer to make each base than the stock foam block method. I have to shorten the black base tabs a little bit on each miniature which again uses up time. Eventually the bases take on a permanent bend and wont grip the miniature as well (this takes a lot of use). Below I’ve documented the process for making these bases:

First up Print and Cutout a base of the required size.

Glue the above base to a piece of 2/3mm Depron/Foamboard

Cut around the hexagon and cut the base in half (or just off center if your going to rank troops) and colour all white edges to black using a thick black marker

Stick the two halves back down onto some thin magnetic sheet ( I use the cheap fridge magnet stuff on ebay), Insert a single piece of card between the two halves as you stick them down to make a slight gap.

Trim the magnet to size and the base is ready to use.

When I make bases for larger paper miniatures I do tend to mount them on thicker bases as they look less out of scale.

Flat Slide Bases (Reivaj bases)

Full credit goes to Reivaj for coming up with this basing method. I’m torn at the moment between using my basing method above or slowly moving my miniatures across to this basing method.

This basing method  provides you with a removable bases, the bases are not to thick so your mini’s don’t have a mounted to a plinth look, they are only slightly more difficult to make than my modified foam block bases above and the miniatures once mounted are near impossible to pull out of the base. They do however have a couple of draw backs: When you make your paper miniatures you have to be careful not to glue the black base tabs together so you can bend them outwards later on, sliding the miniatures into the bases can be a little fiddly and if your not careful you can damage the the base (bend it to much) or the miniature (burr over the tabs).

First up print and cut out a standard One Monk base of the required size.

Trim off the square end tabs as they are not required.

Flip over the base and glue some strips/pieces of cardboard inside the base (black spacers in the below image, I’ve been using doubled up 190GSM card to create the spacers), trim to size and edge.

Fold over and glue the top to the bottom

When Gluing your miniatures up make sure you Don’t glue the black tabs as you need to bend those out left and right.

(You can strength the black tabs with a little sticky tape)

Base all finished. When sliding miniatures in and out bend the base upwards slightly.

As an addition I’ve been  sticking  a thin piece of magnetic sheet to the bottom of these bases to add a little extra weight/strength.


Slotted Foam Block Bases

I’m not sure who came up with this basing method but I’ve seen several users on the cardboard warrior forums using this technique . The advantage of these bases is that they are very quick and easy to make. However they are not without their drawbacks. I have had some problems pushing miniatures into the base slots and removing them which can damage the miniatures base tab, if you use standard 5mm foam core for the bases they are also very chunky. I tend to only use these bases in a pinch eg I’ve run out and need to mount some more mini’s for a game I’ll quickly cut some squares  from black foam board and wont worry about adding a ground texture.

First up Print and Cutout a base of the required size. I tend to find with these bases I need one size bigger than I would normally use for the miniature.

Glue the above base to a piece of foam board

Trim the foam board back to the base shape and cut a groove. I use a small steel ruler to help work the groove slightly bigger.

The base is all finished and ready for use

Onemonk Standard Bases

These are the standard Onemonk bases you can download. There are over 50 pre-made bases and textures available in multiple manufacturers textures. These are easy and fairly quick to make. I have found overtime with use that the tab on the base that holds the miniatures slowly loses it’s grippyness, this tends to occur more quickly than with the other base types. You can fix this issue by simply using a short bobby pin or if you prefer permanently gluing your miniature into the base. This of course then removes some of the advantages of paper miniatures as you will no longer be able to store them flat. I’ve included how I assemble them below as it’s slightly different to the PDF guide located here.

First up print and cut out a standard One Monk base of the required size and score along the indicated score lines.

Flip the base over and using a black  marker blacken the end tabs and a strip down the middle of the base

Simply glue the top to the bottom and edge with a black marker

The base is now ready to use

Permanent Flat Bases

With all the options above I no longer use flat basing as a basing method. Although it looks good it removes one of the key benefits of paper miniatures for me and that’s the ability to store a lot of miniatures in a small space. Saying that it is impossible to remove a miniature from a base short of ripping it off so during gaming they are very durable.

First up Print and Cutout a base of the required size.

Glue the base to your preferred basing material and edge. I’ve used magnetic sheet, Matt board and plain cardboard in the past.

Simply cut the black tab off your miniature and glue it to the base using PVA or super glue

Going All Out

There are some really nice based paper skeleton miniatures across on the cardboard warrior forums, although not removable from the bases they look out standing. Using the above bases as a start there is no reason you can’t use more traditional basing materials to really make your miniatures and bases pop. Although fairly labour intensive to make for a whole army, for special miniatures like Hero’s or PC’s these bases really help to make special characters stand out on the table top. Below is one example I’ve assembled but you could use any of the hundreds of regular basing tutorials on the web to create unique looking bases (here, here, here and here).

Fancy Reivaj style base (sorry about the dark base in the photo)

Here’s a picture of the five different base types side by side at the end of the day they will all look good on the table so pick the base that works best for yourself 🙂

Have fun gaming

Plain Base Shapes Layered PDF (30mb recommend right click save as)

Save the below and load in GIMP/Photoshop, they should be 2550×3300 pixels @ 300 pixels an inch

Circle Square Octagon Hexagon
15mm 15mm 15mm 15mm
20mm 20mm 20mm 20mm
25mm 25mm 25mm 25mm
30mm 30mm 30mm 30mm
40mm 40mm 40mm 40mm
50mm 50mm 50mm 50mm
Pill Rectangle Oct-Rectangle
15x30mm 15x30mm 15x30mm
20x40mm 20x40mm 20x40mm
25x50mm 25x50mm 25x50mm
25x75mm 25x75mm

Papercraft Build – Okumarts Darkfast Set One: Orc Tribe

This is the second set in Darkfast series that Okumarts has released. As the numbering for the Darkfasts series starts at zero this set is labeled as Set One: Orc Tribe. I wont repeat the scaling and background information in this post but you can read all about it in the top of this post.

As you can guess from the title of the set this set contains Orcs. The Orcs are drawn more a long the lines of long snouted Orcs (Pig Orcs) slightly different to your Warhammer 40k orc but are a very nice take on the old Pig Orcs.  There are a total of 24 unique miniatures in this set broken up into two lots of twelve. The first twelve you see when you open the PDF are warriors and these are printable in four colours; red, brown, blue and green. The second bonus set of twelve (turn off the four warrior layers) are available in the one colour but consist of various Orc villager types. I’ve included a picture of all 24 miniatures with the warriors printed in various colours (There is a little lens flare/washout in the below photo’s – Sorry):

Orc Axe (M), Orc Mace (M), Orc Sword & Shield (M), Orc Sword (M), Orc Sword & Shield 2 (M), Orc Club and Chicken (M)
Orc Fancy Sword (M), Orc Axe (M), Orc Axe(M), Orc Club (M), Orc Bow & Arrow (M), Orc Bow (M)
Orc Frying Pan (F), Orc Shaman (M), Orc Thief (F), Orc Bucket (F), Orc Old Broom (F), Orc Thief (M)
Orc Boy 1, Orc Boy 2, Orc Boy Wood Sword, Orc Baby (X), Orc Boy Run, Orc Girl w/Bear

I really like this set, you can outfit a whole Orc village if you wanted  to, something I think would be impossible with metal miniatures. This could open up a world of alignment based issues for your players e.g  The PC’s just crashed into the Orc village intent on killing and plundering and find a calm village scene complete with young Orc children running around (Evil GM Grin). Okumarts has added some very nice touches to make this set stand out, such as:

  • Including Orc’s with Axes facing left and right, great as gate guards, the same yet different.
  • The female Orc thief could make for a very nice NPC or even an unusual PC character.
  • The old Shaman need I say more 🙂
  • Female orc with frying pan, reminds me of the Tangled frying pan quote “Frying pans… who knew, right?”
  • The ability to have four colours of the main warriors, you could have four different clans all fighting, with the PC’s trapped in the middle.

Okumarts has kept the outlines fairly simple although if you are cutting by hand there are a few hair, cloak and horn points you’ll need to cut around. The back to front alignment on the set is excellent which can be an issue with front/back paper miniatures. I was a little skeptical of the cloak colours when viewing the PDF on screen, particularly the green, however on print out all four colours look good. The miniatures themselves are bright and have excellent colour toning. Identification of the different miniatures on the tabletop was very easy when looking down at them from a seated position at a table. The PDF’s are not “locked” so editing them for my (or your) own personal use is easy rather than if they had been password protected.

Village Life (Huts by Worldworksgames)

I have no real issues with the set except wishing that the little craftrobo “L’s” (alignment marks) were on the pages. The only other small comment I have is that I would have liked to see a few female warrior types mixed in with males. However this is an area that metal/plastic miniature manufacturers tend to miss so no big issue. Although in the case of Orcs I can understand their military might not be an equal opportunity employer, unlike more open minded races such as Wood Elves.

This set would be great for any GM who’s players are about to invade an Orc stronghold or try and wipe out an Orc village. Print each of the warriors out in two or three different colours and the villagers once and you could set a really nice scene on the tabletop. This set will also make for a nice warband for a skirmish sized wargame (8-10 miniatures per person) such as Song of Blades and Hero’s. At this point in the Darkfast series this set can’t quiet provide enough variety of miniatures on it’s own to start to outfit a full fantasy Pig Orc army using rules such as No Quarter. Saying that you can field three different types of foot units, Hand to Hand, Archers and Polearms although you might see a little repetition in the units, to this you could add a Ballista (link) or Catapult (link or link), use the Old Shaman as a powerful magic user and use the Orc from Set Zero as a Hero, this will leave you short on some form of cavalry and a command type group. Okumarts is a big fantasy fan so I have no doubt that we will see some more Orcs in the future.

Orc Hand to Hand Unit Ready for Battle

This set is a pay set but will only set you back $2.50 USD about 10 cents a model if you don’t count colour options, less if you do. The set is excellent value for money and the artwork is of a very high standard. I’d recommend picking up a set for yourself, if you have any RPG GM’ing in your future or need a few warbands for a skirmish level wargame. However if your only use for this set is more along the lines of needing a full Fantasy Army I’d carefully weight up buying and building what you can now or simply waiting to see if further miniatures are released in the future and then pickup both sets at that point, so you can better field a more complete army to begin with.

For myself  it was no brainer buy and I’m really happy with how the miniatures look on the table. I’ll wait with crossed fingers for more variants in the future to help fill out a more complete army list for Fantasy Wargaming or possibly I’ll just mod some for my own personal use.

Next up Wood Elves.

Orc Ambush

Papercraft Build – Okumarts Darkfast Set Zero: Basic Adventure

Okumarts has been releasing paper mini sets for about 12 months now. It’s great to see another really talented professional artist get into the paper mini field and I hope he continues to expand his range, especially as Onemonk has hung up his pencil. I decided to build up the first of Okumarts Darkfast Classic Fantasy series (Set Zero: Basic Adventure). I’m currently building sets One and Two and will put posts up about those shortly.

Okumarts has a very distinctive style which aligns most closely with the manga drawing/image style. I personally really have an affinity for his style, if you prefer your paper mini’s more ultra realistic I wouldn’t recommend these. Okumarts has however incorporated a lot of the great features that Onemonk used on his paper mini’s that made them stand out so uniquely, this includes:

  • Tabbed basing for easy mounting
  • Back and front colour art
  • Black border around the outside of the mini to help it pop
  • Close cutting of the mini’s. No fold up triangles here.

The above make Okumarts paper mini’s very compatible with several other artists and let you reuse some of your already existing bases. Although the unique style will mean you can mix and match Okumarts and other artisits mini’s on a table for an RPG, if you try to mix and match them inside the same wargaming army unit it will look at little odd as the styles will clash. This however is not a big drawback as you can’t really mix and match different metal miniatures from different manufacturers in the same unit. As with the metal miniature world there are some issues with scale in the paper miniature world. The advantage with paper is that if you want something a particular scale you can scale it up or down prior to printing. I’ve put together a quick image below which shows one of Okumarts miniatures from this set side by side with a Human from Onemonk and a Human from Sanity Studios, Okumarts miniatures align most closely with Onemonks work however they have a less exaggerated head to body ratio:

Approximate Conversion

Scale Up Sanity Studio’s, print at:  118 – 120%

Shrink Onemonk/Okumarts, print at: 83 – 85%

This is the first set in the Darkfast series Set Zero: Basic Adventure and is a free download. The set contains 10 unique miniatures which can be printed in two different colour schemes, this is achieved by using a layered PDF. The mini’s are split into  Five “Good Guys” and Five “Bad Guys”. If you were just starting out with D&D or another fantasy RPG, this set would give a you the basic figures to get your campaign running for 1-2nd maybe up to 3rd level characters. This set can also be used to give you some quick starter figures for two different warbands for Song of Blades and Hero’s or some other skirmish sized fantasy game. Okumarts didn’t specifically name each of his mini’s but I’ll do my best below:

Dwarf Fighter (M), Human Monk/Druid (M), Human Fighter (M) , Human Wizard (M) , Elven Archer (F)
Bugbear Fighter (M), Gnoll Fighter (M), Goblin Fighter (M), Pig Orc Fighter (M), Hobgoblin Fighter (M)

The colour options for each miniature are:

  1. Dwarf Fighter: Yellow/Brown and Blue/Brown
  2. Human Monk/Druid: Grey/Brown and Green/Green
  3. Human Fighter: Blue and Yellow/Gold
  4. Human Wizard: Mauve and Green
  5. Elven Archer: Natural Green’s and Bright Green/Yellow
  6. Bugbear Fighter: Green/Grey and Red
  7. Gnoll Fighter: Light Brown and Light Green (loincloth)
  8. Goblin Fighter: Light Brown and Dark brown
  9.  Pig Orc Fighter: Burnt Orange and Aqua Blue
  10.  Hobgoblin Fighter: Red and Green

For a free set this set is excellent value for money and the artwork and options are great, the weakest miniature in the set to me is the Bugbear he sort of looks startled rather than aggressive. Okumarts has kept the outlines fairly simple without to many little pointy area’s to cut out (the ones above were cut out by my craftrobo), I test cut out one by hand in 3-4 mins.  The back to front alignment is excellent this can be an issue with front/back paper miniatures not always aligning well. The colours print out very well and the miniatures don’t appear muted or dull. I could easily tell which miniature was which when looking down at them from a seated position at a table. The PDF’s are not “locked” so editing them for my (or your) own personal use is easy rather than if they had been password protected.

Scene One for Fun

I do have  two minor quibbles with the set although as this set is free the word minor should be bolded and underlined. Normally you want 1-2 of each hero and 5-6 of each monster/critter. As the two are tied together on the one page this means to get 5-6 of each monster you end up with 5-6 of each hero as well, not particular useful and a waste of paper and ink. This could have been overcome by making better use of the PDF layering so that you can switch the hero’s “off” and have an extra row of monsters underneath. The second issue is the lack of craftrobo registration marks. I don’t expect every paper mini set to come with a set of GSD’s however it would have been nice if the little craftrobo “L’s” (alignment marks)  had been placed in each corner then it would have been 5-10 min’s work for me (or anyone) to put a set of GSD’s together. Without the L’s I have to export the files to GIMP re-lay them out and then reproduce them which also breaks the layered PDF and makes it impossible to share the GSD’s with anyone.

Scene Two for Fun

I really like this set and as it is free go and grab it now . The minor issues are nothing and can be overcome by spending 10-20 mins with the miniatures in GIMP, something you may like to do anyway so as to get a whole sheet of Hobgoblins etc. This is a great way to get that RPG or skirmish game off the ground with a few miniatures as decoration that wont cost you anything but a little time, some paper and ink.

Have fun with them, I know I will 🙂

Scene Three for Fun

Terraforce Troopers (Onemonk Bash) – Paper Miniatures

I’ve been hard at work on various projects since I stopped playing nexustk (MMORPG). This post relates to extensively modding the existing Terraforce troopers that Onemonk put out a while ago. I wanted to mod them for three reasons. Firstly I wanted to scale them down a little so they were more inline with 28/30mm miniatures. Secondly I wanted more pose options for the HE laser rifle. Lastly I wanted to turn them blue to fit in with how I visualized my armies colour scheme. As I was making all these changes I decided to add a few other colour scheme’s as well just in case.

I carried out all the mod work using GIMP. First step was to import the base set and scale them to more 28/30mm size as it turned out this was spot on 90% for these miniatures. This bought them more into line with 28/30 mm size and Sanity Studio’s scale. For those unaware Sanity Studio’s bought out Onemonk’s back catalog of mini’s and have been putting out some very nice fantasy miniatures, They produce about 1 new set every month but the quality of the artwork on each mini is outstanding (no they don’t pay me for saying this  🙂 ).

Once the troopers were in the correct scale my next job was to provide various colour options. Solid colours were easy but putting together the camo variates took significantly longer although once I had the process sorted out it become quicker. With feedback from the guys and gals across at the cardboard warriors forum I settled on 14 colour options:

I also created two skin colour overlays so that you end up with three skin tone options: Light, Mid, Dark. With all the colour options done I then created the HE Laser Rifle overlay. I had to do some significant fiddling to make the HE laser rifle nicely overlay the stock Laser Carbine, but it worked out well in the end and I think it was worth the work.  Next I laid all the different layers out and combined them into a layered PDF.  Lastly I created the 4 craftrobo GSD files I needed to account for all the weapon options and tested that each cut file was accurate. So this means that you can select uniform colour, skin colour and two weapon choices from the one pdf.

As the sets are going pay again in the near future, I can’t just make these mod’s freely available. I really don’t want to eat into the already small margins on paper miniatures that the commercial guys do plus it would be a breach of copyright and personal integrity.  As a side point if we lose the commercial paper mini makers we’ll lose a whole pile of future releases :). However all is not lost what I have been able to do is supply them to Sanity Studio’s and when the One monk website is updated my mod troopers will be a free download attached to the stock pay set when you buy it.  I’m very happy to be able to share my work with other people otherwise the above would be for my personal use only :).  I do plan on modding all the troop types into the above colour scheme’s, next ones on my list are the special weapons troopers.

I’ll post an update when the above become available so keep an eye on my blog or the One monk main site.

Update: These are now available from Onemonk

Dave Graffam Patrol Boat– Papercraft Build

Dave Graffam has just released a Patrol boat model, basically a small skiff. I needed a break from my terrain building so I put one together. Dave releases all his models as layered PDF’s so you can get quiet a few different looking boats out of the one product. Dave does however include some print and go models ie no layers to tick on and off you just print and build. Unfortunately no GSD’s but there is something soothing about hand cutting a model now and again, I’m always surprised at how enjoyable I find hand cutting stuff.

The Patrol boat is a fairly simple model, there are a couple of free hand curves but nothing to worry about. I was able to cut out all the parts and edge them in about an hour and I had it fully assembled an hour after that. Assuming I can count the model consists of 16 parts, here are mine all cut out and ready to assemble:

I went with a blue theme so that it matched with my Pirate Bear Cog. Once you get all the parts cut out it’s a simple matter of gluing them together, make sure you follow Dave’s instructions as there are a couple of spots were if you glue things out of order you will be reprinting parts 🙂 . Here is my finished patrol boat:

You may have noticed the little piece of string and magnet at the bow of my boat in the above picture. I made one little change and that was to add a small piece of metal to the base of the boat and place a magnet in the mast. This allows me to remove the mast for storage making the boat much easier to store:

It’s a great little boat and I plan on making 2 or 3 more. The only minor issue I have with the design is that the front sail is mounted offset, however I plan on adding a few little tabs to the sail on my next one and gluing these inside the mast through some slots I’ll cut , similar to how the rudder is mounted.

It’s a great little boat and well worth the $3.95 price tag Dave has on it.

I better get back to building the WWG terrain I’m doing.


Project Status


WWII Project First Release

80%


B-tech Buildings Five

20%


Design Victorian era City

15%


Something Different

5%


Enter your email address to follow this blog and receive notifications of new posts by email.

Join 110 other subscribers

Content Released Under

Creative Commons License
This work is licensed under a Creative Commons Attribution-NonCommercial 3.0 Unported License.
Please Attribute to Sirrob01 with a link back to my blog

%d bloggers like this: