Archive for the 'Mine' Category

Aircraft 2.5d – Spitfire, Hurricane, Bf109 and Bf110

supermarine spitfire thumbFinished my first batch of 2.5d WWII paper aircraft for wargaming. I’ve started with the four main aircraft used in the Battle of Britian, well the fighter aircraft. For the Allies there’s the Hawker Hurricane and Supermarine Spitfire, for the Axis we have the Messerschmitt Bf109 and Messerschmitt Bf110. I’ve been working on these off and on since December 2013 but only recently finalized a design which was sturdy enough for gaming and allowed me to remove the aircraft models from the bases and stands for easy storage.

Unassembled


I designed these as I wanted something a little simplier to build than 1:200 scaled fiddlersgreen aircraft. I made a few of their models shrunk down but they took me on average 2-3hours to assemble a single plane, so I started work on my 2.5d simple designs. I based most of my models on freely available 3 drawings which I turned into vectors using Inkscape. In the case of Bf110 Péter Kaboldy  had already done this and released the 3-views under CC license so I used that as a starting point for the Bf110. About the only fiddly part to assemble on each aircraft is the horizontal stabs, I recommend using superglue to fix them in place. Full credit goes to Reivaj for the basing technique, which I’ve also reused on the underside of the aircraft so they can slipped on and off the stands.

Hawker Hurricane 2_5d paper aircraft

Hawker Hurricane

Supermarine Spitfire 2_5d paper aircraft

Supermarine Spitfire

Messerschmitt Bf 110 2_5d paper aircraft

Messerschmitt Bf 110

Messerschmitt Bf 109 2_5d paper aircraft

Messerschmitt Bf 109

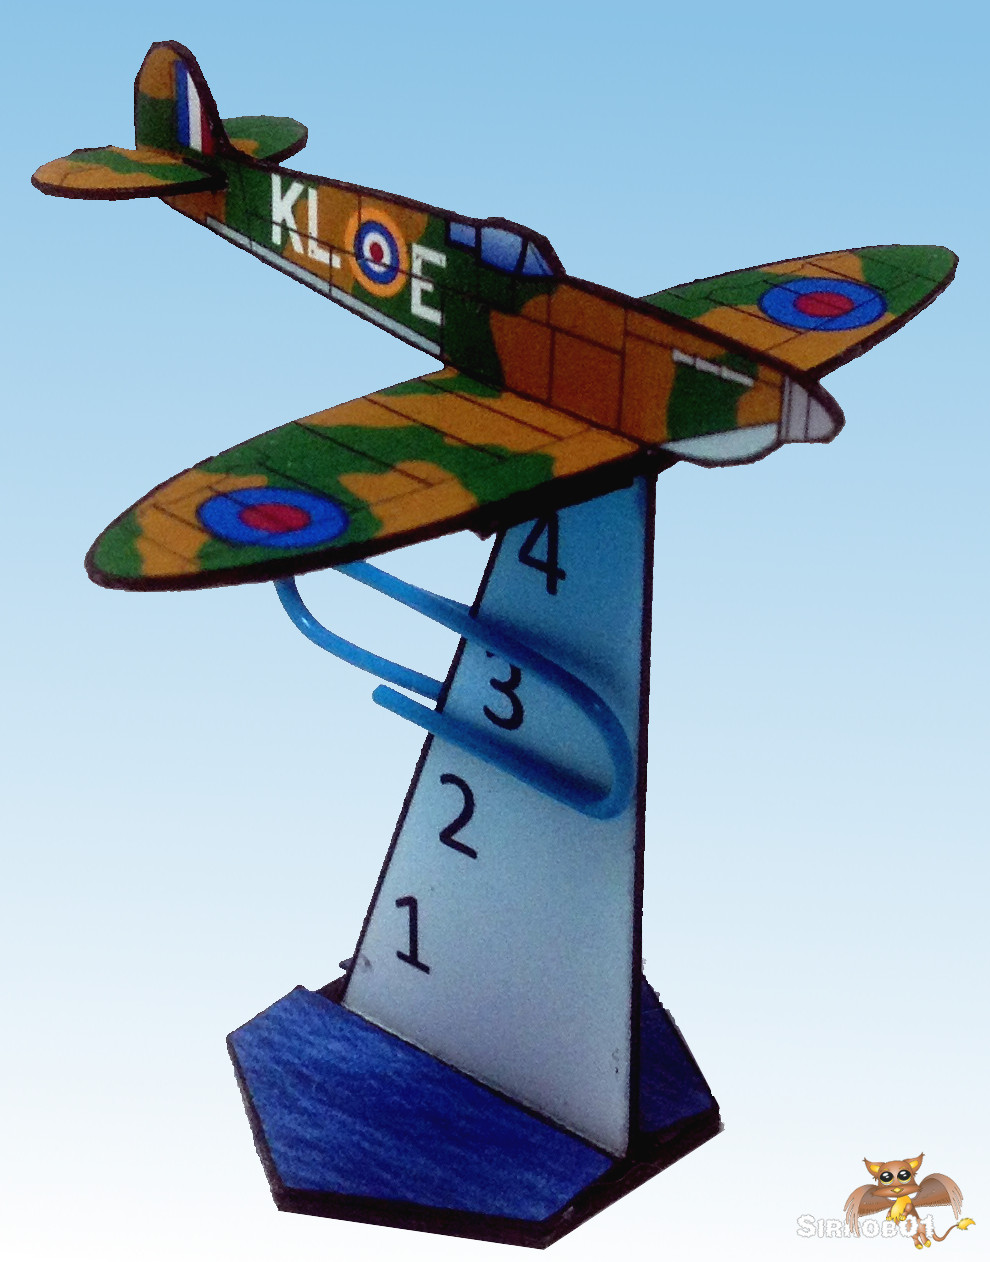
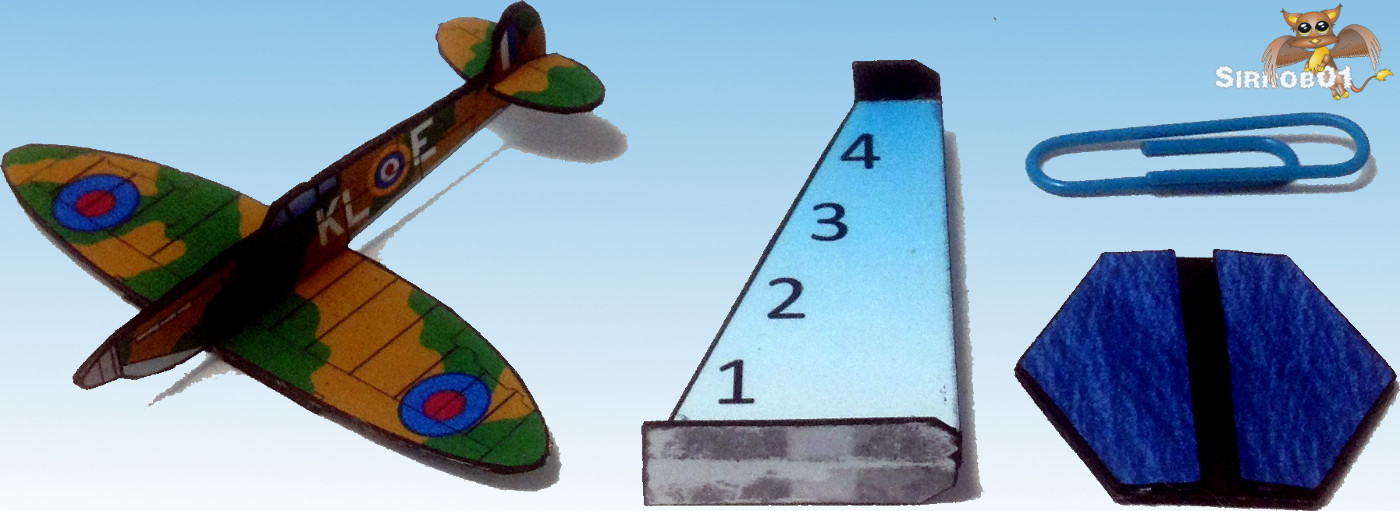
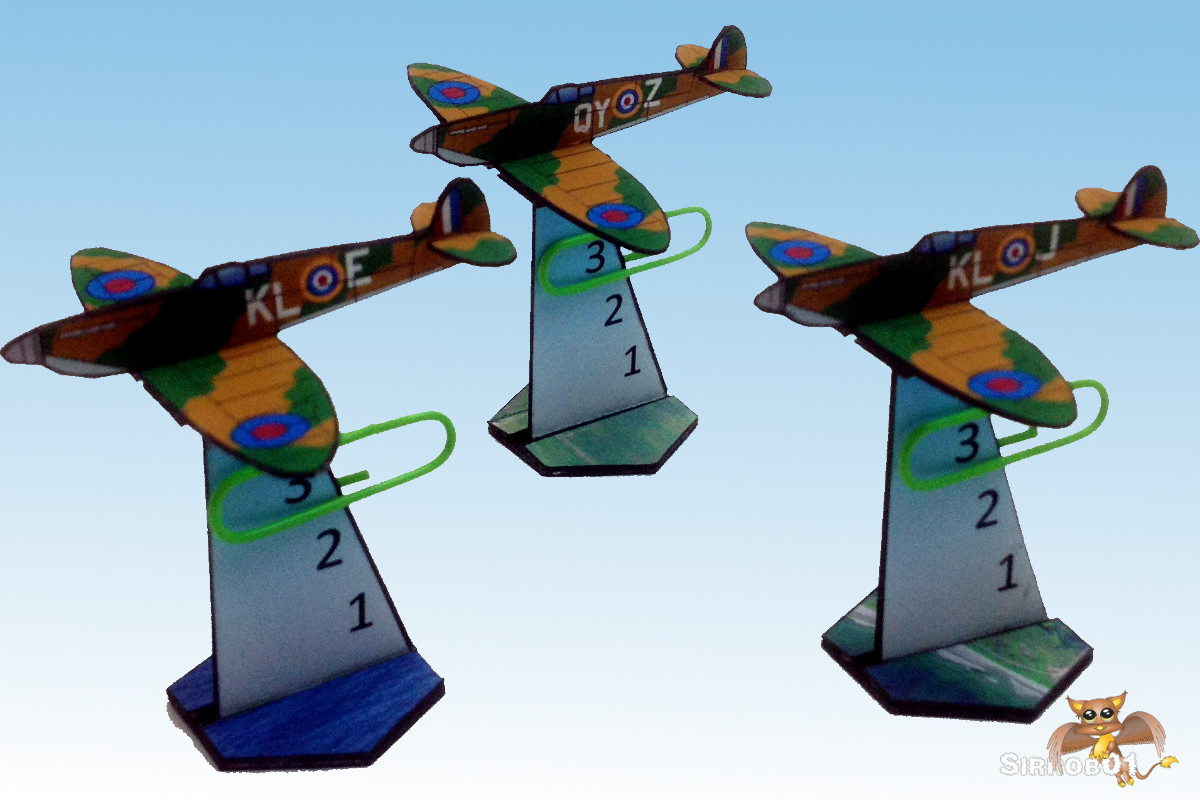
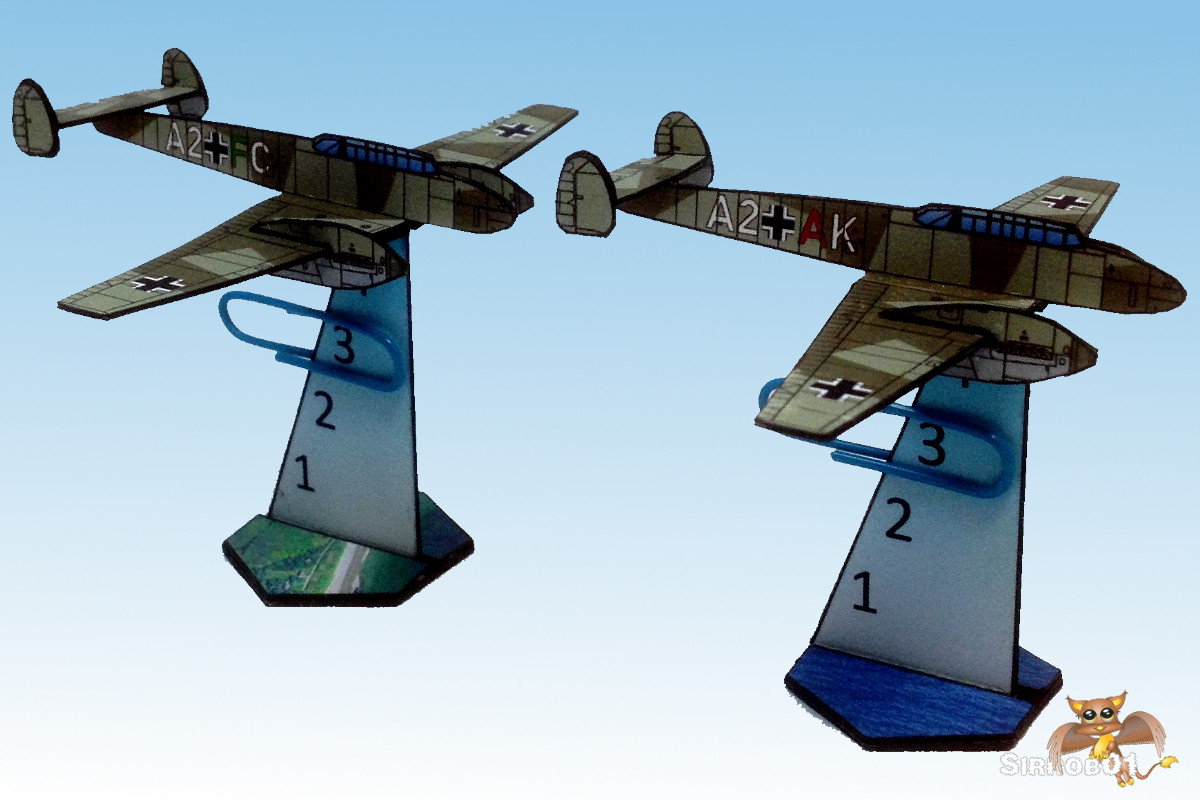
There’s only one colour scheme for each aircraft and I tried to pick the colour scheme which was most likely to have been used during the Battle of Britian. I have included a high contrast version which I think looks better on the table and a more accurate historic version. I’ve included four different types of 25mm hex bases; Ocean, Coast, Farmland and City. The stands/posts I have completed three different types; plain blue, numbered 1-4 and numbered 1-6. The numbered stands are designed to fit in with Wings of War/Glory and the easiest way to track the current flight level is to simply use a paperclip.

wings of war_glory bases and aircraft scaled

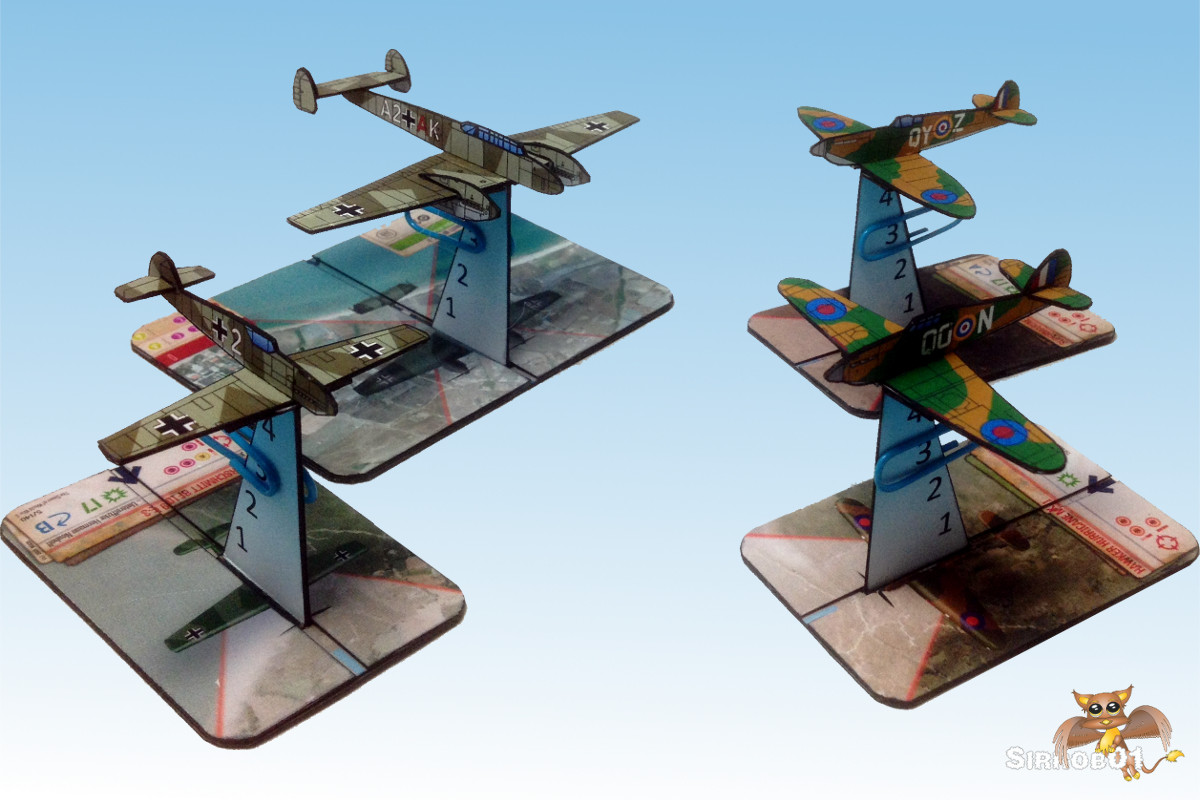
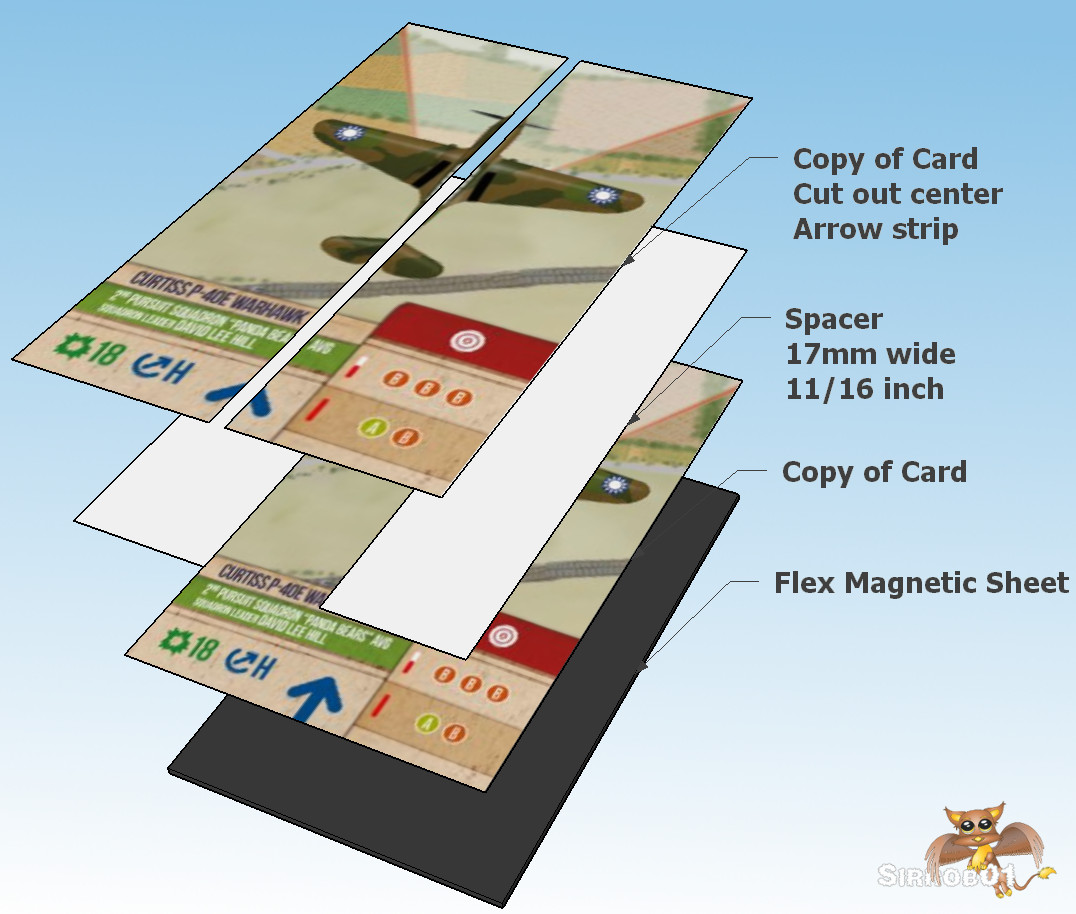
I plan to use my models for Wings of War/Glory so I also created some slide bases based on the wings of war aircraft cards. Basically I copied each aircraft card twice. I then cut the central segment out of one copy of the card added a spacer between the top and bottom piece and ended up with a base almost identical to the original card which I can also add the 2.5d aircraft model to. For extra weight I added a thin piece of flex magnetic sheet to the bottom. The description above might be a little vague so I’ve assembled a quick diagram to assist anyone who might wish to make some.

Wings of War_Glory Base


in addition to Wings of War there are two free rulesets that I want to try out using my models. These are Thunderbolt and Lightning and Pz8 Aerial Combat. Both are hex based games and the rulesets are free so feel free to try them also.

I do plan on completing more aircraft from ww2 and I’ll also do some re-colours of the above aircraft over time. The aircraft files, hex bases and stands are below. I hand cut all my test builds (12 aircraft in total) to ensure they were fairly quick to build and it is possible to assemble 3 aircraft in about an hour including cutting out, edging and gluing together. Unfortunately this means at the moment there are no cut files for the above aircraft, however I will make some at a later date when I do some of the alternate colour schemes (read that as these four were way more work than expected and I need them finished). The below should be more than enough models to replicate some of the air battles from the  Battle of Britain, enjoy :).

Supermarine Spitfire

Hawker Hurricane

Bf109

Bf 110

Bases Hex

Bases Stands

 When it is obvious that the goals cannot be reached, don’t adjust the goals, adjust the action steps.- Confucius

Battletech – Buildings Sci-Fi Light Commercial

Here are my next lot of battletech buildings, three light commercial buildings to expand the city. The powers on, the roads are down, people are getting comfy in there homes and now they can walk down the road to the corner shop for a quick coffee, a haircut or some dancing at the local night club. As with the houses three designs have been created by the three companies offering building designs to the newly formed city.

Battletech 6mm City Commercial Buildings 1_1
B.O.R.I.N.G Construction Company are back and have truly excelled to bring you an even more lack luster design than before. They have developed a lower level shop unit that can simply be placed down before the existing house design to give you a small shop with an upstairs apartment or a large venue featuring up and downstairs area’s. Fortunately the designers did see clear to add more expansive glass paneling at the store front – bullet resistant glass is available on request for those buildings located in less reputable surroundings.

Battletech 6mm City Commercial Buildings 1_4


The next offering is from Cubico Construction Pty Ltd, they have continued with the modular theme for there buildings. They have added a new shop front base with a slightly altered upper floor window configuration module, more suited to use as a small office space or open plan restaurant, they do however offer this new upper floor in an open plan house configuration.

Battletech 6mm City Commercial Buildings 1_5

STAR Industries realizing they needed to keep pace with the other two companies, looked over the back inventory of star ship components and uncovered that they had several thousand units of standard cargo transport pods (HEX-11-21) on hand. Sealing up the entry and exit hatches on the ends and then tipping them on there ends provided a near instant light commercial building. They then simply added some windows, a new door and some internal fit out. For STAR Industries these are cheap to make as they are currently using up there stockpile of transport pods, so if you need a building fast no-ones going to be able to get one on site faster than STAR.

Battletech 6mm City Commercial Buildings 1_6

I’ve included about 23 different shop signs with the buildings so you can make the buildings multiple times and place different signs on each one. I’ve done two different sign types a flat glue on the front sign and a vertical sign. For the vertical sign you’ll need to run a thin film of glue down the edge and bottom to glue it in place, at this scale including glue tabs is near impossible. The second design (Cubico Construction)you should be able to mix and match with the existing pieces to get some interesting looks. Once again I’ve uploaded a copy of the sketchup file to the warehouse(Here).

I’ve created a 32/33mm PDF version and a 38mm (1.5inch) PDF version, links are below enjoy:

Commercial Small One 32_33mm

Commercial Small One 38mm


Battletech 6mm City Build So Far

 I have been impressed with the urgency of doing. Knowing is not enough; we must apply. Being willing is not enough; we must do. – Leonardo da Vinci

Papercraft Kuboid Dragon – Something Fun

Will across at Inked Adventures  doodled a nifty little cuboid dragon, which was really awesome so I felt inspired to create this 3D papercraft version of Wills Dragon or Fan art….maybe fan paper model is a better term.

Dragon Papercraft Live Build Christmas Colors S01

I didn’t have any particular design goal in mind when I created the model it really was just made as a fun little dude (or dudette) to hang/sit around the place. For myself I plan to sit one on top of my monitor and I’ll make a few for the old Christmas tree this year to give it a bit of a fantasy theme.

Dragon Papercraft 3 View S01

I did design two slightly different sizes a 6.5 inch long model and a 4.5 inch long model. The larger model fills three pages and the smaller model fits on a single page. I have included four main colours as well as a version you can print and hand to a small assistant to colour in :).

Dragon Papercraft Christmas Colors S01

Not much else to say except here are the files, enjoy 🙂

Kuboid Dragon

Mini Kuboid Dragon

It does not do to leave a live dragon out of your calculations, if you live near him. – J. R. R. Tolkien

Battletech – Building Sci-Fi Houses

Houses ThumbnailNow that the Power Plant is built and we’ve established some Roads, People have started to move into the Town. Three styles of house have started to spring up designed and built by three different construction companies but with a sci-fi look and feel (hopefully) – Sorry to much Simcity again :).

Houses Scene

First up we have the Bunker by the B.O.R.I.N.G Construction Company. A fairly simple industrial looking concrete bunker building, used for both military and civilian purposes. Quick and cheap to build and extremely sturdy.  The company plans to extend the range for the military by offering rooftop mounted weapon modules in the future.

Sci-fi House 1


Cubico Construction Pty Ltd is providing a more modern look to their buildings in a two story layout. With the top floor of the building dedicated to the living areas/bedrooms and the lower floor for the garage/workshop/laundry space.  Appealing to the more affluent members of the city, these buildings are  more expensive to build due to the extensive use of large glass panels. Due to the square design the floors can be built offsite and then moved into location and bolted together, this also enables the floors to bolted together differently or added to at the client request very easily.

Sci-fi House 2


Lastly STAR Industries a former spaceship building company has entered the housing market to try and bolster there income streams.  There design more than a little resembles the spaceships they normally design and assemble. This does however mean the designs are strong and suitable for both civilian and military use.  Unfortunately the interiors also resemble spaceships, with bulkhead doors used in some of the cheaper fit outs. Great for military applications but not so much for your daily household when little Tommy continually trips over the door jam.

Sci-fi House 3

Messed up the texturing on this one, should only have a doorway on the right

Okay enough fluff stuff :). I used the same texture pack that I used for the power plant so the houses have a consistent look and feel with the power plant. I’ve also uplaoded a copy of the sketchup file to the warehouse, not sure if that will be useful to anyone in the future (Here). I’ve created a 32/33mm PDF version and a 38mm (1.5inch) PDF version, links are below enjoy:

Houses Group One 32_33mm

Houses Group One 38mm

Houses Only

An investment in knowledge pays the best interest – Benjamin Franklin


Battletech – Roads Asphalt

6mm Asphalt Road Tiles Decorative CircleNow that we have power on our Battletech map-board we need some roads so people can move around and start to build the city…maybe I’ve played a little to much Simcity in my time. Some simple asphalt road tiles to spread around your map board to give it more of a city feel. Later I may do some transition tiles for cross-country roads so they meld better with a green background.

The road tile image I created myself using base textures, there’s not to much to a simple road tile, concrete, asphalt and some drop shadows and your pretty much done. I did throw on some drains and rubbish but at this scale you’ll need a magnify glass to see them. As Battletech runs in two very different scales, 1:300 for the miniatures and 1:900 for the ground scale I struggled a little with what to do. In the end I scaled the road widths to about 1:300 so two 1:300 cars can be placed on each road half and not look strange. The car-park tile I split the difference and just made the parking spots about 1:500 no particular reason other than it looked okay.  Later I might do a proper drop in 1:300 scale car-park area in various hex sizes making the single tile redundant but it works for now.

Asphalt Road Tiles 1200x900

It would seem that hex size on the old Battletech maps and the new Battletech maps is different. Not by much 32mm vs 33mm. However that 1mm causes big problems when you string 10 road tiles together in a long straight suddenly your either half hex short or half hex to long. So the only solution I could see was to export a version at 32mm and a version at 33mm. If your using mostly new map-boards or the downloaded map sheets from RPGnow. It is safest to stick with the 33mm size, if you have a ton of old printed map sheets from the 80s/90s go with the 32mm sized tiles, If your not sure I’d run with the 33mm as that’s what the new stuff seems to be created in. I also created a 38mm/1.5inch version for those playing on a larger hex size. If someone has a need for some other odd size feel free to leave a comment and I’ll export a copy at that size (hex dimensions flat to flat in mm) – not promising it’ll have the layer options :). Due to this 32/33 discrepancy I’ll also need to upload a new base for the power plant in 33mm but I’ll do this when I get time to finish the page of plain concrete pieces.

Asphalt Road Tiles mockup  1200x900

I used the Megamek Road tiles to check I had included all the various turn shapes etc, hopefully I haven’t missed any. Later on I might try and pull together a high tech road set if I can find some inspiration but for the moment I’ve got more than enough basic models to work on. No cut files as they seemed a tad redundant as you’ll need to glue the tiles to some heavier weight card and cut around them so the tiles have more heft/durability. I’d recommend box board, matt board, cereal box card as good starters to back the tiles to, or you can do what I did and mount them on 0.8mm magnetic sheet. They are much easier and quicker to cut out with scissors than using a box cutter or scalpel blade.

To prevent them slipping around you can paint the backs with a thin layer of PVA glue or if you can get hold of it that paint on rubber stuff that should help a little with keeping them in place (trusty old blu-tak will also work). If you do use magnetic sheet simply place a big piece of flat tin/steel (1.5mm thick) under your paper map and then drop the tiles on and they wont shift and as a bonus the map sheet wont move either. Links to the pdf files are below- enjoy 🙂

Roads Asphalt 32mm hex 1.25 inches

Roads Asphalt 33mm hex 1.3 inches

Roads Asphalth 38mm hex 1.5 inches

Step with care and great tact ,and remember that Life’s a Great Balancing Act. – Dr. Seuss 


Battletech – Building Sci-Fi Power Plant

There is not to much card/paper hex based terrain around the internet that is designed to neatly fit on the standard 32mm or 1-3/16 inch Battletech hex without overhanging. As a sort of sub project in one of the several larger projects I’ve been working on, here is a Sci-fi power plant designed to fit neatly inside 5 standard Battletech hex’s.

Final Picture Scaled

Battlemechs not included 🙂

I designed the simple mesh in sketchup and then retrieved one of the many free sci-fi texture packs available across the internet to texture the mesh in GIMP – Full credit to Philipk across at the polycount forum for making the textures freely available. I did do some recolouring and tweaking to textures so they looked better on printout although at 6mm scale, textures are pretty redundant by the time the printer prints them.

PowerGeneratorOneSketchupColours

I did do two size varieties a standard 32mm 1-3/16inch hex size model and a 38mm 1 – 1/2 inch hex size model. Essentially the larger is just an upscale of the smaller although I kept the single door at about 7mm tall on both. My goal for the 32mm model was to have all the parts on a single page which was a bit of tight squeeze but they all fit with a bit of careful placement, unfortunately the 38mm model spans two pages.  I did a cutfile for the 32mm version which I also test built, although my cutter is playing up again so use the cut file at your own risk. The larger 38mm model has no cutfile – sorry, but I did include the rego marks in the 38mm pdf so generating one from the 32mm cut file should be easy enough if you have the desire. Minimal instructions included as most of the shapes are pretty simple box’s and half circles to assemble, although I have included an exploded view of the completed model inside the PDF’s and a few assembly dot points.

Exploded Image

I’ve uploaded a copy of the cleaned up sketchup file with the blue textures in place to the sketchup warehouse (Here). I have some plans for a modified 15mm and 30mm version for normal sized wargaming but I’ll have to see if I have time pull those together later on.

Power Plant One 32mm 1-25 inch

Power Plant One 38mm_1-5 Inch

Rename the studio file from .txt to .studio once you’ve downloaded it

Power Plant One 32mm cut File

Do not follow where the path may lead. Go instead where there is no path and leave a trail – Ralph Waldo Emerson

Treasure Chest Half Round Lid – Papercraft

It has been a long time since I pulled together a paper model of my own. So I decided to re-use the textures from the card box’s I created for Dungeon on a treasure chest mesh I designed about 2 years ago. It’s your fairly standard cliche treasure chest design with a square base and half rounded lid.

Treasure Chest One

The card box textures give the chests a cartoon feel and I’ll be using my assembled chests with Dungeon Plungin. The chests themselves are about 1 x 3/4 x 1 inch (length x width x height). I’ve included 3 different metal strapping colours, gold, silver/metal and copper. I assembled the layered PDF using Scribus and then used Chez/Mel ebbles fix to make the layers only print what you have turned on (Big thanks to Ebbles for sharing the fix).

Treasure Chest TwoFigures by Dungeon Plungin, Tile by Inked Adventures

If you’d like the files here they are:

Treasure Chest Half Round

Treasure Chest Instructions

Studio File on Dropbox

Have fun gaming 🙂

Snow Tundra Tiles/Terrain

Snow Tundra Terrain Tiles

The Cardboard Warriors forum hoard 104 was Xmas Wars and as I’ve always wanted to try my hand at creating some terrain I thought some Snow Tundra tiles would be a nice start. It turned out to not be as easy as I hoped as getting some form of texture into a white snow background is very challenging.

First up I sorted through my skiing photos looking for a good snow texture, unfortunately real snow when used as a texture looks very boring basically you may as well just go and cut out 6 inch squares from plain white card. So I took a segment of particularly interesting textured snow from one of my photos, duplicated it and then bump mapped and played around with the colours until I got a base texture I was pretty happy with. I then added an overlay of irregular white shapes to represent blown snow drifts and then finally placed on some rocks, logs, grass tops and a frozen pond (sorry no river it was beyond me, plus no time). I’m fairly happy with how the tiles turned out although the shadows around the rocks didn’t really work the way I wanted but overall they look good on the table. I turned the whole thing into a layered PDF and with the bits I’ve put in you can get about 8-9 fairly unique tiles.

Snow Tundra Terrain TilesReady for Xmas Wars miniatures to be deployed

I also put together a quick snow covered tri-fold pine tree, I changed the colour a little on the tree so there is a green/green tree and blue/green tree in 3 sizes; 5 3/4, 4 3/4 and 3 inch tall versions. I only had time to put together one tree texture so all the versions use the same texture but I’m very happy with how they turned out as I don’t think there are any snow covered pine trees out there in the war gaming paper tree world. I did make the little 1/3 base circle bits separate so if you like you can easily integrate my trees with one of the commercial snow terrain sets around the place.

Snowy Paper Pine Trees

Three Sizes of Snow Covered Pine Trees

I’ll be including my Snow Tundra tiles in hoard 104 but they are available below  for download as well. I’ve included both a Cameo and SD cutfiles,  Unfortunately I cant test the Cameo file so use with caution, if they do work okay please let me know in the comments below.

The below is a zip file but I’ve had to rename it as an odt so right click save as and then rename the extension .zip once downloaded.

All Zipped – Sirrob01 Snow Tile Final

I’ve only put the cutfiles in the zip as I have rename those anyways but below are just the PDF’s.

PDF – Snow Tiles and Pine Trees

PDF Instructions – Pine Tree Instructions

Enjoy 🙂

UFO MK I – Papercraft

I’ve spent the past 2-3 weeks working on finishing a papercraft UFO, primarily to use with Okumarts retro aliens. The UFO itself is reasonably small (75mm/3inches across), this does mean some of the parts are quiet difficult to build due to the size of the parts. The Guns are the most fiddly followed by the canopy and then the rest of the UFO. I will warn that this is not an easy model to assemble and you will need at least 2 hours to cut and assemble the clear canopy version, the first time you make it. I have also included a solid coloured canopy if you don’t want all the internal detail

Quick Download Links
UFO Mk1 Final – PDF (25mb)
Instructions UFO Mk1 (5mb)
UFO Mark One Studio  (rename extension to “.studio” after download)

I designed the base UFO in sketchup and ran through several different designs before settling on an Octogon as the bases for the UFO.

For each of the initial designs I also built a rough version in plain white card to see how hard the design was to build. I added some small plastic beads to the below gun ends to help give them that more retro laser/gun look similar to how Okumarts drew his weapons.

To try and make the instructions a little clearer after I’d flattened the model and textured it. I laid the texture over the top of the sketchup model and created some renders for use in the instructions. Below are some renders I made up for the instructions, you can see the rest in the instructions :). I learnt a lot about what not to do when trying to texture a model in Skechup and will be much more careful with the layout of any future models.

As far as texturing goes it was fairly standard GIMP work, I did add two base  texture types a sort of brushed metal look and a more enamel paint look. I put in a large number of colour options as not all the colours worked with both texturing looks, plus I’ve learn’t to keep my texture and colour layers seperate so that adding a new colour is just a matter of duplicate existing layer and flood fill. I also split the base and cockpit out so you can have a coloured top, a metal coloured base and then if you like a different coloured metal texture for the inside of the cockpit. I added a few other customizable bits such as; different insignia, different light colours, several different engine globe colours and two different clear canopy designs (see final picture (type two) and test build (type one)) . There is a studio cut file for the model (use the new Studio Designer to open), I included both an SD and Cameo layer for cutting, the SD is the default layer so if your cutting on the new Cameo don’t forget to turn on the correct layer before printing (if anyone does use a Cameo to cut the file let me know if it works :)). I have hand cut and cut with the Silhouette SD and due to the size and scale of some parts on the UFO if you can afford the time I’d definitely recommend hand cutting as the human hand and eye are still more accurate than the SD, with the small parts on the UFO even a small mis-alignment during cutting can cause problems during assembly of the UFO.

Newspaper Mockup: City Scape by Barive, Text inspired by H.G.Wells War of the Worlds

I actually had a lot of fun putting this model together, with both the dragonfly and dunebuggy I used a lot of time up learning how to best lay the files out etc which meant a bundle of re-work for both. Although still a lot of work the UFO seemed to flow much better and I knew what to do to help speed up certain steps and what to expect in regards to amount of work at each step. A rough breakdown of time is about a 1/3 on the mesh, 1/3 on texturing/layout and 1/3 on instructions.

I’m off to build a few more UFO’s so that my retro aliens can face of against the terra force marines and at least have some chance of competing against the Dunebuggy and Dragonfly. Hope you enjoy the model :).

UFO Mk1 Final – PDF (25mb)

Instructions UFO Mk1 (5mb)

UFO Mark One Studio  (rename extension to “.studio” after download)

Flight stand from Dragonfly


Project Status


WWII Project First Release

80%


B-tech Buildings Five

20%


Design Victorian era City

15%


Something Different

5%


Enter your email address to follow this blog and receive notifications of new posts by email.

Join 110 other subscribers

Content Released Under

Creative Commons License
This work is licensed under a Creative Commons Attribution-NonCommercial 3.0 Unported License.
Please Attribute to Sirrob01 with a link back to my blog