Archive Page 2

Battletech – Building Sci-Fi Power Plant

There is not to much card/paper hex based terrain around the internet that is designed to neatly fit on the standard 32mm or 1-3/16 inch Battletech hex without overhanging. As a sort of sub project in one of the several larger projects I’ve been working on, here is a Sci-fi power plant designed to fit neatly inside 5 standard Battletech hex’s.

Final Picture Scaled

Battlemechs not included 🙂

I designed the simple mesh in sketchup and then retrieved one of the many free sci-fi texture packs available across the internet to texture the mesh in GIMP – Full credit to Philipk across at the polycount forum for making the textures freely available. I did do some recolouring and tweaking to textures so they looked better on printout although at 6mm scale, textures are pretty redundant by the time the printer prints them.

PowerGeneratorOneSketchupColours

I did do two size varieties a standard 32mm 1-3/16inch hex size model and a 38mm 1 – 1/2 inch hex size model. Essentially the larger is just an upscale of the smaller although I kept the single door at about 7mm tall on both. My goal for the 32mm model was to have all the parts on a single page which was a bit of tight squeeze but they all fit with a bit of careful placement, unfortunately the 38mm model spans two pages.  I did a cutfile for the 32mm version which I also test built, although my cutter is playing up again so use the cut file at your own risk. The larger 38mm model has no cutfile – sorry, but I did include the rego marks in the 38mm pdf so generating one from the 32mm cut file should be easy enough if you have the desire. Minimal instructions included as most of the shapes are pretty simple box’s and half circles to assemble, although I have included an exploded view of the completed model inside the PDF’s and a few assembly dot points.

Exploded Image

I’ve uploaded a copy of the cleaned up sketchup file with the blue textures in place to the sketchup warehouse (Here). I have some plans for a modified 15mm and 30mm version for normal sized wargaming but I’ll have to see if I have time pull those together later on.

Power Plant One 32mm 1-25 inch

Power Plant One 38mm_1-5 Inch

Rename the studio file from .txt to .studio once you’ve downloaded it

Power Plant One 32mm cut File

Do not follow where the path may lead. Go instead where there is no path and leave a trail – Ralph Waldo Emerson

Miniature Painting – Battletech 3rd Edition Mechs

I finished painting four battlemechs from the old 3rd edition intro box. The four I painted are the Phoenix Hawk PXH-1, Griffin GRF-1N, Thunderbolt TDR-5S and Warhammer WHM-6R. A good friend let me take them from his stockpile of mechs to practice painting on with the understanding if I totally turned them into messy plastic blobs no problem. I think they turned out okay and should be okay for use on the tabletop.

These miniatures are not what you would call premium quality with sunken bits, holes and missing detail. The plastic itself doesn’t sand or file very well and only a really sharp blade seems capable of cleaning up the flash. The plastic itself is also very slippery with super glue struggling to adhere unless its roughed up. On each mech I did my best to clean them up as well as bending the arms around a little, I also added some magnet sheet to the bottoms to add some weight. I picked a paint scheme from the Federated Suns -1st Aragon Borderers   basically because it was majority blue which is an easier colour to paint and would fit the 3025 era mechs.

Battletech 3rd Edition Federated Suns 1st Aragon Borders

First up the Griffin, I reworked the gun and replaced it it with something more substantial and hopefully PPC looking. I’m pretty happy with how the cockpit came out on this one and the mech overall although I’m a little biased as the Griffin is one of my Favorite mechs.

Battletech 3rd Edition Griffin GRF-1N


Next up is the Phoenix hawk, minimal changes a little arm bending, leg bending  and a new gun barrel. The 4 antenna were a little painful to insert in place but they turned out okay, I used a bristle from a dustpan brush. I did paint this one slightly different to the others, on the Phoneix Hawk I tried to highlight the edges using the side of the paint brush rather than dry brushing. The result is definitely cleaner and nicer looking so I’ll continue practicing that technique.

Battletech 3rd Edition Phoenix Hawk PXH-1


Next up the thunderbolt, bent the arm up and replaced the end of the gun barrel but he still appears slightly off balance. I did not paint any of the numbers or insignia on any of the mechs they are all self print decals.

Battletech 3rd Edition Thunderbolt TDR-5S


Lastly the trusty old Warhammer, He really is the most boring of the bunch although I used him as a checker pattern practice, hard to see in the pictures but the bulbus bits on the backs of his lower legs are all checkered. If I paint another one of these I’ll try and add some different coloring around the torso area.

Battletech 3rd Edition Warhammer WHM-6R


I had fun painting these and for the first time I’m pretty happy with how they turned out. I hope to paint a few more next would be a star of Clan Mechs.

In order to succeed, your desire for success should be greater than your fear of failure – Bill Cosby


Donating my Ponytail

A quick first post for the new year. I’ve spent the past 2.5 years growing my hair out to basically donate to the Pantene Beautiful Lengths, not sure mine are to beautiful but I figured as I can’t donate blood that this was one small thing I could donate. I ended with a ponytail about 30cm long when it’s stretched out  which is plenty of length.

Pantene Hair Donation

If your interested in donating your hair to a good cause and are in Australia or New Zealand check out the website. Other countries have similar types of things run by different groups US and Canada – this and this, For the UK try here. There are numerous others for other countries a quick google search will normally give you plenty of options, try  using “Donate hair Countryname”. If your thinking about cutting your already long hair or can just grow it to donate it do consider doing it :).

“Three things in human life are important: the first is to be kind; the second is to be kind; and the third is to be kind.” ― Henry James

Flipit Black X – Commanders

Flipit Black X Commander Hanz Gewehr MiniI’ve been slowly working my way through building the Black X faction for Flipit. I’ve got a tub full of half finished Black X troops still to go but the commanders and almost all the vehicles are finished (One Tank to go).

The Black x faction for Flipit has four commanders as someone pulled together an extra commander who suspiciously resembles Colonel Klink. The three commanders done by Newobmij have special abilities I was unable to locate any special rules for Hauptman (Col Klink 🙂 ). I’ll either have to make up some of my own or simply sub the abilities for one of the others in.

Flipit Black X CommandersI wanted to give my Black X faction for flipit a city base theme, It probably seems odd to some people to have a basing theme for paper miniatures. However paper, plastic or metal good basing can really help finish off the miniatures and tie the army together. For the four commanders I made up some slightly raised bases so it looks like they are standing on the pavement in front of a road. I’m not sure it quiet works. It does give them a slight lift that should make them stand out from the regular troops so for the moment I’m happy with the effect. As I wasn’t sure this would work I magnetized the base of the miniatures and the top of the pavement surface so the miniatures can be removed from their bases easily (Erwin Muttonschnitzel needed this anyway).

Flipit Black X Commanders Magnetic BasesFat Dragon Games Capital City used for bases

Nothing much to mention in the assembly of Four Black X commanders for Flipit. Hanz Gewehr, Gunter Donnerfaust, Muttonschnitzel and Hauptmann all go together fairly easily. Donnerfausts claw and Hauptmanns crop were a little fiddly but this will have been because I’m building at 75% of full size.

Flipit Black X Commander Hauptmann

Flipit Black X Commander Hanz Gewehr

Flipit Black X Commander Gunter Donnerfaust

Flipit Black X Commander Erwin Muttonschnitzel

Captian Erwin Muttonschnitzel is a little different his special ability lets him drive (command an Uberpanzer). When I dropped him into the top of the Uberpanzers turret his arms naturally caught and he was suspended at a terrible angle. I created a little magnetic stool for him to stand on when driving the tank this means he pokes out a little more than normal but lets him stand straight. This issue was probably caused as I built the Uberpanzer as with the Blue Falcons Tank at 100% not 75%.

Flipit Black X Commander Erwin Muttonschnitzel Tank Riser

Flipit Black X Commander Erwin Muttonschnitzel Uberpanzer (Tank)

The commanders for the Black X army are now ready to lead there troops into battle. Muttonschnitzel is peppering me with tiny tank fire demanding I hurry up and finish the troops so they can face off against their adversaries the Blue Falcons….I better get back to building those troops before he ups the fire rate 🙂 .

Thousands of candles can be lit from a single candle, and the life of the candle will not be shortened. Happiness never decreases by being shared. – Buddha

Papercraft Build – Onemonk Hybrid Cannoneer

Onemonk Chimera Hybrid Cannoneer SmallThe onemonk site has not had a new release in a while but two days ago the Chimera Hybrid Cannoneer was released.  For those who missed it  Squirmydad took over custodianship of the onemonk website and all the content 4-5 months ago. Squirmydad has spent the past few months re-releasing all the old sets.  Now  the back catalog is back up he has released the first new set the Chimera Hybrid Cannoneer. Many of us have been waiting a longtime for this model ever since Onemonk showed some concept art 2-3 years ago… hmm maybe longer. I needed a break from building Flipit Black X troopers (25 waiting for arms) so I decided to build a Cannoneer.

Onemonk Chimera Hybrid Cannoneer all

The Cannoneer is a large model, think of it as either a light vehicle or small mech rather than as a single human sized model. The Cannoneer comes with four different weapons an Acid Lobber (right end), Spike Cannon (Left end) and two different types of claws (middle). These all mount to the top edge of the carapace, although I think I’ll be using the claws more for mods or possibly mount them down lower.

Onemonk Chimera Hybrid Cannoneer Spike Cannon

Onemonk Chimera Hybrid Cannoneer Acid Lobber

You can mount the weapons permanently or the Spike Cannon and Acid Lobber fit tightly enough that you can leave them as swappable weapon options (what I’ll be doing). I will be spraying mine with clear matte varnish so that the printed surface doesn’t take to much wear when sliding them on and off.

Onemonk Chimera Hybrid Cannoneer Claws Two

Onemonk Chimera Hybrid Cannoneer Claws One

Once I finished wrestling with my printer (its getting a little old 🙂 )the assembling of the model wasn’t difficult but it did take some time, this is fine if you remember the model equates to a light mecha or vehicle rather than a single  humanoid trooper. The Chimera Cannoneer will certainly help round out the Chimera Brood as they have been sorely lacking some heavier units/fire support. Unfortunately all the other Chimera models I had built were destroyed when the roof leaked in our back sun room so I’ll have to rebuild all the others from scratch again. This will be after the Black X army and the Orcs I’m working on, so many fun things so little time.

Onemonk Chimera Hybrid Cannoneer Ambush

If your looking for a Xenomorph styled Army but don’t want figure flats or are willing to spend a little more time building up the 2.5d Chimera Brood, drop across to RPGnow and pick up the whole set and then grab the Chimera Hybrid Cannoneer. I’m pretty sure you wont be disappointed and the sets even though a little old  (except the Chimera Hybrid Cannoneer) are still great value for money.

The mind is everything. What you think you become.  – Buddha

Flipit Blue Falcons – Vehicles

Blue Falcons JetHere are the Blue Falcon Vehicles from Flipit, I’ve built all the vehicle types except the Agile II. I will only build that model if I can find a copy of the Red Hammer mech. I’ve  included some notes and handy pointers from when I assembled each vehicle, hopefully these will be helpful for anyone else who may wish  to build their own Blue Falcon army.

First up for the Blue Falcons Motor pool we have the bikes. These are a pretty simple build cut out and score the lines, then fold up one side and glue the front back strip in place, then glue the other side up. I then glued some small rocks into the inside of the bike to help weight the base down. I did push my riders down a little far when I glued them in.

Flipit Blue Falcons Bike Vehicle

Next up is the AA Microtank (Night Owl), I found this model the hardest of all the Blue Falcon vehicles to assemble. Scaling it down to 75% meant the little gun barrels were extremely difficult to roll. So on one of my Microtanks I cheated by replacing the paper gun barrels with toothpicks  cut to the correct length and coloured yellow. The tracks were also a little fiddly but the best way I found to assemble them was to glue the track base to both sides and then wrap the ends around and glue in place. There are not many references around about how to build the Microtank so I pulled together a quick reference page which will hopefully be a helpful to others who might wish to build one.

Flipit Blue Falcons Night Owl Microtank Vehicle

Flipit Blue Falcons AA Microtank Reference

 All Troops need some form of APC and the Blue Falcons come equipped with a rugged 4×4 called the Osprey. The model came together pretty easily, I did modify the windshield and inserted a small clear panel. I glued 4 troops into the vehicle permanently for two reasons; firstly as I based all my soldiers they wont fit in the vehicle with bases and secondly I didn’t want to be fiddling around pulling out and putting troops into the transport mid game much easier to just deploy a unit and mark the vehicle empty.  There are a number of completed pictures of the transport around the place but as with above Microtank I pulled together a quick 1 page assembly reference.

Flipit Blue Falcons Osprey Transport Vehicle

Flipit Blue Falcons Transport Reference

To protect the skies the Blue Falcons can deploy a Fighter Jet (Peregrine).  This is my favorite model for the blue falcon army (followed by the Micro tank), there’s something about it which just makes it cool and fun looking  (I deny all knowledge of sitting around swooshing jets through the air making engine noises). They were however a little fiddly to pull together at 75%. Make sure you have a pen or something thin handy to push/pull/press tabs into place while they glue. Newobmij put together some assembly instructions for the jets. I did build my own custom flight stands which are magnetized and let me store the jets much more easily, I did however make them a little tall and may need to shorten them a little in future.

Flipit Blue Falcons Peregrine Fighter Jet Vehicle One

Flipit Blue Falcons Peregrine Fighter Jet Vehicle Two

Lastly we have the Blue Falcon Tank. I did build a 75% version of this tank but it just seemed a little small for the main line Tank so I rebuilt the tank(s) at 100%. With everything else scaled to 75% this gives the tanks a much more impressive presence on the table, well to me. I’ll be building the other faction tanks at 100% as well. Newobmij has also done a very nice sequence of pictures showing assembly of this tank. The only other minor change I made was that instead of using the paper/card axle I replaced this with a Kebab skewer cut to correct length, it was the perfect size as an axle and much straighter and stronger than anything I could roll from card/paper.

Flipit Blue Falcons Tank Vehicle One

Flipit Blue Falcons Tank Vehicle Two

Lastly I needed some way to store my miniatures, so I grabbed two blue CD box’s from an Office supply store. For one of the CD boxes  I created a lift in and out module to hold the soldiers. The 2nd box will be used to store the Agile II (assuming I build it) and all the vehicles, if I need I can fit several units of troops on the top floor of the lift in and out module and several vehicles on the bottom so if I’m traveling anywhere I can take a single box with enough troops to game with.

Flipit Blue Falcons Carrier Storage One

Flipit Blue Falcons Carrier Storage Two

Well that’s enough troops to field a fairly hefty Blue Falcon army so I’ll move on a build a similar sized black X army. Although I’m really not looking forward to making another 50+ Soldiers :).

Try not to become a man of success, but rather try to become a man of value – Albert Einstein

How to Base Paper Miniatures – Part 2

Paper Miniatures Litko Base Hexagon ZeroI detailed a few of the DIY options available for paper miniature basing here. However there are a few (and I mean a few) commerical options for bases around the web for paper miniatures.

I’m not going to cover the option of simply buying pre-cut plain flat wooden/plastic bases as pretty much that’s the same as permanent flat basing I mentioned in the previous blog post, be it with a little less cutting. I should mention all my paper miniatures are built using 220gsm (140lb) card which means by the time the front and backs are glued together it equates to 440gsm (280lb) thickness. If your using thinner card the bases may not grip as well as they did for me.

The first option are bases described as “card stands”. I’ve only found these as round bases approximately 20mm (3/4 inch) in diameter made of that hard plastic material approximately 6mm tall from base to the top . There are similar bases which are square but unfortunately these are 30mm in size (1 1/4 inch) and a little big for my uses.  Both do come in a wide range of colours and they are pretty cheap, they work out to about 10-20cents (AUD each) and I managed to find them at a few different web stores in various countries (UK round 1 UK round 2, US square 1, US square 2). Basically these stands all work the same they have little offset plastic nodules inside the slot which grab the miniature base tab.

Paper Miniatures Card Base 20mm Round

Over time these bases could slowly tear or wear out the base tab (best to slide them in sideways to minimize damage). However if your at all worried you can always strength the base tab by coating it with super glue this will virtually turn the card into plastic. At the end of the day though if a miniatures tab gets to beat up which should take a fair old while simply reprint the miniature, that is one of the advantages of paper miniatures :). Value for money wise these bases are great so long as you don’t mind the restriction of either 20mm round or 40mm square and your miniatures sitting a little tall. Even if your not sure  grabbing a bag they wont break the bank.

Paper Miniatures Card Base 20mm Round Two

Next up we have the Rolls Royce of paper miniatures stands by Litko games. The bases are custom created/made by Litko so there is a far wider range of choices 12 different shapes and sizes from circles, squares, rectangles and hexagons in various sizes from 20mm to 50mm. They are available in three colours; clear, clear-bronze and solid-black. The bases themselves are cut from 3mm thick acrylic and work by having a slightly curved slot which holds the miniature in place. If you buy a bag of 50 bases they work out at 40cents (USD each), if you stretch it to a bag of 100 they work out slightly cheaper.

Paper Miniatures Litko Base Hexagon One

I tried very hard to shake a miniature out of the base but the bases stubbornly refused to let go of the miniature, so I think Jim over at Litko has designed the curve of the holding slot perfectly. The curve is slight enough that miniatures are not permanently bent and when removed they go back to flat very quickly, the bigger base also means the miniatures are slightly tougher to knock over compared to the 20mm card stands above. I picked up a bag 25mm clear hexagons and will definitely pick up some more bases.

Paper Miniatures Litko Base Hexagon Two

I can’t really recommend one base type over the other, if your in the US and get that super cheap shipping from Litko I’d say just jump at the Litko bases. For the rest of us scattered around the globe paying ridiculous postage no matter what. If your on a very tight budget grab the cheaper bases they’ll be more than acceptable. If you have a few more $$$ to spend grab the Litko bases you wont be disappointed.

Get your facts first, then you can distort them as you please. – Mark Twain

Flipit Blue Falcons – Troops

Flipit Blue Falcons Mechanic SmallA Flipit army wont get very far without troops and support personnel, so here are the Blue Falcon troops. There is not very much I can say about these as the pictures pretty much say it all. I did modify the base Blue Falcon troops so I had a male and female version but all the rest are pretty much stock except printed and built at around 75%. I did mount them all to 1 inch Octagon bases for extra stability (2mm mag sheet) and it seems to help finish them. Some of the edging looks a little rough but I was having issues with edge bleed. The pictures pretty much show the whole story so enjoy :). If you need help building the troops check out this you tube video.

Flipit Blue Falcons Male and Female Soldier Troop

Male and Female Soldiers

Flipit Blue Falcons Soldier Troop Milling AroundAwaiting Parade

Flipit Blue Falcons Soldier Troop In UnitsIn Units On Parade

Flipit Blue Falcons Soldier Troop Single UnitClose Up Single Unit

Flipit Blue Falcons Mortar CrewMortar Crew (Need to build two more)

Flipit Blue Falcons ScientistsScience Team Equipped with Jet Packs

Flipit Blue Falcons Mechanic Medic Veteran SpyMechanic, Medic, Grumpy Sergeant and Saboteur

Flipit Blue Falcons WeaponsArmory – Little Low On Standard Rifles – Weapons tubes were fiddly at 75%

Flipit Blue Falcons Size Scale

Flipit Blue Falcons Size Scale TwoShowing Size Scale

Next up will be all the Blue Falcon vehicles and then I’ll move on to the Black X’s so the Blue Falcons have someone to fight against. I’ll try and find someway to share the female troops somewhere so keep a weather eye open if your interested in those.

There is only one way to avoid criticism: do nothing, say nothing, and be nothing. –Aristotle

Flipit Blue Falcons – Commanders

Flipit Blue Falcons Air Marshal Roce Bleauciel SmlI really like the models for the flipit wargame made by newobimj, probably as they have a fun chibi look. As a bonus they come with there very own wargame called flipit for which newobimj has designed 4 full factions. The game has been around a fair while 4+ years and basically these have been on my to build list for about that long.

I finally settled on a scale to build the armies at I spent way to much time trying to decide on a scale with numerous test builds occuring between 100% and 65%. After comparing all the test builds I finally settled on a 75% scaling. This makes the little weapon tubes still build-able and the miniatures themselves stand about 28mm to the eye or 35mm to the top of the head/helmet. I plan on building all four factions and using them for flipit but also defiance  and of course flying lead.

First up I decided to build the Blue Falcon faction, I spent sometime working out how to assemble a few of the models as well as throwing together a few Custom models. First up I’ve completed the Commanders of the blue falcons faction; Air Marshal Roce Bleauciel, Serge Cargoe and Acel DeSparrow, I modified all of them so they use the karate chop hands and mounted them permanently to octagon bases.

Flipit Blue Falcons Commanders

First up we have Serge Cargoe, semi cyborg mad scientist type who gets around in an exo-skeleton wielding a nasty zap pistol and lightning glove. The assembly of the standard figure was pretty easy simple cylinder and a round top head. The exo-skeleton was a little tougher, I re-enforced each of the legs with wire in the middle and then mounted them to the backpack, bending them a little. I couldn’t find any instructions or any pictures of  an already complete Cargoe so I made a best guess with the leg locations. Hopefully the wire will prevent any future miniature sag through the paper bending.

Flipit Blue Falcons Serge Cargoe

Next up we have Acel DeSparrow, Rocketeer and all round smiling hero. I made some minor adjustments to his helmet colour so it was more gold/brass then silver and knocked together a rocket blast so it looks like he is just lifting off the ground. I used a tank explosion available on the flipit forum to make the rocket fire and smoke.  Looking at it I probably made the smoke and fire a little long.

Flipit Blue Falcons Acel DeSparrow

Lastly we have the big cheese of the Blue Falcons Air Marshal Roce Bleauciel. I didn’t want to have him sitting at the same height as the other falcons so I found a nice Crate papercraft (scaled to about 80%) and placed the Air Marshal on top of the Crate. I was trying to make it look like the Air Marshal was giving a speech before the troops head into battle and so he’s not looking the same as all the other regular troops when placed on the table.

Flipit Blue Falcons Air Marshal Roce Bleauciel

I found these a lot of fun to build and I’ve got more builds in the Blue Falcon faction coming shortly. If I could I’d share my 75% version of these files but unfortunately I can’t post in the flipit forum so for now you’ll have to scale them yourself. Later on if I get an okay to share or can post them in the flipit forum I’ll share them as I’ve done cut files as well. If I was building these guys again I would definitely edge in matching colour rather than in black but as I’ve now started in black edging they’ll all be black edged for consistency :).

Troop Builds here

Today was good. Today was fun. Tomorrow is another one. – Dr. Seuss

Castle Dice Review(Print and Play) – Kickstarter

Castle Dice logoI’ve just finished assembling my print and play copy of Castle dice by Fun to 11 games. I have had this game on my “to build” list for sometime but the number of dice I would have needed to source has always put me off a little. Fun to 11 games ran a kickstarter for Castle dice and had an option for dice only. I didn’t want to pay a small fortune in shipping so I elected for the dice only. As it turned out the dice only reward was meant for the US only (I miss read) but in what I can only say was a stellar level of Customer service, Fun to 11 games shipped the dice all the way to Australia (Big thumbs up and thanks).

Castle Dice All the Dice

A word of caution on Kickstarter, a number of people seem to see/treat kickstarter as a pre-order mechanism. This is not the case at all kickstarter is you providing an unsecured loan to the company or individual to launch a product. This means if the project goes south you’ll receive nothing (well maybe a refund). You can see the information AISC (Australian Investment & Securities Commission) has assembled on crowd funding. Basic rule of thumb as with any investment or business backing, do your research and don’t commit to more than you can afford to lose. Saying that I’ve supported 17 projects; 2 failed to meet funding goals so no cost to me, 7 I’ve received my goods for no issue, 5 I know the stuff is coming as the people running those KS already have 90% completed drafts (basically need funding to produce) or have started shipping, 2 are still active and 1 I’m unsure on but my pledge was minimal and was more of giving someone an opportunity.

On with Castle dice, if you live in the US and definitely want the game, I’d be inclined to just buy the game outright, it’s $65 shipped in the US and although I haven’t seen the printed commercial game in real life, the components look solid from the you-tube video’s. For myself as shipping to Australia almost doubles the cost of the game I used the print and play copy I received from the Kickstarter it contained cleaner artwork than the original print and play files. You might still be able to get these files from the Fun to 11 games website.

Castle Dice Castle Deck

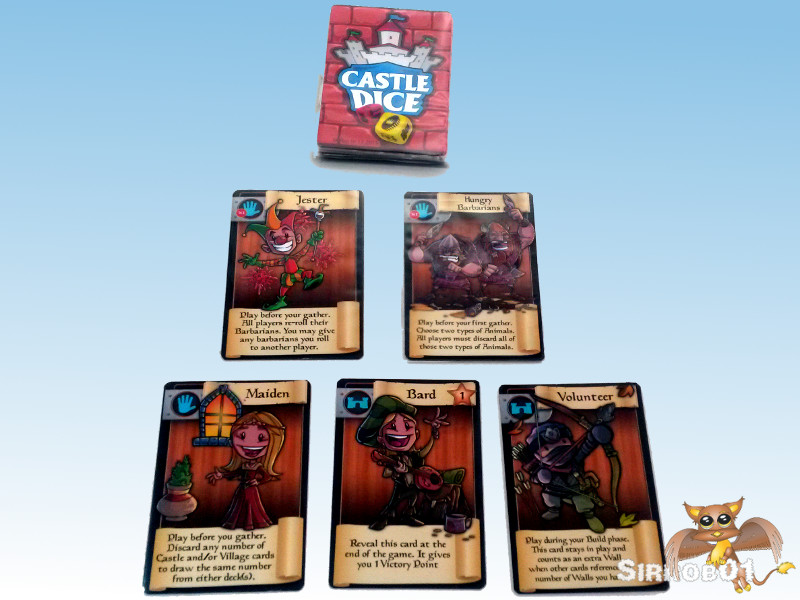
The market cards are meant to be smaller the the villager and castle cards for ease of making them by hand I enlarged my market cards back to standard card size. This enabled me to simply print a front and back for all the cards on sticker sheet, then cut them out using a craft knife as slightly oversize card shaped rectangles. These I then carefully stuck onto the front and back of common magic cards and trimmed any overhang and rounded the corners back.  This was fairly mind destroying to complete 107 cards but they do look good if a tiny bit thick. I did contemplate using artscow however I might in the longer term expand my set to cover upto 8 players which will require me to print more cards and doing it at home through the same printer I can keep them consistent, plus new custom cards become a possibility. All the cards got plastic sleeved to make shuffling a tad easier and limit wear and tear.

Castle Dice Village Deck

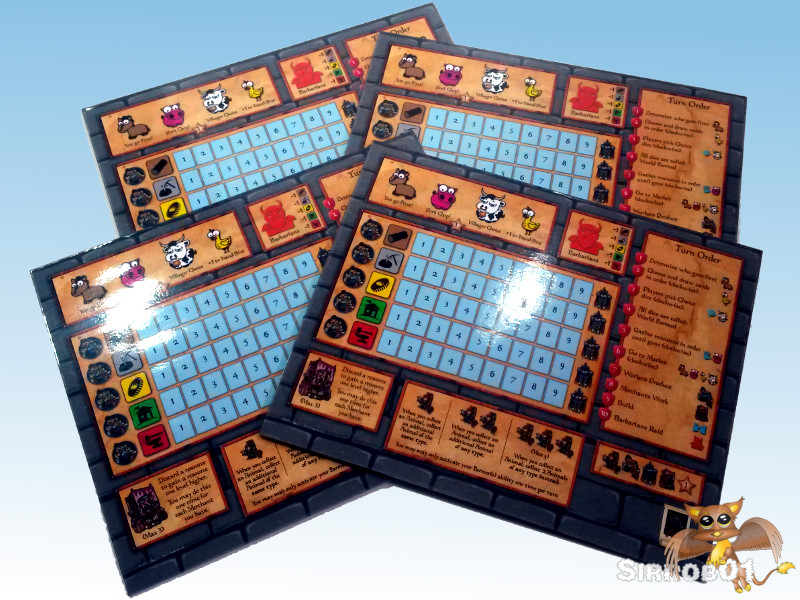
For the playing mats and turn tracker I stuck these down to heavy box board and then covered them with clear contact to help minimize the wear and tear. I did discover that if I spray the box board with 3m glue and then stick the sticker sheet to the box board I seem to get much better adhesion and I had minimal warping. I tried this out the game pieces here as I had noticed a few my dungeon tiles the sticker sheet was lifting away from the box board. my guess is that the box board is very very dry and sucks any moisture out of the sticker backing causing it to lift slightly. I’m hoping the very light layer of 3m glue will provide a barrier and better adhesion, it seems to on these 5 test pieces.

Castle Dice Player Boards

Castle Dice Turn Board

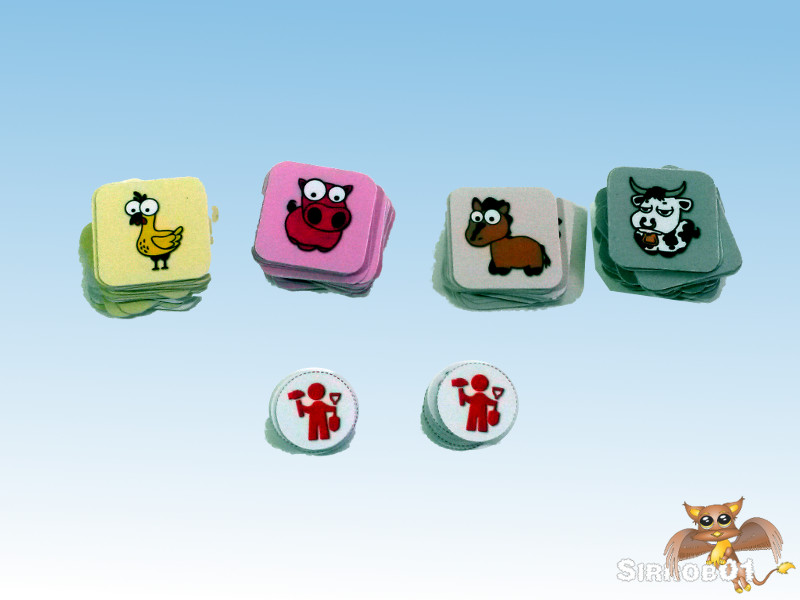
Last up were all the tokens, I ran these through my trusty cutter and other than being a little thin they work well. I’ve played a couple of games and it would definitely be handy if the tokens were a little thicker and double sided. So I’ll probably work on remaking these int he future if the game itself gets enough play time (more on that later). The animal tokens are excellent and look very good on the table, the villager tokens in contrast I’m not so impressed with and I might find and use a different piece of artwork for these when I remake them. For resource markers I used clear glass beads which lets you read the numbers through the beads with little difficulty.

Castle Dice Tokens

We’ve played through a number of games now from everything from 2 through to 6 players (yep stretching it out). For myself and the people who played the game with me we found the game a little to flat/detached with not enough player interaction. Although I should caution that as a group we tend to prefer games with lots of player interaction for example Citadels, Resistance although Munchkin gets rolled our reasonably often in one flavor or another. It’s possible we are simply missing something from the game play or that the game just dosen’t fit what we all prefer to play.

Saying that the game does play solidly, we had no issue with any of the rules and most players had picked up what was going on by about 1/3rd of the way through the first game. I can see it as being a fairly good game for younger gamers (okay anyone with Kids) although depending on age they might struggle a little with some of the card interactions but saying that 8-9 year olds handle Ipads like pros so it probably wont be an issue.  We did find stretching the game to 6 players with just the standard dice wasn’t to much  of a problem. In two of the  turns the person picking last ended up with little choice but this actually made it slightly more enjoyable as we had exhausted the available resources for the world and naturally the time to play was also lengthened.

Castle Dice Market Deck

I do have some idea’s to increase player interaction so as to spice things up a little but as they will be experimental and it will require not an insignificant amount of work on my half to create customs cards etc I may not get to it but in no particular order, there a little shorthand noted:

  • Bribe the Barbarians – play the card and send 1 group of rolled barbarians to any other player.
  • Wall w/ Ballista  – Destroy a bunch of Barbarians.
  • Stables – Send out your on cavalry to raid a neighboring castle (resolve after barbarians raiding castle and receive one of resource if successful)
  • Wall w/ Catapult – Pummel a neighboring castle, not sure how to make this work yet.

I guess the big question is would I buy this game now, answer would have to be No, it just doesn’t fit with what our group enjoys.  I would point out that on BGG castle dice is running at a solid 7+ which is a fairly impressive score for a game so I suspect this is a personal group preference thing more than anything (not every game will please everyone) . If your not sure give the print a play version a try before you buy.

“You can only be young once. But you can always be immature” – Dave Barry

Project Status


WWII Project First Release

80%


B-tech Buildings Five

20%


Design Victorian era City

15%


Something Different

5%


Enter your email address to follow this blog and receive notifications of new posts by email.

Join 110 other subscribers

Content Released Under

Creative Commons License
This work is licensed under a Creative Commons Attribution-NonCommercial 3.0 Unported License.
Please Attribute to Sirrob01 with a link back to my blog

%d bloggers like this: