Posts Tagged 'Papercraft'


Flipit Blue Falcons – Commanders

Flipit Blue Falcons Air Marshal Roce Bleauciel Sml
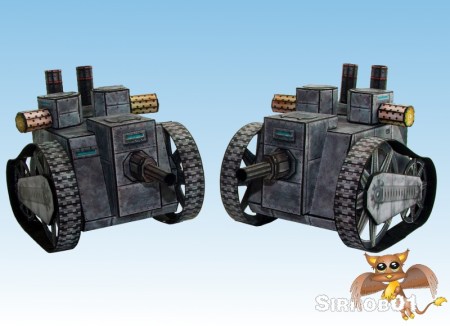
I really like the models for the flipit wargame made by newobimj, probably as they have a fun chibi look. As a bonus they come with there very own wargame called flipit for which newobimj has designed 4 full factions. The game has been around a fair while 4+ years and basically these have been on my to build list for about that long.

I finally settled on a scale to build the armies at I spent way to much time trying to decide on a scale with numerous test builds occuring between 100% and 65%. After comparing all the test builds I finally settled on a 75% scaling. This makes the little weapon tubes still build-able and the miniatures themselves stand about 28mm to the eye or 35mm to the top of the head/helmet. I plan on building all four factions and using them for flipit but also defianceย  and of course flying lead.

First up I decided to build the Blue Falcon faction, I spent sometime working out how to assemble a few of the models as well as throwing together a few Custom models. First up I’ve completed the Commanders of the blue falcons faction; Air Marshal Roce Bleauciel, Serge Cargoe and Acel DeSparrow, I modified all of them so they use the karate chop hands and mounted them permanently to octagon bases.

Flipit Blue Falcons Commanders

First up we have Serge Cargoe, semi cyborg mad scientist type who gets around in an exo-skeleton wielding a nasty zap pistol and lightning glove. The assembly of the standard figure was pretty easy simple cylinder and a round top head. The exo-skeleton was a little tougher, I re-enforced each of the legs with wire in the middle and then mounted them to the backpack, bending them a little. I couldn’t find any instructions or any pictures ofย  an already complete Cargoe so I made a best guess with the leg locations. Hopefully the wire will prevent any future miniature sag through the paper bending.

Flipit Blue Falcons Serge Cargoe

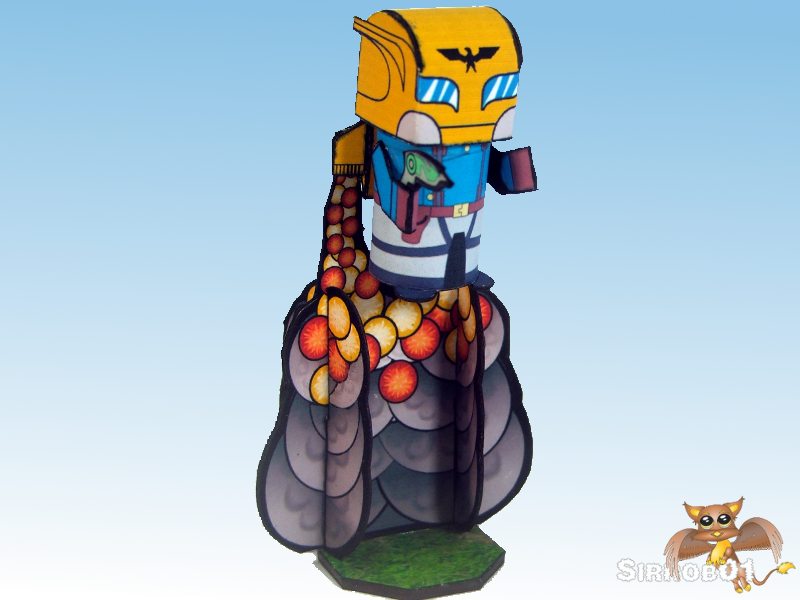
Next up we have Acel DeSparrow, Rocketeer and all round smiling hero. I made some minor adjustments to his helmet colour so it was more gold/brass then silver and knocked together a rocket blast so it looks like he is just lifting off the ground. I used a tank explosion available on the flipit forum to make the rocket fire and smoke.ย  Looking at it I probably made the smoke and fire a little long.

Flipit Blue Falcons Acel DeSparrow

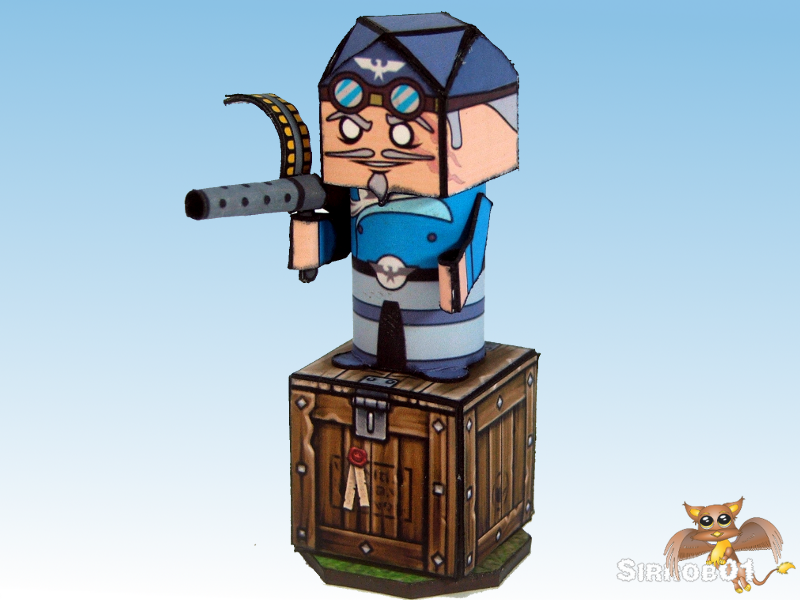
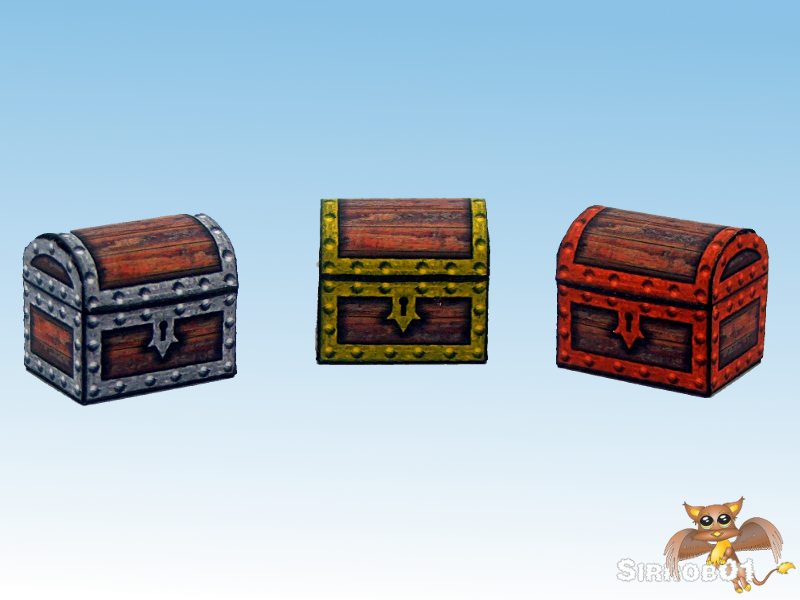
Lastly we have the big cheese of the Blue Falcons Air Marshal Roce Bleauciel. I didn’t want to have him sitting at the same height as the other falcons so I found a nice Crate papercraft (scaled to about 80%) and placed the Air Marshal on top of the Crate. I was trying to make it look like the Air Marshal was giving a speech before the troops head into battle and so he’s not looking the same as all the other regular troops when placed on the table.

Flipit Blue Falcons Air Marshal Roce Bleauciel

I found these a lot of fun to build and I’ve got more builds in the Blue Falcon faction coming shortly. If I could I’d share my 75% version of these files but unfortunately I can’t post in the flipit forum so for now you’ll have to scale them yourself. Later on if I get an okay to share or can post them in the flipit forum I’ll share them as I’ve done cut files as well. If I was building these guys again I would definitely edge in matching colour rather than in black but as I’ve now started in black edging they’ll all be black edged for consistency :).

Troop Builds here

Today was good. Today was fun. Tomorrow is another one. – Dr. Seuss

Treasure Chest Half Round Lid โ€“ Papercraft

It has been a long time since I pulled together a paper model of my own. So I decided to re-use the textures from the card box’s I created for Dungeon on a treasure chest mesh I designed about 2 years ago. It’s your fairly standard cliche treasure chest design with a square base and half rounded lid.

Treasure Chest One

The card box textures give the chests a cartoon feel and I’ll be using my assembled chests with Dungeon Plungin. The chests themselves are about 1 x 3/4 x 1 inch (length x width x height). I’ve included 3 different metal strapping colours, gold, silver/metal and copper. I assembled the layered PDF using Scribus and then used Chez/Mel ebbles fix to make the layers only print what you have turned on (Big thanks to Ebbles for sharing the fix).

Treasure Chest TwoFigures by Dungeon Plungin, Tile by Inked Adventures

If you’d like the files here they are:

Treasure Chest Half Round

Treasure Chest Instructions

Studio File on Dropbox

Have fun gaming ๐Ÿ™‚

Papercraft Build โ€“ Inked Adventures Dungeon Cut-Up Basic

Inked Adventures Dungeon 4 (S01)I have a real soft spot for nostalgic themed games, papercraft or artwork, this little build fills two of those. Ever since Inked Adventures released their basic Dungeon cup setup I’ve been wanting to build enough for a dungeon layout. So I put some time aside over the past few weeksย  and have now built enough tiles to populate a fairly decent sized dungeon, I can see I need to create a few more tiles but for the most part I’m done. As you can tell by the release date it’s taken me a fair bit of time to get around to building these, some of this relates to me trying to find a good material to mount tiles to but I’ll mention more below on that.

All Inked adventure tiles are hand drawn which I find a very nice look. There are 41 pages of dungeon goodness contained in this pack; rooms, corridors, stairs, trap tiles, 2d doors and 3d standup doors multiple versions of both. The beauty of the Dungeon Cut-Up set is even if your not into altering dungeon segments using GIMP/Photoshop, Billiam from Inked Adventuresย  has created this set so you can use a pair of scissors and glue to create your own custom tiles. There are 4 pages of “extra” bits which you can use to either decorate your tiles permanently by sticking them down directly to the tiles or by turning them into loose tiles you can add mid game.

Inked Adventures Dungeon 3 (S01)Layout Example – From an angle

For my set I stuck with components that are multiples of 2inches, 3inches or 6 inches. This will make it simpler to use for Dungeon plungin and Basic fantasy, although I might make a few special rooms that don’t conform to these sizes later on. For the moment I’ve created 8 – 6×6 rooms, 8- 6×2 corridors, 2 – 6×1 corridors, 4 L and T junctions, 2 X junctions, 4 dead ends, 14 small doors, 2 double doors, 2 double joiners, 4 double rockfalls and 2 large pit traps.

Inked Adventures Dungeon 1 (S01)Bits created so far laid out

The rooms I created from the parts supplied by Billiam although I did a fair chunk of altering in Gimp to make them fit a 6×6 square. Other than the room with blue squares you could replicate most of the room designs with a pair of scissors, glue andย  a little ingenuity or simply use the ones that come with the bundle (12 rooms included).

Inked Adventures Dungeon 2 (S01)Example Layout – Top Down

I mentioned at the top I’d been putting of creating these as I’ve never really found a suitable substrate for mounting tiles to. I’ve tested quiet a number of crazy ideas in my time from rubber carpet tiles to magnetic sheet. Not sure if it’s just the extreme weather down under but I’ve found all glues that are easy to use for tile creation (read spray glue even the good 3m stuff) do eventually fail, 3m takes the longest at around the 1-2 year mark.

Inked Adventures Dungeon 6 (S01)Kitchen mat backing, simply double sided taped on

After years I’ve finally narrowed it down to two methods, the first I mentioned in my city build thread 8mm PVC foamboard. A little heavy duty for this application plus chews up extra storage space so I’ve simply used grey boxboard 1400gsm (basically what commercial game boards are made from) and printed directly to sticker sheet, stuck the tiles down then cut around the whole lot giving a nice neat tile. To prevent slipping on smooth tables I used double sided tape to a fix non-slip kitchen mat to the backs. Nothing to out of the ordinary and it’s been done before but I’ve found this one of the better solutions for DIY tiles; No spray glue mess, No warping from glue, No lifting , Reasonably slip proof on a table and lastly they don’t take up to much room to store. My current dungeon tiles fill about 1/3 of anย  A4 document box. To give the doors some weight I stuck them down to some thick (2mm) magnetic sheet, this will also let me stick them to the inside of the lid of the storage box later on to protect them during storage.

Inked Adventures Dungeon 5 (S01)I’ll add some dividers etc later on but just to give an idea on storage

If your not sure you like the style of the tiles or simply want to give them a try there is a free sampler pack which should give you an idea of what to expect. I did this myself while experimenting with tile mounting techniques, once I had a solution I grabbed the full set and haven’t been disappointed. I even grabbed the square tile version although I haven’t used them. I should probably mention that Inked Adventures has released some freebies for this set so grab those as well as they’ll give you more options.

Inked Adventures Dungeon 4 (S01)The whole example layout – yep missed a door on the right

As always have fun building and gaming and I hope to get some more posts up shortly, I have 6 projects 90% complete….I should probably focus on one project at a time rather than starting six at once :).

Papercraft Build โ€“ Steam Ram

Mayhem in Paper Steam Ram Variant F(1)Back in April Squirmydad from Mayhem in Paper released the Steam Ram. At the time I picked up the model with the plan to build a Steampunk army around a couple of them. I’ve finally got around to building two and thought I’d do a review/build post about the Steam Ram.

Once you have purchased the Steam Ram for the very reasonable price of $3.95, you’ll receive a zip which contains:

  • A single layered version of each colour (brown, dark grey, light grey and green) at 28/30mm scale
  • A layered version of the above so you can turn guides and other bits off which is great for customizing
  • A single layered version of each colour (brown, dark grey, light grey and green) at 15mm scale
  • A single layered version of each colour (brown, dark grey, light grey and green) at 15mm scale with all guides off
  • Assembly Instructions and a Card modelling basics file.

On top of this if you own a craftrobo/silhouete/cameo you can slip over to the Mayhem in Paper website and pickup the GSD files for the cutter. All round this is an absolute pile of stuff for the purchase price but as you look through the Instructions and files you’ll notice that Squirmydad has also included parts not just for one model but for at least four different versions. Although with the parts this actually equates to a lot more options, here are the four basic ones easily constructed from the instructions:

  • Wheeled with Main Gun
  • Tracked with Main Gun
  • Wheeled with Top Machine Guns
  • Tracked with Top machine Guns.

Steam Ram Mayhem In Paper Variant A_C

I’ve borrowed the above images from the Instructions (copyright Mayhem in Paper)

The model itself is well laid out and all the parts are easy to identify. If you are hand cutting the model do be aware that not all the parts are used when assembling a Steam Ram so make sure you check the instructions and see what parts are needed for the version your planning to build before just cutting everything out. The 30mm sized Steam Ram is spread across 4 pages but for a single tank build you’ll only need to use about 3 pages of parts.ย  I found the colouring of the ram to be perfect not to dark and not to light scaling wise the ram should be perfect to use with 28mm miniatures. It did take me around 4-5 hours to finish each Ram, they mainly took this long as I was building very carefully and ensuring every join and part was edged, I even sanded a couple of parts to ensure they were perfectly perpendicular. So if your used to assembling card models you should be able to pull a Ram together much more quickly.

I did make some slight modifications to the two tanks I constructed. Firstly I centralized the gun box on the front but then cut out the driver window and glued this to the left of the gun box. I then added both machine guns to the top but set these towards the rear and facing left and right to provide some flanking protection to the tank. Naturally I had to build the tracked version and later on I might add some unit markings when I have more of a feel/theme for the army.

Mayhem in Paper Steam Ram Variant F(1)

Mayhem in Paper Steam Ram Variant F(3)You can see in the above pictureย  how I made use of some of the extra hatches that were included with the Steam Ram to add hatches to the top of the machine gun turrets. I am really happy with how the Steam Ram looks on the table and a pair of them really do look intimidating when I was in no way pretending to push them across a table in formation ๐Ÿ™‚ .

Mayhem in Paper Steam Ram Variant F(2)

I actual had the urge to create some fan art for the Steam Ram, this ended up beingย  some desktop wallpapers and a Kindle screensaver image. First up the wallpapers I did two versions a widescreen 1920×1080 and a 4:3 aspect ratio 1600×1200 version.ย  I am happy with how the wallpapers came out although I’m not sure anyone would actual use them as wallpaper. However they were fun to make and have a Steampunk/Victorian era feel. For want of a better name I’ve called my Steam Ram “Variant F”, Lord Hamilton Squirmydad had already written into the short back story for the model.

Mayhem in Paper Steam Ram 1600x1200 (small2)

1600×1200 version – Link to Full Size

Mayhem in Paper Steam Ram 1920x1080(small2)

1920×1080 version – Link to Full Size

Lastly I pulled together a quick version for a Kindle Screensaver. The image below will appear slightly washed out but it has been colour balanced to look okay on an e-ink Kindle not a computer monitor :). I’ve uploaded the below on my kindle and it now cycles through in my screensavers and if anything still appears a little dark (note you do need to jailbreak your kindle to use custom screensavers).

00006_Card_Steam_Ram

Click the above and then right click save as

As you can probably tell I really enjoyed building the Steam Rams and the customization options available in the PDF’s is huge with a large variaty of models achievable from just the base included parts. As I mentioned above I plan on building an entire Steam punk army around these two models and then using either Defiance VG or No Limits to spec the army out so watch out for more models/miniatures and eventually army lists in the coming months. If you haven’t already done so this model is well worth the money so head over to RPGNOW and grab a copy you wont be disappointed.

Hope you enjoy your Steam Ram, I’m going to go back to not pushing mine around a table in formation ๐Ÿ™‚ .

Cardboard Warriors Forum โ€“ Paper Miniature Hoard 104

Cardboard Warriors forum Hoard 104 is finished and released, this hoard contains some good stuff to pack out your Christmas Wars armies with. There is the Reinhold by Squirmydad a couple of mini-gun wielding Santa’s by Ryan and the Snow Tundra Tiles and Toy Soldiers from myself.

hoard104
You can pick up other Xmas Wars goodness from Hoards 38, 39, 40 and 88 . Between the old hoards and the new one this year you can put together a couple of very nice themed warbands or a whole Xmas wars themed army.

The December Hoard (105) with a theme of Chaos Unleashed/Modern & Ancient is open and will remain so until mid Jan so why not head over and create a miniature, a piece of terrain or a vehicle for the hoard.

Hoard 104 โ€“ November 2012

Enjoy battling with Xmas wars miniatures over the holidays :)

Snow Tundra Tiles/Terrain

Snow Tundra Terrain Tiles

The Cardboard Warriors forum hoard 104 was Xmas Wars and as I’ve always wanted to try my hand at creating some terrain I thought some Snow Tundra tiles would be a nice start. It turned out to not be as easy as I hoped as getting some form of texture into a white snow background is very challenging.

First up I sorted through my skiing photos looking for a good snow texture, unfortunately real snow when used as a texture looks very boring basically you may as well just go and cut out 6 inch squares from plain white card. So I took a segment of particularly interesting textured snow from one of my photos, duplicated it and then bump mapped and played around with the colours until I got a base texture I was pretty happy with. I then added an overlay of irregular white shapes to represent blown snow drifts and then finally placed on some rocks, logs, grass tops and a frozen pond (sorry no river it was beyond me, plus no time). I’m fairly happy with how the tiles turned out although the shadows around the rocks didn’t really work the way I wanted but overall they look good on the table. I turned the whole thing into a layered PDF and with the bits I’ve put in you can get about 8-9 fairly unique tiles.

Snow Tundra Terrain TilesReady for Xmas Wars miniatures to be deployed

I also put together a quick snow covered tri-fold pine tree, I changed the colour a little on the tree so there is a green/green tree and blue/green tree in 3 sizes; 5 3/4, 4 3/4 and 3 inch tall versions. I only had time to put together one tree texture so all the versions use the same texture but I’m very happy with how they turned out as I don’t think there are any snow covered pine trees out there in the war gaming paper tree world. I did make the little 1/3 base circle bits separate so if you like you can easily integrate my trees with one of the commercial snow terrain sets around the place.

Snowy Paper Pine Trees

Three Sizes of Snow Covered Pine Trees

I’ll be including my Snow Tundra tiles in hoard 104 but they are available belowย  for download as well. I’ve included both a Cameo and SD cutfiles,ย  Unfortunately I cant test the Cameo file so use with caution, if they do work okay please let me know in the comments below.

The below is a zip file but I’ve had to rename it as an odt so right click save as and then rename the extension .zip once downloaded.

All Zipped – Sirrob01 Snow Tile Final

I’ve only put the cutfiles in the zip as I have rename those anyways but below are just the PDF’s.

PDF – Snow Tiles and Pine Trees

PDF Instructions – Pine Tree Instructions

Enjoy ๐Ÿ™‚

Cardboard Warriors Forum โ€“ Paper Miniature Hoard 103

I’ve just finished assembling the Cardboard Warriors forum hoard 103. This was a fairly small hoard although the little Zerstorung was pretty challenging to build due to the size. I’ve included two different PDF’s, one with SD registration marks and the other with Cameo registration marks both are contained in the zip below.

Reminder that the November hoard is still open which is Xmas wars and Super Heroic, so get those submissions in, only a week left.

Feel free to check over the old Hoards for other miniatures.

Hoard 103 – May/June 2012

Enjoy ๐Ÿ™‚

BoardGame – Dungeon!

Wizards of the coast (WOTC) has just re-released the Dungeon! board game. I played this game a heap as a kid, although it was one of the very early 1975 Aussie editions byย  Jedko. So the game was actually older than me (still is).ย  I was very excited that WOTC had done a reprint and re-release and basically kept the core of the original game intact ie they resisted the urge to tinker with the game.

The game on re-release was very reasonably priced ($22 AUD) which worried me a little as I wasn’t to sure how good the quality would be. However I took a gamble and ordered three copies , one for myself, one for my brother and one for my good friend. The three of us played dungeon way to much together so I wanted to get a copy for each of us, as much for the nostalgia and memories as anything.

Ready to explore the Dungeon

Opening the box up I was pleasantly surprised at the quality of the components the board is solid and actually backed on a thicker board than what I’ve come to consider as normal. The cards are simple and colourful and the artwork overall well executed. If there is one item which was a little bit of a disappointment it was the player counters included, they are fairly unstable and don’t look that great they are okay but just not as good as the rest of the components or as functional. The only other bit lacking was no storage compartments for the bits basically just an empty box. Those minor quibbles aside the reprint is excellent value for money.

What you end up with after you unwrap the cards

I decided to work at fitting out the box to better hold the components as well as replacing the player counters. First up I had to come up with a layout for the box to fit all the components. To this end I cut out 2 x 1 inch frames of 8mm thick PVC foam board and glued these together which made a lip raised up from the base of the box by 16mm. This was primarily to accommodate the 16mm square dice. I then subdivided this into 3 rows 2 down each side to hold the cards and a larger section in the middle for the tokens and the new player counters these strips are just under 1/2 an inch wide. Below you can see a picture of the box fitted out ready for filling.

Next up I designed some card-boxes to hold the monster, treasure and spell cards. I based the design of the boxes on a shrunk down cigarette packet (cigarette companies got that right). I textured the boxes to resemble locked chests and did 3 different colors; blue (Spells/Spares), red (Monsters) and yellow (treasure). I am very happy with how these turned out and I plan toย  strength the hinge area on the inside with a strip of sticky tape. I also came up with a new Silhouette/Robo/Cameo cut template that means the Cameo and SD marks are on the one page but does mean I need to release two slightly different cut files. I think releasing two cut files is slightly better than releasing two pdf versions as the cut files are normally very small 50kb as apposed to pdfs which can be 5-10mb, the only problem is I cant test the Cameo cut files so if someone uses it and it works okay please let me know.ย  I’ve included the deckboxes at the end of this post if anyone else wants them, I included 3 blank/unlabelled versions at the end of the PDF.

The last little improvementย  I made was to the player tokens. Previously I had stumbled across some nice miniatures by Battle Studio, unfortunately they had no backs so I couldn’t use them for wargaming but for Dungeon! were facing doesn’t matter they were perfect. I basically bought 4 of there sets and then picked out the minis I liked, I then modded the mini’s. Firstly I colour coded the characters clothing to the right colours for the classes, next I laid them out the Onemonk way ie black borders and tabs, lastly I made some mods such as switching some weapons, in the case of the elf mage she is composed of 3 different miniatures. The mini’s themselves are sized almost spot on 25mm to the eyes although I did need to scale a couple a little. I used the flat Reivaj basing technique for these and made 20mm hexagon bases which fit well with the game board. I ended up with 16 character minis, 8 male, 8 female:

Top Row Warriors, Bottom Row Rogues
Top Row Mages, Bottom Row Clerics

I was very happy with the size of the paper miniatures at 25mm and I’m seriously considering scaling all future card miniatures to 25mm to the eyes as then I could base my terrain on 20mm instead of 25mm and save a little space. I still have some other additions I’d like to make like some custom treasure cards and an expanded rulebook but for the moment I just want to get the 3 copies all finished up to the below layout then I’ll look at additions in the future:

Flip Top Card Box Download:

Dungeon Card Box

Dungeon Card Box Instructions

Below are the cut files as usual I’m tricking wordpress and have renamed the extension to odt, after you download them rename the extension studio

Dungeon Card Box SD Cut

Dungeon Card Box Cameo Cut

In caseย  anyone wants the blank mesh, I’m releasing the below file into the Public Domain, I’d appreciate a mention if you use it but no obligation.

Dungeon! Cardbox Mesh Only

Enjoy the card boxes and if you see a copy of Dungeon! grab it you wont be disappointed for the price ๐Ÿ™‚

Papercraft Build โ€“ Undersea Kingdom

Squirmydad (Mayhem in Paper)across on the cardboard warrior forum designed a paper version of the Juggernaut from the Undersea Kingdom TV show/series. Right about now I can see most people scratching their heads as I was. Basically it was a 1936 TV series put together to compete against Flash Gordon. It’s not what you would call a high budget series. However when I saw some of the pictures that Squirmydad posted from the series, itย tugged at my nostalgia bone in particular the Volkites (large robot guys) . I suspect they remind me of the monsters from the early Doctor Who episodes I used to watch as a kid, you know the high budget monsters from the 2nd, 3rd and 4th Doctors stint in the TARDIS.

Volkite Upclose

Squirmydad was almost finished the model so I thought I’d try my hand at drawing some Volkites. As Squirmydad was almost finished the Juggernaut I drew and finished these fast. These are the quickest I’ve ever completed some paper mini’s basically from scribbling on the page to 5 finished mini’s was about 3 maybe 4 days. I did use every trick I could think of such as mirroring bits and reusing as much as possible. I was pretty happy with the results although I did fall into my usual bad habits drawing them but still learnt a lot. The one mistake I did make which made it to the final versions available is that the fold line on the tabs is about 1/64 (1/2mm) to high so you’ll need to score just below the line not on it (I must have bumped the line at some point).

Juggernaut with Volkites in foreground

Squirmydad did an excellent job on the Undersea Kingdom Juggernaut, considering the flimsy reference pictures available I think he has nailed the vehicle almost perfectly. The model is very easy to build, I assembled it in one afternoon and it has that classic Sci-fi retro feel. Squirmydad has also done a set of Robo/Silhouete SD GSD files so for those who own one of those cutters the model is even easier to build. There is a full sheet of clear instructions as well, although for the most part the model goes together easily enough and I only checked the instructions twice.

Juggernaut by Squirmydad – Mayhem in Paper

I managed to finish up 5 Volkites, 4 with guns and 1 with just traditional claws. Now I’m not entirely sure I got the colouring right as the show was in black and white but I coloured the models to give them that retro sci-fi feel without going to over the top. I then didn’t do my normal trick of procrastinating over the small imperfections and simply wrapped them up and called them done.

Volkites ready to Invade

Lastly a picture with the Volkites around their Juggernaut vehicle. Now the observant of you will note that the Volkites cant actually enter their vehicle,ย  being to tall. Interestingly if you look at the original shots of the Juggernaut and the Volkites from the TV series you’ll notice that in the show they likewise couldn’t physically fit in the Juggernaut. So I think somehow Squirmydad and I got the scaling spot on and as with all good 1930’s sci-fi you’ll have to get inventive with your scene cutting ๐Ÿ™‚

Volkites and Juggernaut

Squirmydad had one last piece of fun with the models and did a quick 1930’s inspired movie poster of the Juggernaut and Volkites.

If you’d like a copy of the models you can grab them from the Mayhem in Paper website:

Link to Mayhem in Paper Freebies Section

Link to Juggernaut and Volkite Zip

Hope you have fun terrorizing your 1930’s sci-fi pulp hero’s ๐Ÿ™‚

Cardboard Warriors Forum โ€“ Paper Miniature Hoard 102

Just a quick post, I’ve just finished assembling the cardboard warriors forum hoard 102. There were a number of submissions from different artists which resulted in 8 pages of miniatures. It has taken me some time to layout the miniatures, test cut and photograph them. I’ve done two different PDF’s one with SD registration marks and the other with Cameo registration marks both are contained in the zip below.

Currently the November hoard is open which is Xmas wars and Super Heroic, so I’d encourage anyone who has ever wanted to try there hand at creating a paper miniature to give it a try, make sure you check out the guidelines first.

You can currently get the fileย  from my dropbox folder, but I suspect it will be available from the Onemonk hoard area shortly:

Edit: Now Available from the hoard pages

http://dl.dropbox.com/u/15349793/Hoards/….Hoard%20102.zip

Not much else I can really add except I’ll be finishing the May/June hoard shortly.

Enjoy ๐Ÿ™‚


Project Status


WWII Project First Release

80%


B-tech Buildings Five

20%


Design Victorian era City

15%


Something Different

5%


Enter your email address to follow this blog and receive notifications of new posts by email.

Join 110 other subscribers

Content Released Under

Creative Commons License
This work is licensed under a Creative Commons Attribution-NonCommercial 3.0 Unported License.
Please Attribute to Sirrob01 with a link back to my blog

%d bloggers like this: