Posts Tagged 'Papercraft'


Papercraft Build – Okumarts Darkfast Set Zero: Basic Adventure

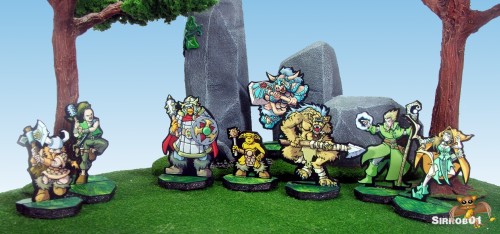
Okumarts has been releasing paper mini sets for about 12 months now. It’s great to see another really talented professional artist get into the paper mini field and I hope he continues to expand his range, especially as Onemonk has hung up his pencil. I decided to build up the first of Okumarts Darkfast Classic Fantasy series (Set Zero: Basic Adventure). I’m currently building sets One and Two and will put posts up about those shortly.

Okumarts has a very distinctive style which aligns most closely with the manga drawing/image style. I personally really have an affinity for his style, if you prefer your paper mini’s more ultra realistic I wouldn’t recommend these. Okumarts has however incorporated a lot of the great features that Onemonk used on his paper mini’s that made them stand out so uniquely, this includes:

  • Tabbed basing for easy mounting
  • Back and front colour art
  • Black border around the outside of the mini to help it pop
  • Close cutting of the mini’s. No fold up triangles here.

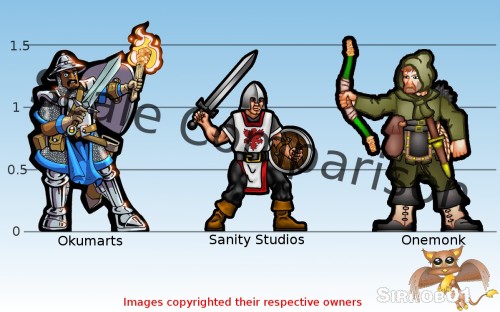
The above make Okumarts paper mini’s very compatible with several other artists and let you reuse some of your already existing bases. Although the unique style will mean you can mix and match Okumarts and other artisits mini’s on a table for an RPG, if you try to mix and match them inside the same wargaming army unit it will look at little odd as the styles will clash. This however is not a big drawback as you can’t really mix and match different metal miniatures from different manufacturers in the same unit. As with the metal miniature world there are some issues with scale in the paper miniature world. The advantage with paper is that if you want something a particular scale you can scale it up or down prior to printing. I’ve put together a quick image below which shows one of Okumarts miniatures from this set side by side with a Human from Onemonk and a Human from Sanity Studios, Okumarts miniatures align most closely with Onemonks work however they have a less exaggerated head to body ratio:

Approximate Conversion

Scale Up Sanity Studio’s, print at:  118 – 120%

Shrink Onemonk/Okumarts, print at: 83 – 85%

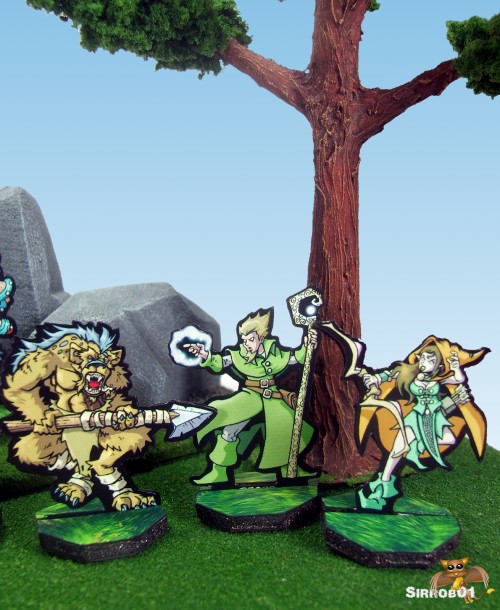
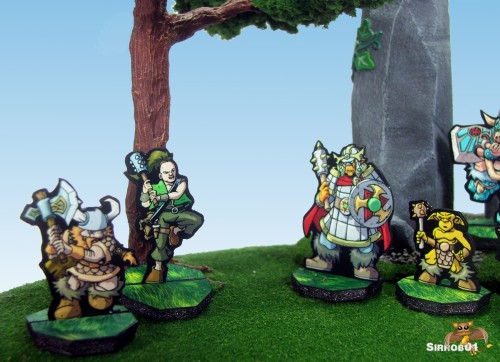
This is the first set in the Darkfast series Set Zero: Basic Adventure and is a free download. The set contains 10 unique miniatures which can be printed in two different colour schemes, this is achieved by using a layered PDF. The mini’s are split into  Five “Good Guys” and Five “Bad Guys”. If you were just starting out with D&D or another fantasy RPG, this set would give a you the basic figures to get your campaign running for 1-2nd maybe up to 3rd level characters. This set can also be used to give you some quick starter figures for two different warbands for Song of Blades and Hero’s or some other skirmish sized fantasy game. Okumarts didn’t specifically name each of his mini’s but I’ll do my best below:
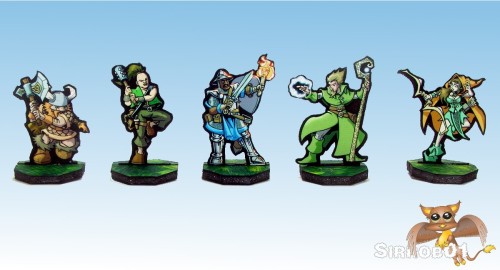
Dwarf Fighter (M), Human Monk/Druid (M), Human Fighter (M) , Human Wizard (M) , Elven Archer (F)
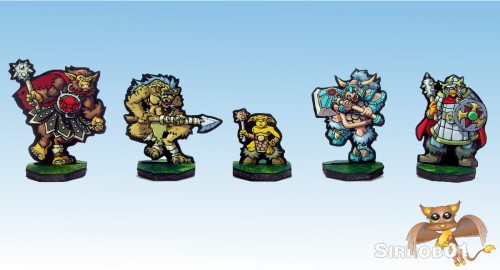
Bugbear Fighter (M), Gnoll Fighter (M), Goblin Fighter (M), Pig Orc Fighter (M), Hobgoblin Fighter (M)

The colour options for each miniature are:

  1. Dwarf Fighter: Yellow/Brown and Blue/Brown
  2. Human Monk/Druid: Grey/Brown and Green/Green
  3. Human Fighter: Blue and Yellow/Gold
  4. Human Wizard: Mauve and Green
  5. Elven Archer: Natural Green’s and Bright Green/Yellow
  6. Bugbear Fighter: Green/Grey and Red
  7. Gnoll Fighter: Light Brown and Light Green (loincloth)
  8. Goblin Fighter: Light Brown and Dark brown
  9.  Pig Orc Fighter: Burnt Orange and Aqua Blue
  10.  Hobgoblin Fighter: Red and Green

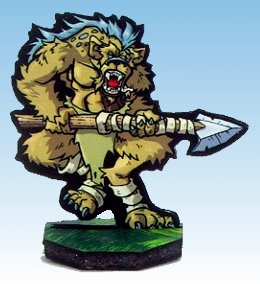
For a free set this set is excellent value for money and the artwork and options are great, the weakest miniature in the set to me is the Bugbear he sort of looks startled rather than aggressive. Okumarts has kept the outlines fairly simple without to many little pointy area’s to cut out (the ones above were cut out by my craftrobo), I test cut out one by hand in 3-4 mins.  The back to front alignment is excellent this can be an issue with front/back paper miniatures not always aligning well. The colours print out very well and the miniatures don’t appear muted or dull. I could easily tell which miniature was which when looking down at them from a seated position at a table. The PDF’s are not “locked” so editing them for my (or your) own personal use is easy rather than if they had been password protected.

Scene One for Fun

I do have  two minor quibbles with the set although as this set is free the word minor should be bolded and underlined. Normally you want 1-2 of each hero and 5-6 of each monster/critter. As the two are tied together on the one page this means to get 5-6 of each monster you end up with 5-6 of each hero as well, not particular useful and a waste of paper and ink. This could have been overcome by making better use of the PDF layering so that you can switch the hero’s “off” and have an extra row of monsters underneath. The second issue is the lack of craftrobo registration marks. I don’t expect every paper mini set to come with a set of GSD’s however it would have been nice if the little craftrobo “L’s” (alignment marks)  had been placed in each corner then it would have been 5-10 min’s work for me (or anyone) to put a set of GSD’s together. Without the L’s I have to export the files to GIMP re-lay them out and then reproduce them which also breaks the layered PDF and makes it impossible to share the GSD’s with anyone.

Scene Two for Fun

I really like this set and as it is free go and grab it now . The minor issues are nothing and can be overcome by spending 10-20 mins with the miniatures in GIMP, something you may like to do anyway so as to get a whole sheet of Hobgoblins etc. This is a great way to get that RPG or skirmish game off the ground with a few miniatures as decoration that wont cost you anything but a little time, some paper and ink.

Have fun with them, I know I will 🙂
Scene Three for Fun

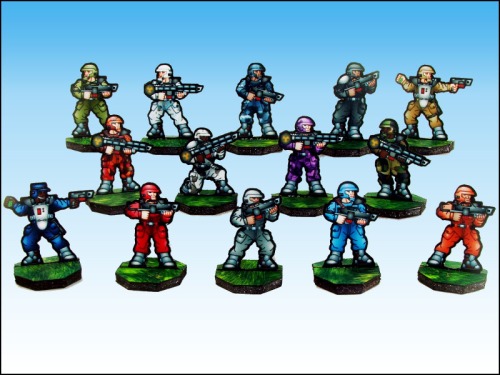
Terraforce Troopers (Onemonk Bash) – Paper Miniatures

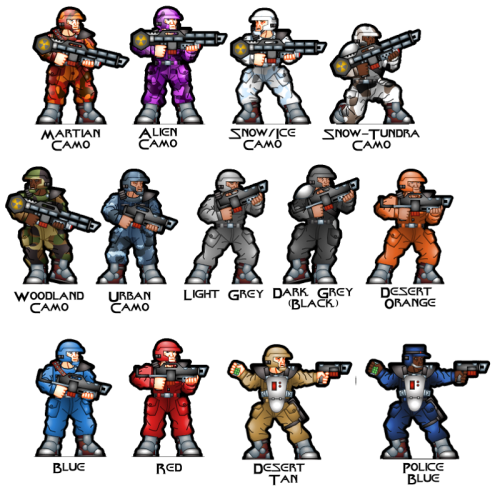
I’ve been hard at work on various projects since I stopped playing nexustk (MMORPG). This post relates to extensively modding the existing Terraforce troopers that Onemonk put out a while ago. I wanted to mod them for three reasons. Firstly I wanted to scale them down a little so they were more inline with 28/30mm miniatures. Secondly I wanted more pose options for the HE laser rifle. Lastly I wanted to turn them blue to fit in with how I visualized my armies colour scheme. As I was making all these changes I decided to add a few other colour scheme’s as well just in case.

I carried out all the mod work using GIMP. First step was to import the base set and scale them to more 28/30mm size as it turned out this was spot on 90% for these miniatures. This bought them more into line with 28/30 mm size and Sanity Studio’s scale. For those unaware Sanity Studio’s bought out Onemonk’s back catalog of mini’s and have been putting out some very nice fantasy miniatures, They produce about 1 new set every month but the quality of the artwork on each mini is outstanding (no they don’t pay me for saying this  🙂 ).
Once the troopers were in the correct scale my next job was to provide various colour options. Solid colours were easy but putting together the camo variates took significantly longer although once I had the process sorted out it become quicker. With feedback from the guys and gals across at the cardboard warriors forum I settled on 14 colour options:

I also created two skin colour overlays so that you end up with three skin tone options: Light, Mid, Dark. With all the colour options done I then created the HE Laser Rifle overlay. I had to do some significant fiddling to make the HE laser rifle nicely overlay the stock Laser Carbine, but it worked out well in the end and I think it was worth the work.  Next I laid all the different layers out and combined them into a layered PDF.  Lastly I created the 4 craftrobo GSD files I needed to account for all the weapon options and tested that each cut file was accurate. So this means that you can select uniform colour, skin colour and two weapon choices from the one pdf.

As the sets are going pay again in the near future, I can’t just make these mod’s freely available. I really don’t want to eat into the already small margins on paper miniatures that the commercial guys do plus it would be a breach of copyright and personal integrity.  As a side point if we lose the commercial paper mini makers we’ll lose a whole pile of future releases :). However all is not lost what I have been able to do is supply them to Sanity Studio’s and when the One monk website is updated my mod troopers will be a free download attached to the stock pay set when you buy it.  I’m very happy to be able to share my work with other people otherwise the above would be for my personal use only :).  I do plan on modding all the troop types into the above colour scheme’s, next ones on my list are the special weapons troopers.

I’ll post an update when the above become available so keep an eye on my blog or the One monk main site.

Update: These are now available from Onemonk

Cardboard Warriors Forum – Paper Miniature Hoard 90

I’ve finished laying out forum hoard 90, turned out to be very small. I scaled my two guys to Sanity Studio’s scale which is slightly smaller than standard One Monk size.

Pick the files up here:

Cardboard Warriors Forum

Have fun with them and drop by the other artists forum boards  to give them a little bit of feedback as well if you like what they have been doing.

Cardboard Warriors Forum – Paper Miniature Hoard 89

Took me a bit of time to get this one together and I had some issues with getting some of the miniatures scaled correctly. However it’s finally finished the Cardboard Warriors Forum Hoard 89, the theme was Robots and Androids. Once again this is not my work but the work of all the people across at the Cardboard Warriors Forum

Links to the files:

Zip File

or from this Forum Topic:

Forum Hoard Topic


Cardboard Warriors Forum – Paper Miniature Hoards 87 & 88

Jim across at the cardboard warriors forum is taking a short break, while he’s away I volunteered to compile and post the forum hoards. I’ve now compiled two hoards on behalf of the contributors on the board. It should be noted these are not my work, well I did submit the parcel mimics in the Nov hoard:

The Forum hoards are a great way to get started in paper miniature creation so feel free to head over to cardboard warriors forum and submit something :).

The above miniatures as well as a bundle of others can be downloaded from this thread.

I hope everyone has a Merry Christmas and Great New Year and I look forward to producing some more paper miniatures in the new year and stay safe if your traveling.

Dave Graffam Patrol Boat– Papercraft Build

Dave Graffam has just released a Patrol boat model, basically a small skiff. I needed a break from my terrain building so I put one together. Dave releases all his models as layered PDF’s so you can get quiet a few different looking boats out of the one product. Dave does however include some print and go models ie no layers to tick on and off you just print and build. Unfortunately no GSD’s but there is something soothing about hand cutting a model now and again, I’m always surprised at how enjoyable I find hand cutting stuff.

The Patrol boat is a fairly simple model, there are a couple of free hand curves but nothing to worry about. I was able to cut out all the parts and edge them in about an hour and I had it fully assembled an hour after that. Assuming I can count the model consists of 16 parts, here are mine all cut out and ready to assemble:

I went with a blue theme so that it matched with my Pirate Bear Cog. Once you get all the parts cut out it’s a simple matter of gluing them together, make sure you follow Dave’s instructions as there are a couple of spots were if you glue things out of order you will be reprinting parts 🙂 . Here is my finished patrol boat:

You may have noticed the little piece of string and magnet at the bow of my boat in the above picture. I made one little change and that was to add a small piece of metal to the base of the boat and place a magnet in the mast. This allows me to remove the mast for storage making the boat much easier to store:

It’s a great little boat and I plan on making 2 or 3 more. The only minor issue I have with the design is that the front sail is mounted offset, however I plan on adding a few little tabs to the sail on my next one and gluing these inside the mast through some slots I’ll cut , similar to how the rudder is mounted.

It’s a great little boat and well worth the $3.95 price tag Dave has on it.

I better get back to building the WWG terrain I’m doing.

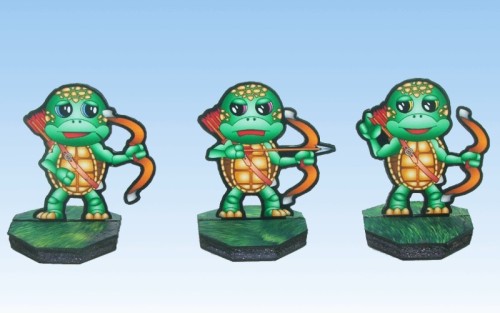
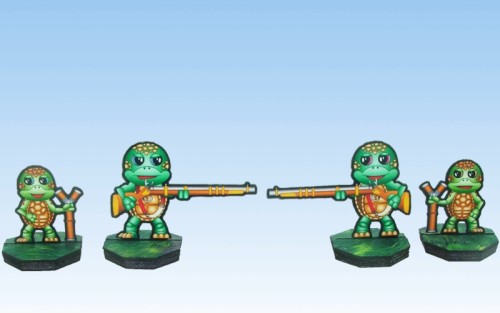
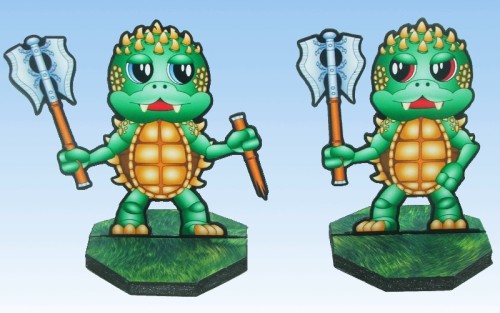
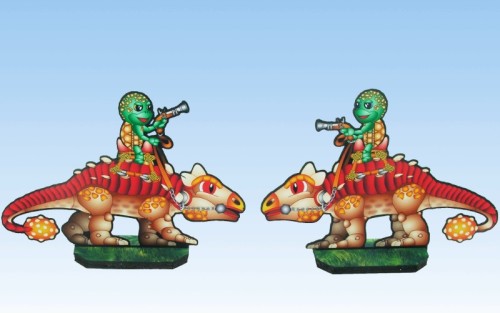
Turtle Clan – Paper Miniatures

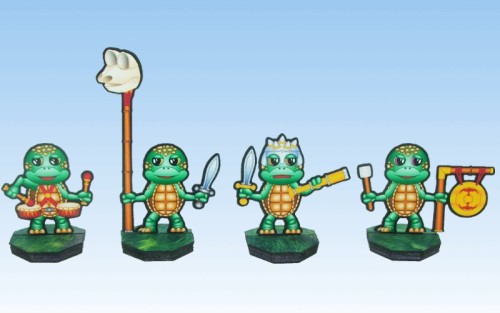
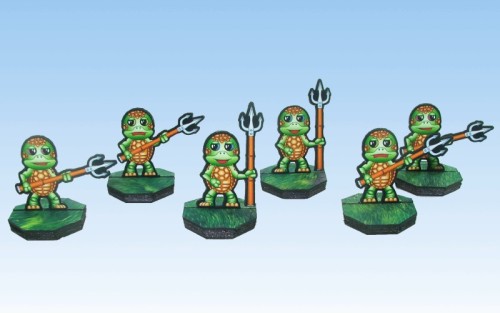
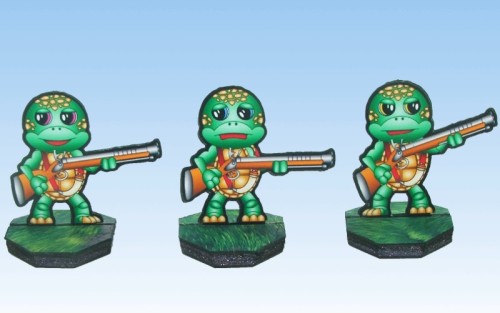
I’ve  finished the Turtle Clan, which means I can sort of play through to the end of scenario 10 in Song of Fur and buttons, I really need to get those picnic bears done.  I haven’t added any extra troop types this time although there is an extra musician. I haven’t designed any flags but I might add a flag or two later on.

On with the show as they say, here are the pictures of the Turtle/Terrapins:

Turtle Command with Musicians


Terrapin Spears


Turtle Rifle


Turtle Bow


Turtle Snipers


Turtle Giants


Turtle War Anklyosaur


The files are below, you will need to rename the GSD files after you download them from .odt to .gsd(feel free to grab some bases from Onemonks site):

Turtle Clan Page 1 – PDF

Turtle Clan Page 1 – GSD

Turtle Clan Page 2 – PDF

Turtle Clan Page 2 – GSD

Turtle Clan Page 3 – PDF

Turtle Clan Page 3 – GSD

I’m going to be taking a little bit of a break from creating miniatures for fur and buttons as I need to get some terrain built. At the moment I have no gaming board to play Fur and Buttons on :). I will be coming back to these miniatures it just maybe 3-4 weeks before I get a chance to work on them again :).

WorldWorksGames Ruined Keep (Custom) – Papercraft Build

I’ve spent the past 4 -5 days working on some Worldworksgames terrain. Primarily I’m working on a largish Tlinx Hinterland (pending release)and Mayhem city layout. I will make separate posts for both those builds. To go with the Hinterland (out door type terrain) I wanted some drop down tiles. Pieces of terrain that stand independent of the surrounding game board which can be used with my Hinterland table or if we need can be scattered onto a more conventional tabletop. I’ve also converted Tlinx to use magnets but I’ll detail that more in it’s own post later on.

This is my first standalone tile a small ruined keep, which has turned out to be significant amount of work, a lot more than I originally intended (hence the lack of turtle miniatures 🙂 ). The additional work was mostly caused by the fact I had to convert Castleworks ultimate (CWU) to the Tlinx format or at least those bits I wanted to use.

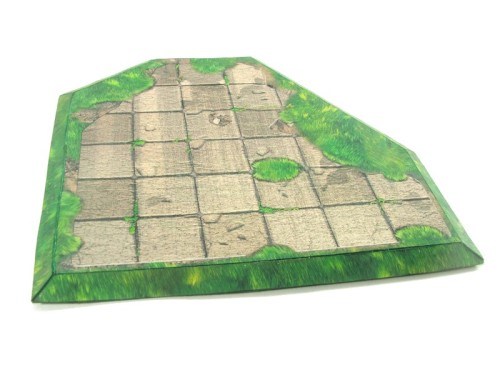
First up I cut a base out of depron (straight foam), using my hotwire cutter to this I added some sloped/beveled edges to give the appearance of the ruin sitting on a slight rise. Once the foam was cut I inlaid some metal mount points into the tile and then covered the tile edges in hinterland grass texture. For the top of the base piece I created a custom graphic which combined elements of Castleworks Ultimate and Hinterland. The two texture types fit together very well which is a credit to the quality of work the WWG crew put out:

Depron Base with mounts inserted

(Yes those are old craftknife ends 🙂 )

Base Ready to Go

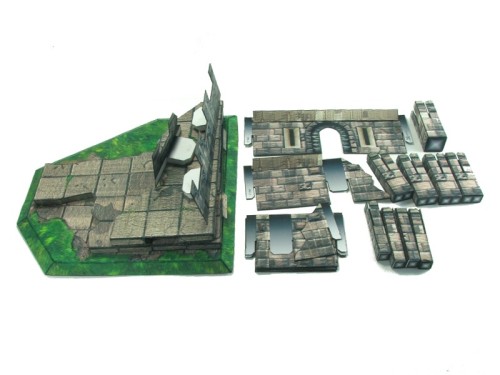
Next I started converting CWU textures to the Tlinx layout, I had to do walls, mounting posts and create a custom 1st floor destroyed/damage tile. I ended up creating a few other custom parts such as a “3 inch through wall” it hooks through the mid sized post and pokes out the other side to create a more solid destroyed wall effect. I also bashed some parts using Streets Of Legend-Destroyed as a guide but replacing the textures with CWU. Below you can see all the parts laid out and the through walls:

Through Walls


Laid out ready for assembly

The above may not look like a lot of work, but it took a fair amount of time to create those pieces. The good thing about Tlinx is it’s very flexible and with the parts I’ve created I could easily build a none destroyed keep. The downside is it’s very flexible so when you want to change elements or use different textures you have to convert a minimum number of parts so whether it’s one building or 10 the workloads about the same. Still I’m going to do a second stand alone outpost but undamaged and I wont need to bash any parts (okay maybe 1-2) so it’ll be much quicker. Here’s some pictures of the keep from 4 angles fully assembled and ready for gaming:

I know building the above sort of defeats the purpose of Tlinx as it’s not very flexible but for me being able to disassemble the whole thing and pack it easily for transport makes it well worth the while. Packing and carting air around with you is no fun 🙂

A few points of note, I’m using very small magnets 6mmx1mm these are plenty strong enough to hold the posts and building up, If I find I’m having problems I’ll drop a 2nd magnet on top of the first. The metal piece’s I’m now using (base used old craftknife ends) are square shade cloth holders I cut them into 4 or 2 depending on whether I’m doing corners or mid points, these save me from any polarity issues I might have with magnet to magnet joins, they also allow me to adjust the post locations a little if I need to (read build inaccuracies 🙂 ), I’ll cover this a bit more in later post :).

If you often travel for gaming or even just have limited storage space check out Tlinx terrain across at WWG :).

Green Tree Frog Clan – Paper Miniatures

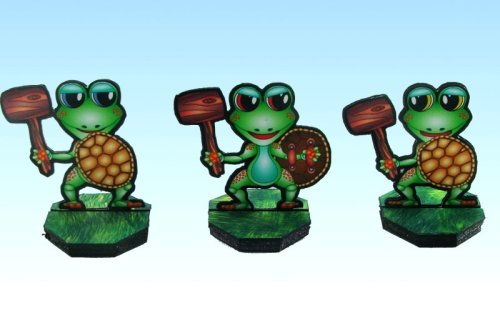
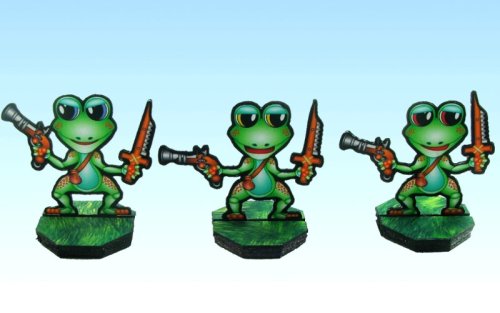
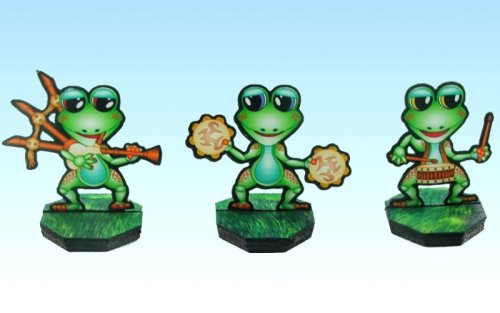
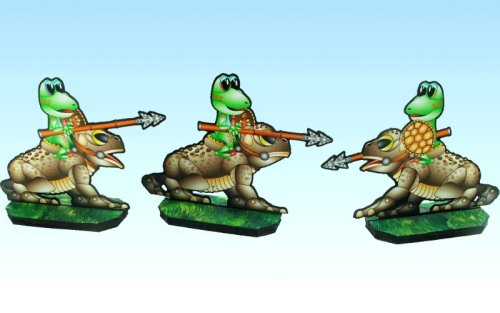
I finished the Green tree Frog Clan today this means I’ve finished up enough miniatures to play through to the end of scenario 9 in Song of Fur and buttons.  I haven’t added any extra troop types this time although there are two extra musicians. I did create flags for the standard bearer but I don’t like the way they look so I didn’t glue one to my standard bearer but left them on the page as I thought someone might still get some use out of them :).

I have some idea’s and thoughts for some other troop types later on which I’ll add once I’ve finished all the mini’s I need to finish the  Song of Fur and buttons scenario’s. Below are the pictures of the Green Tree Frog Clan:

Command Group: Standard Bearer, Major and Hero


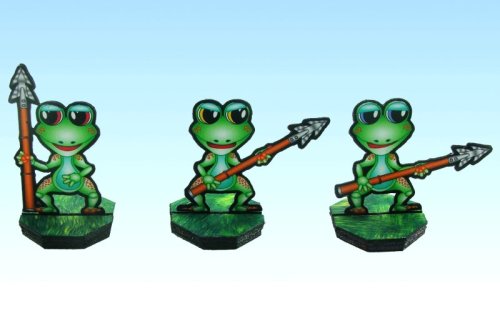
Spearfrogs


Turtle Crusher


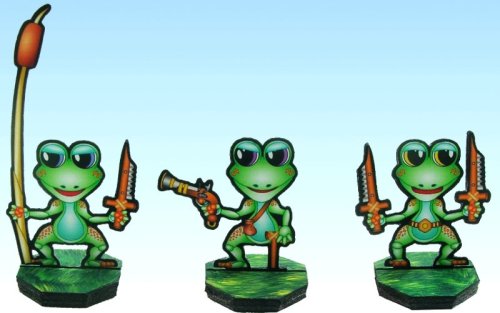
Musketog’s or Musket Frogs 🙂


Musicians: Piper, Tambourine Player and Drummer


Toad Rider Cavalry


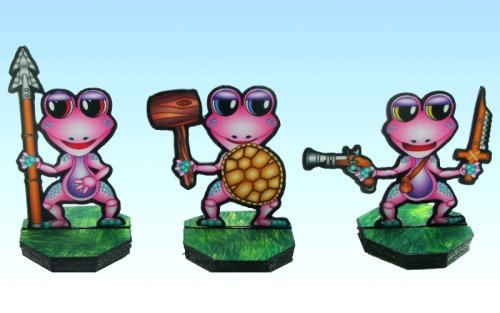
Onemonkeybeau’s daughter across on the cardboard-warriors forum asked for some Pink frogs. So I did I full set of re-colours to pink of the above frogs:

I learnt a lot doing the re-colours in Inkscape. The biggest issue was that when I changed the gradient fill colours in Inkscpae to the pink scheme I had to also change all the line colours, this was much more time consuming as I had to click every object and adjust the line colour. In future I’ll set all the line colours using a gradient with the same colour at both ends to make re-colours much faster and easier. I have now set the above frog files up in that manner and I can produce any colour I like very quickly :).

The files are below, as usual you will need to rename the GSD files after you download them (feel free to grab some bases from Onemonks site):

Green Tree Frog Page 1 – PDF

Green Tree Frog Page One – GSD

Green Tree Frog Page 2 – PDF

Green Tree Frog Page Two – GSD

Green Tree Frog Page 3– PDF

Green Tree Frog Page Three – GSD

Pink Versions:

Pink Tree Frog Page 1 – PDF

Pink Tree Frog Page 2 – PDF

Pink Tree Frog Page 3 – PDF

I’ll get the turtles laid out as quickly as I can, until then have fun :).

Fat Dragon Games Medieval Cog – Papercraft Build

To go with the pirate bears I really wanted some sort of ship. It’s never explicitly called for in the fur and buttons scenario’s but I thought it would look cool. I didn’t really want to design and build something myself at this stage and as I knew of several card model ships around the net I had a look at what was available. I eventually settled on the Fat Dragon Games medieval cog.

I ended up making a few modifications and changes to the Cog (I can’t leave anything stock 🙂 ). The first change I made was to cut a 1nch length out of the hull, I wanted to shorten the ship by 2 inchs but wasn’t sure what sort of impact that would have on the overall design so settled on a safe 1 inch shorter.

While I had been checking around for other card ships I had stumbled across this (One Picture below):

I really liked the rear stern-castle design so I decided to modify the stern-castle on the FDG Cog to emulate the above. First up I worked out the length of the rounded walls and bashed these from the existing stern-castle walls. I was able to keep the front wall of the stern castle as it was. Next was to design the floor insert for the floor of the cabin and glue it into place. Once this was done the stern-castle was glued to the rear deck:

Next was the angled top for the rounded stern-castle.  I made the topper 7inchs wide at the front approximately 6inchs long down each side and about 3 inchs across at the rear. As these were all straight piece’s bashing them up from the existing stern-castle top was very easy. The worst mistake I made was to use matte board to reinforce the floor of the stern-castle, matte board and PVA glue don’t like each other at all and the floor cupped quiet badly. It’s not very noticeable in the picture:

I am pretty happy with how the rounded Stern-castle turned out. Next I added a removable crows nest so I could still swap the sail over if I wanted, this turned out to be very easy. The crows nest is approximately 3×3 inchs but shaped like an Octagon, the walls are modded from the fore-castle walls. A small hole cut in the middle lets me slide it down the mast and it holds in place very well:

Last mod I made was to add the Bear skull and crossbones to the sail, but you can see that in the finished pictures below:

Even though it’s a bit the wrong century and my printer was playing up hence all the interesting colour variation, Captain Longfur and his pirates are very happy with their new Cog:

I seem to be able to share the bashed files, big thanks go’s to Tom for allowing this with his files. You’ll need to head over to Fat Dragon Games to buy the cog first so you can make use of the files. All the modified images  inside my files remain the property of Fat Dragon Games:

Forum Board Link – Yep you’ll need to login to get them 🙂

For anyone needing a smallish vessel for there gaming needs you can’t go past the FDG Cog.

Anyways back to laying out those frogs 🙂


Project Status


WWII Project First Release

80%


B-tech Buildings Five

20%


Design Victorian era City

15%


Something Different

5%


Enter your email address to follow this blog and receive notifications of new posts by email.

Join 110 other subscribers

Content Released Under

Creative Commons License
This work is licensed under a Creative Commons Attribution-NonCommercial 3.0 Unported License.
Please Attribute to Sirrob01 with a link back to my blog